Bucket List Fishing
What an adventure this whole fishing thing is. Like many things in life, often the journey is more fulfilling, exciting, and memorable than the ending. I shouldn't even say “ending”. Maybe outcome or result are better words. I have no intention of stopping fishing for what quickly became one of my new favorite fish—the latest stamp to be added to my fishing passport.
I’m going to come right out with it, the fish pictures included with this article are not show-stopping, wall-mounting, brag to your buddies type of fish. Some might look at them and wonder if they were even photo-worthy at all. But to those folks, I’d retort with a new phrase that has newly become part of my regular vernacular. A polite way to say be nice, be joyful for others, or perhaps more bluntly, a phrase we all heard as kids, if you don’t have anything nice to say, don’t say anything at all. Don’t yuck someone’s (my) yum. My recent yum, both literally and figuratively as you’ll come to read, centers around catching what became a winter fishing obsession. I am referring to one of the more mysterious fish I’ve come across as an angler, the burbot.
Highly regarded for its taste as poor man's lobster yet criticized for its appearance, I knew I had to catch one, two, as many as I could. They are most active during the winter months and at night, two challenges as we’ve had an unseasonably warm winter and I’m more apt to hit the snooze button and sleep in than drive to a frozen lake and sit outside in the dark or first light of the morning hours. Still, I had to add this fish to my checklist of caught species.
The fish is an oddity with their eel-like appearance, freshwater habitat (the only cod to live in such an environment in North America), and some seeming barriers in place - fishing during the winter, night activity, and competition with other anglers - I was obsessed. I researched online, talked with other anglers, called MT FWP for information from biologists in the field, asked questions when buying gear at local shops, and watched YouTube clips (check out our ProTip video with Craig Dowdy on the website or our YouTube channel on how to filet burbot), anything you could think of to educate myself on how to best catch this fish. Maybe a bit counter to the introductory prose, I’m all for enjoying the experience of fishing and the ambiance of the outdoors, but darn it, I really like catching fish, too. Especially with all the work and background knowledge I had completed. Not catching the fish would’ve been a letdown, surely.
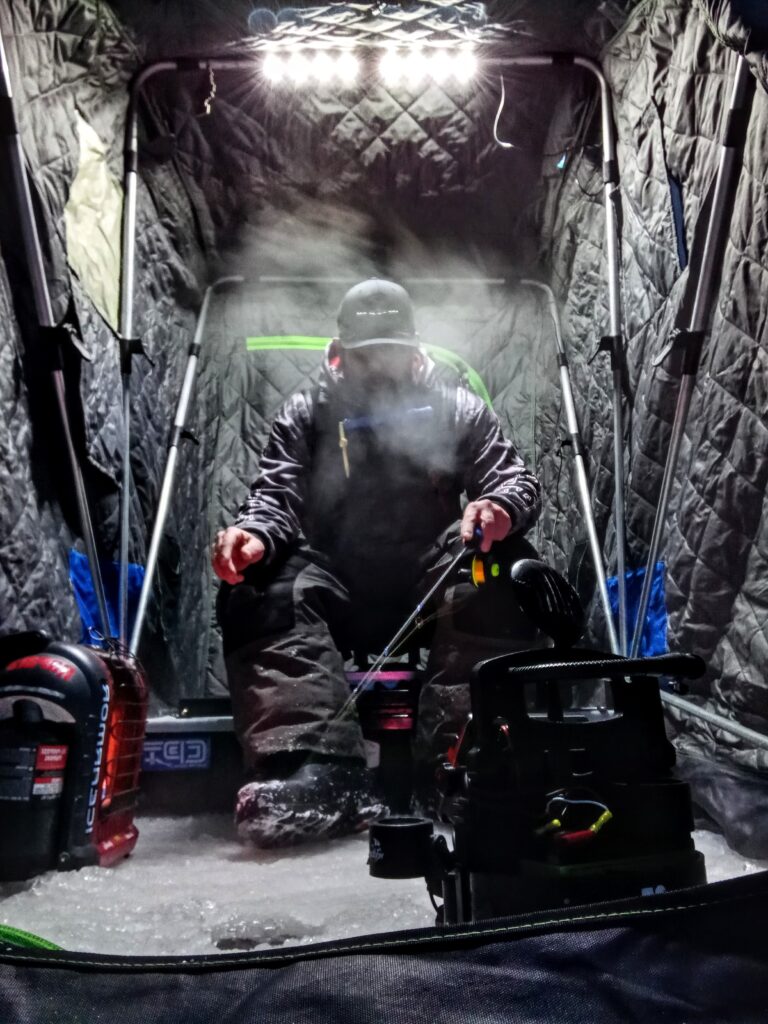
After finding a few reservoirs in my area and properly gearing up, the only thing left to do was hit the ice. A scenic 20-minute drive to my first location yielded no fish. Slightly concerning, but motivating at the same time, another angler told me about some perch and a small ling (another name for the burbot) he released. Good to know, but after a few more evenings on the ice with no fish, it was time to try somewhere new. How about 40 minutes away? I had heard more consistent information about the fish being abundant in this second location but again, coming up sevens at this new spot.
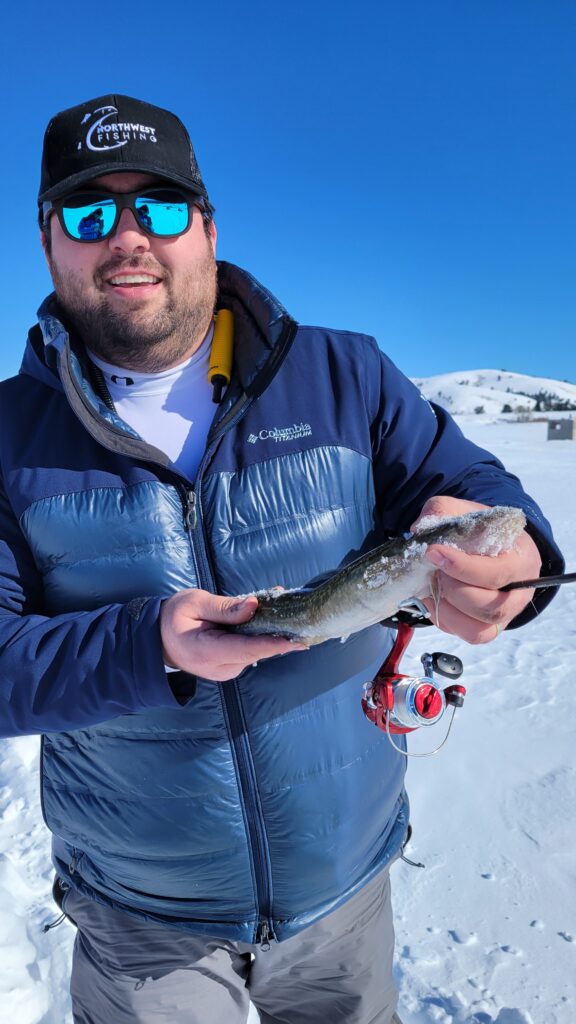
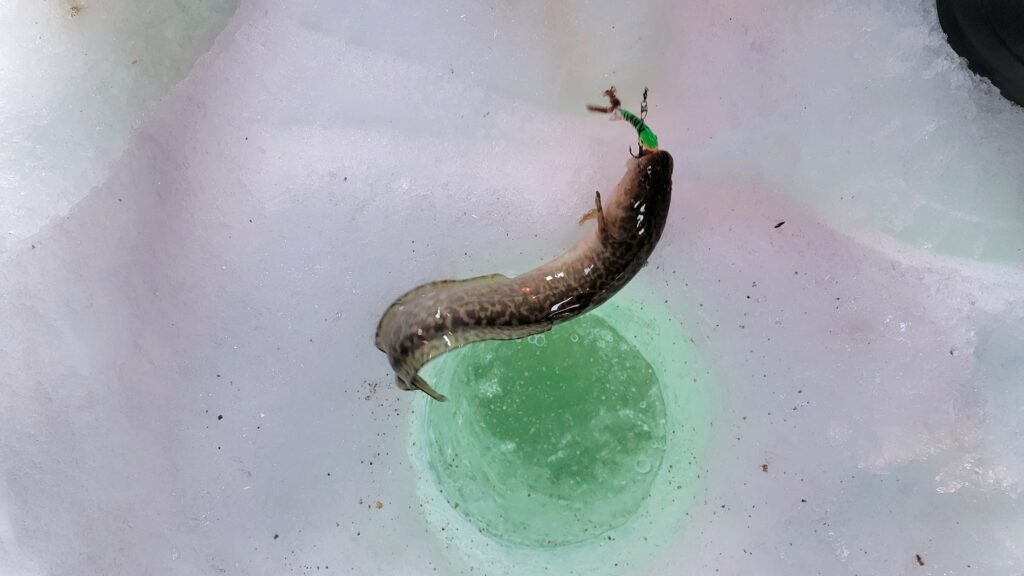
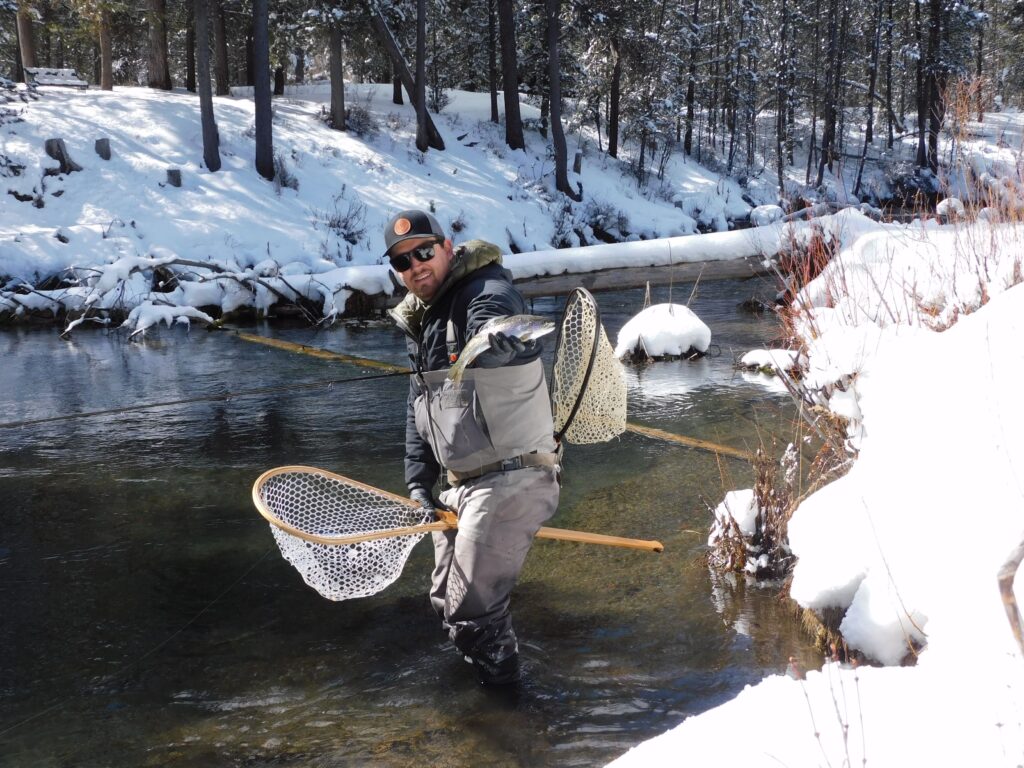
For those without an interest in throwing dice at the craps table like myself, that means I didn't catch anything here either. So, perhaps where I should've started all along, a trip to White Sulphur Springs, MT about 1.5 hrs. away would host my next attempt. As with most fishing, the lulls made for some long hours. Despite the wait, I had the opportunity to hook into my newest fish friends both jigging for them and through a stationary rod, both targeting slightly off the bottom, about 40 feet. I'll never forget the sight of my first burbot as it appeared from the icy blue depths below. Examining this new-to-me fish, it had greenish, yellowish, olive covered spots all along its body. A catfish like appearance with a more than normal amount of fish slime coating the body, which I quickly became acquainted with as it slithered snake-like in my hands. Knowing I had finally caught one had me pumped up! All that was left was to see how it tasted.
As mentioned, they are highly regarded for their table fare. Bringing my catch home, I had done my homework as to how I should prepare my meal. Simplicity is sometimes the answer. Boil a little lemon soda, poach the fish for a few minutes and dip in some garlic butter with lemon on the side. Enjoy, easy. One thing I hadn’t accounted for, sharing with my family. My wife, not as invested in the pursuit of this fish, was fine to try it, compliment me on cooking it and move on with her evening. My kid, 2 years old, however, grabbed this fish by the fistful. So much so that I started getting a little jealous!
I put in the legwork to catch this fish and had built my first meal up in my head and here she is eating it all! Rationing out my portion, I was glad to see my daughter enjoyed the meal, but I was for a moment inclined to respond like the 2-year-old I was interacting with - to say “mine” and grab it all back. They don’t call this fish the poor man’s lobster for nothing I suppose. The white meat is what you’d expect from any similar cod fish, but the firm texture and taste of the fish paired with the garlic butter and lemon certainly lived up to my expectations. The enjoyable meal was the culmination of my burbot experience and a fitting way to affirm my latest fishing craze.
So, now that I’ve caught what was previously a mysterious fish to me, I look forward to another season with refined skills but the same level of excitement I had before encountering the burbot. A note for myself, I’ll have to do some research on some of those other strange fish to be caught…paddlefish, an arctic grayling, pallid sturgeon…all to hopefully be checked off the species bucket list.

/articles/bucket-list-fishing
Forecast the Fishing for Late Winter Rainbows
Several factors come into play in March when anglers can take advantage of spring-like weather to catch the biggest trout of the year.
The old saying the worst day fishing is better than the best day at the office is simply not true. It's almost true, but there are some really bad times to go fishing like whenever your brother-in-law wants to go.
We're enjoying a cold snap right now, but a lot of our trout lakes don't ice over. And the water is begging to be fished as soon as daytime temps get back to the low 50s.
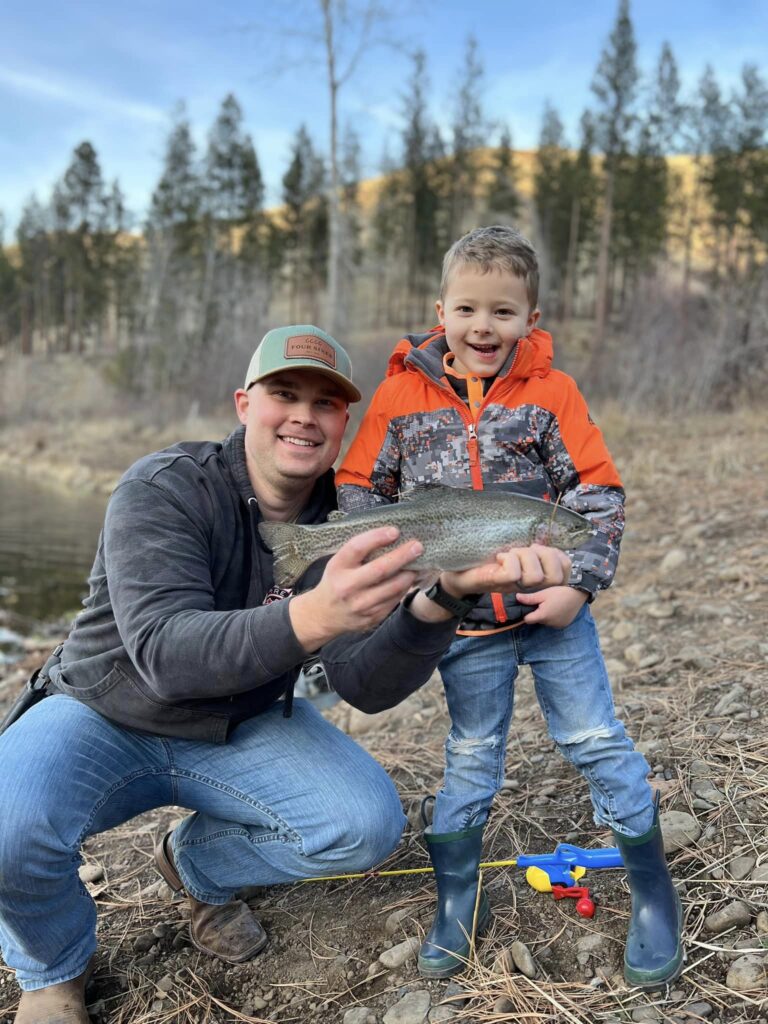
This is the time of year when an angler has a chance to catch bigger trout for the table. The fish hatcheries want to find forever homes for surplus brood stock, putting those big old rainbows that can weigh 4 to 8 pounds out to pasture while last year's holdover legals can go 12 to 18 inches.
While food sources are scarce, bigger trout can be easier to catch than they will be in May. Flashers and hoochies and wedding ring spinners tipped with bait can catch fish, but fly fishing methods are a better bet.
A lot of our favorite lakes are too low to put boats in; Haystack, Hyatt, Chickahominy, Duncan, Prineville and Ochoco reservoirs are in build back better mode.
Instead, when planning a road trip for rainbows, tow the boat to places like Pine Hollow Reservoir (call the resort to check the ice), Lake Simtustus, Willow Creek Reservoir (Heppner), Lost Creek Reservoir (east of Shady Cove) and Dexter Reservoir along Highway 58.
In the winter, trout seek shallow water because the shallows warm first, which promotes weed growth which in turn promotes the insect activity that draws in little fish. Larger trout feed on the minnows, crustaceans and insects.
While shallow water offers better feed options, they are also a danger zone where larger trout may be taken by ospreys. Trout tend to rest and rove along the ledges where the light green shallows give way to deep blue depths. Rocky points, submerged rim rocks and even - in bigger reservoirs - flooded road and railroad beds also offer the kind of habitats where big trout like to hunt.
For the fly angler, a slow-sinking line is the best option because trout may be closer to the surface. Optimal trolling speed in most cases will be between .8 and 1.2 miles per hour, about the speed of a slow walk. Establish a trolling circuit to follow a contour line or to hit the rocky points. Feed out 30 to 50 feet of line behind the boat.
Vary the trolling speed and change direction by zigzags over the trolling circuit which changes the action of the flies. A lot of strikes come on the deceleration or on the outside of a turn.
Rods can be kept in rod holders, but strikes are often missed on fly gear because of the shock-absorbent nature of the line. Hold the rod in hand, the tip near horizontal. If a fish bites, lift the rod and set the hook with a quick strip of line.
A slower initial speed allows lines and flies to sink. Watch the amount of drop, the angle of the line and length. The boat operator can control depth by adjusting speed and lengthening or shortening the lines.
Watch the weather for the days between storm fronts when temps come up and the wind is light. Like grandpa told me, trout and salmon bite ahead of a storm front, and again after a low pressure system.
Late last winter we fished Lake Simtustus. Dad caught a fish on the first pass and then Randy and I doubled up when two trout grabbed on a turn - nice fat rainbows that had fed well over the winter. Then we could not get another bite. Looking at the solunar tables now, I see we fished two hours too late, but still it was better than a day at the office.
The Old Farmer's Almanac says the best days to fish are when the moon is between New and Full. That means we want to fish March 10 to March 24 and then starting again April 8.
My grandpa used to watch the barometer and tell me when the fishing was going to be fair. He would say something like, "When the barometer is below twenty-nine-point-seven, the fishing won't bite as good. What you want to see is when the barometer is low and rising." Then grandpa would say, "But it's always a good day to go fishing."
People have been studying this subject for millennia. We don't need a new brother-in-law, but we ought to remember the factors our grandfathers employed to forecast the fishing.
# # #
For a copy of the Fishing Central Oregon book, send $29.99 to Gary Lewis Outdoors, PO Box 1364, Bend, OR 97709 To contact Gary Lewis, visit www.GaryLewisOutdoors.com

/articles/forecast-fishing-late-winter-rainbows
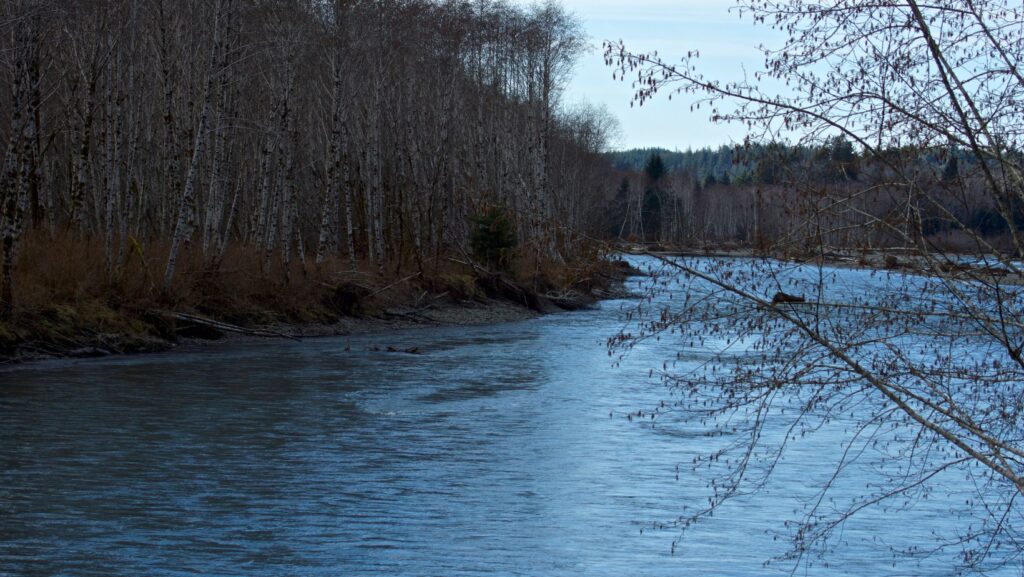
Onward Hoh... River That Is
If ever there was a river world renowned for its beauty, versatility, and Gollum-like trophy steelhead, this is it.
The Hoh River, from deep within the Olympic National Park, sourced from Mt. Olympus himself.
Floating north and west with a full mountain embrace, collecting headwater tributaries like badges of honor. A collection of blue and white glacial waters swirling under a canopy of fierce and protected old growth, this braided channel river looks to be strategically created. An art unto itself. Its milky slate blue waters, glisten like the eyes of a newborn.
The Hoh River flows 56 miles from its headwaters to the Pacific Ocean. The South Fork Hoh River is 17 river miles in length and enters the main stem at the Olympic National Park boundary at RM 30. The upper section of the Hoh watershed lies entirely within the Olympic National Park. The middle section of the river flows through state and industrial forest and valley homesteads. The Lower Hoh River encompasses the lower third of the watershed, 16 river miles from Highway 101 to the Pacific Ocean. 750 miles of tributaries flow into the river below ONP. Of these, 250 miles provide fish habitat. Numerous spring-fed terrace tributaries feed the Hoh River.
The Hoh River watershed is home to four species of wild salmon, steelhead, and many other fish and wildlife species. Located at the mouth of the Hoh River, the tiny Hoh Indian Tribe or “Chalá·at” ("Those-Who-Live-on-the-Hoh River") are dependent on the fish and wildlife of the Hoh River for their subsistence and commercial economy. Protecting the watershed’s function is key to preserving these important resources, not only for the tribe, but also for fishing and recreational communities in nearby cities and towns, and up and down the coast.
Despite this river's status as one of the healthiest in the country, the Department of Fish and Wildlife has enacted severe restrictions on coastal steelhead fishing due to “low returns.” It was specifically focused on the long-term decline of coastal steelhead in the Queets and Quinault watersheds, Quillayute River system, Hoh River, and Willapa Bay River system.
Between December 1st, 2023, and March 31st, 2024 there are opportunities to fish from floating devices on the Hoh Sunday through Tuesday only from the Morgan’s Crossing boat launch downstream to the Washington Department of Natural Resources Hoh Oxbow Campground boat launch, and Wednesday through Saturday only from the Hoh Oxbow boat launch downstream to the Olympic National Park boundary near the mouth.
Barbless single hook, catch and release only. This is a continuation of the WDFW implementation of the Statewide Steelhead Management Plan which requires the Department to prioritize the sustainability of wild coastal steelhead runs by focusing on healthy levels of abundance, productivity, diversity, and distribution.
While these regulations are creeping onto every river in the state, if you are like me, it isn't necessarily a deterrent. There is more than just catching to all of this. It is the gorgeous scenery, the fresh air, the sun on my face and wind in my hair. Even the rain, which you should expect.
Annual precipitation is 140 to 170 inches. The Hoh Rain Forest is one of the finest remaining examples of temperate rainforest in the United States. Giant Western Hemlock, Douglas-fir, Western Red Cedar, and Sitka Spruce dominate the landscape, while ferns and mosses cloak the trees and forest floor. This is a great reminder of why I am here, alive and a part of it all.
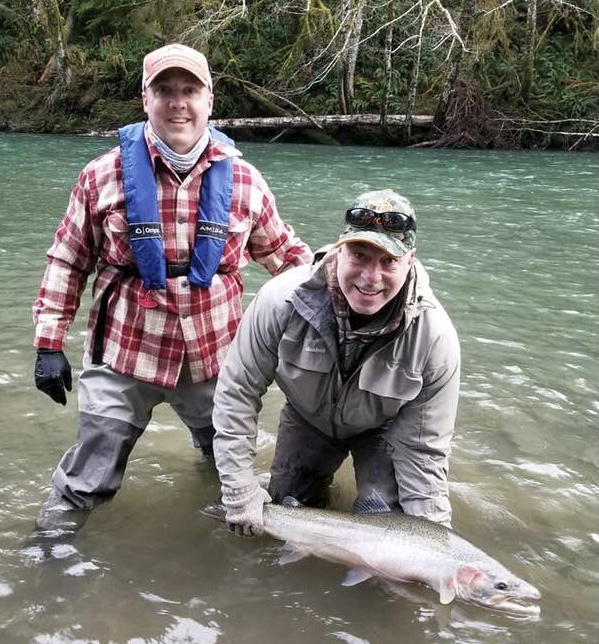
The Hoh River is what legends are born from, whether you are a conventional or a fly angler. From a bank or a boat, you are bound to have a great time. Prime fishing for winter Steelhead happens in February and March, though any time of the year the river is producing, depending on what you are fishing for.
If steelhead aren’t your thing, don’t worry – the Hoh boasts impressive salmon runs each year from late spring through fall and manages to sustain returning populations of both Chinook and coho salmon.
The early summer run of Chinook begins in May and is productive through about August.
The Coho run on the Hoh, like on all other Pacific Northwest rivers, occurs in the fall.
If you’re a salmon fan, fishing in the Hoh can be good from May through November, if the river stays open.
Resident trout are available in the river in addition to sea-run cutthroat that make their way up the river later in the summer and through the fall.
Where do you go from here? Do you prefer floating down the river with a seasoned guide? There are plenty of options. Hopefully, I'll have many more opportunities to meet some more awesome river guides but today I am going to throw a nod out to Pat Neal. (Hoh River Rafters)
With 35 years of experience, Pat has the Hoh River in his back pocket. He is a writer for the Peninsula Daily News and a published author. He is warm and funny, and made me feel completely at ease in conversation. One of my biggest hangups with float fishing is space and comfort, but I look forward to some solid adventures with this local gem.
If walking the banks is your thing, there are three DNR-managed campgrounds with river access and a lovely property called Hoh Valley Cabins ( Hoh Valley Cabins). The Peterson family are descendants of some old-timey pioneers; their family property covers about 500 acres and over a mile of riverfront with access to the river.
In this age of river closures and limited opportunities, we are lucky to have one of the last strongholds of Winter Steelhead right in our backyard. Observe where you can fish, do not encroach on tribal land, and always check the rules and regulations prior to embarking.
")
/articles/onward-hoh-river
Looking Ahead to March Fishing
It’s hard to think of fishing for most of looking at iced in boat ramps and/or iced over lakes but the ice will likely thaw by the beginning of March and you’ll have some great opportunities for fishing when it does. Looking for some early-season trout and walleye ideas? Here’s a few for you:
LATE WINTER WALLEYE:
The Columbia River is the place to be in March for walleye as the big females get ready to spawn. In fact, this is the time of year to land a true trophy walleye. Traditionally, the bigger females have been targeted near the Tri-Cities but quality walleye can be found in The Dalles and John Day pools as well the Upper Columbia near Hydro Park in East Wenatchee, and in Rufus Woods Reservoir as well as the upper end of Lake Roosevelt.
When it comes to catching March walleye, try trolling a small spinner worm harness like a Mack’s Lure Slow Death Rig at a very slow speed (around 1 to 1.2 MPH). Once you find a school of fish you can jig for them. In addition to jigging for walleye with soft plastics on jig heads, you can also use metal blade baits or vertical jigs like a Mack’s Sonic Baitfish.
QUINCY LAKES TROUT FISHING:
The Quincy Lakes trout opener on March 1st is either a boom or a bust depending on the amount of ice remaining on this chain of lakes between Quincy and George which lie in a sizeable state wildlife area. The most popular lakes to fish are Quincy and Burke Lakes, which are both well-stocked with rainbow trout. There are also several small walk-in lakes southwest of these bodies of water that are stocked with smaller numbers of trout but which receive less pressure.
The opener often finds crowds of both day-anglers and overnight campers congregated close to the shore of the main two trout lakes, many of them in a festive mood, especially when early spring weather and sunshine is present. That isn’t always the case though, The Quincy Valley Chamber of Commerce, which has hosted an annual trout fishing derby with prizes for kids and adults in the first half of March, is hedging their bets this year (as to whether the lakes will be ice-free) and will wait until March 22nd and 23rd to hold their event at Burke and Quincy Lakes.
TUCANNON LAKES TROUT:
The Tucannon Lakes, nestled in the W.T. Wooten Wildlife Area and the Blue Mountains of Southeastern Washington, offer another March destination. Speaking with Kim Andersen at The Last RV Resort (the closest resort to these lakes), I learned two small lakes (Blue and Spring) are open all year and have historically received plants of 24,000 and 15,000 trout respectively.
Four additional lakes open on March 1st (Deer, Watson, Rainbow, and Big Four), though Anderson says since the area flooded a few years ago, Big Four Lake doesn’t really exist as such and should not be considered as a viable option. Asked which lakes fish best in early March, Anderson said Spring, Deer, Rainbow, and Watson Lakes all fish well when ice-free.
The Last RV Resort near Pomeroy has cabins, RV, and tent sites available along with a coffee bar. Anderson says they still have openings available for the popular March 1st opening day of trout fishing. www.thelastresortrv.com
LAKE LENORE TROUT:
If you are looking for some big trout to catch and release, consider a trip to the Columbia Basin north of Soap Lake and cast a line into Lake Lenore. You’ll find Lahontan cutthroat trout here, a species native to Nevada that was stocked in this very alkaline lake decades ago by WDFW. The trout commonly weigh two to three pounds but five to six-pound fish are not uncommon and there’s always the possibility of landing a ten-pound trout.
This was a very popular spring fishery in the 1990’s and early years of the 21st Century. Unfortunately, poaching efforts knocked down this fishery. Why anyone would want to take home fish that likely taste like soap, I do not know but enough people did that the fishing suffered.
Fortunately, the fish population has rebounded but despite that, the word hasn’t gotten out to most anglers and this place fishes under the radar. It is a selective fishery lake, where only single barbless hooks are allowed. If you are in a boat, you can only use an electric motor and your fishing net has to be knotless.
If you do decide to take a fish home you only get to take one and it must measure at least 18 inches long. There is plentiful shoreline access along the east side and at the north end of the lake though there are a couple of areas closed (marked by signage) by the inlet stream and irrigation pumping station towards the upper end.
Lake Lenore is a wonderful place to fish. The scenery of sagebrush and basalt cliffs is pleasant and the chorus of geese, ducks, chukar, and other wildlife add to the experience. The best times to fish Lake Lenore are in the spring (March and April) and again in the fall (late September through November).
In the spring, most of the trout are found at the northern end of the lake, cruising the shoreline in depths as shallow as three feet as they prepare to spawn. Fly fishing anglers target them from shore or float tubes and pontoon boats. The “go to” offering is a small black chironomid, fished under a strike indicator, in sizes 12 to 20.
Hardware anglers have success as well. You can use a spinner but you’ll likely be frustrated by all the grass floating in the water which limits the effectiveness of the spin itself. Instead, consider using a spoon. I’ve had good luck with Luhr Jensen Krocodile lures in 1/8th to ¼ ounce size. Hammered brass and orange as well as a frog-colored pattern have both worked well for me.
In the fall, the fish will be found further to the south, especially around the islands in the lake and casting or trolling for them from the boat can net you and your partner up to 35 fish a day if fortune smiles upon you. We’ll save that fall conversation for later though, because right now, it’s March and we’ve got fish to catch!
John Kruse – www.northwesternoutdoors.com and www.americaoutdoorsradio.com
")
/articles/looking-ahead-march-fishing
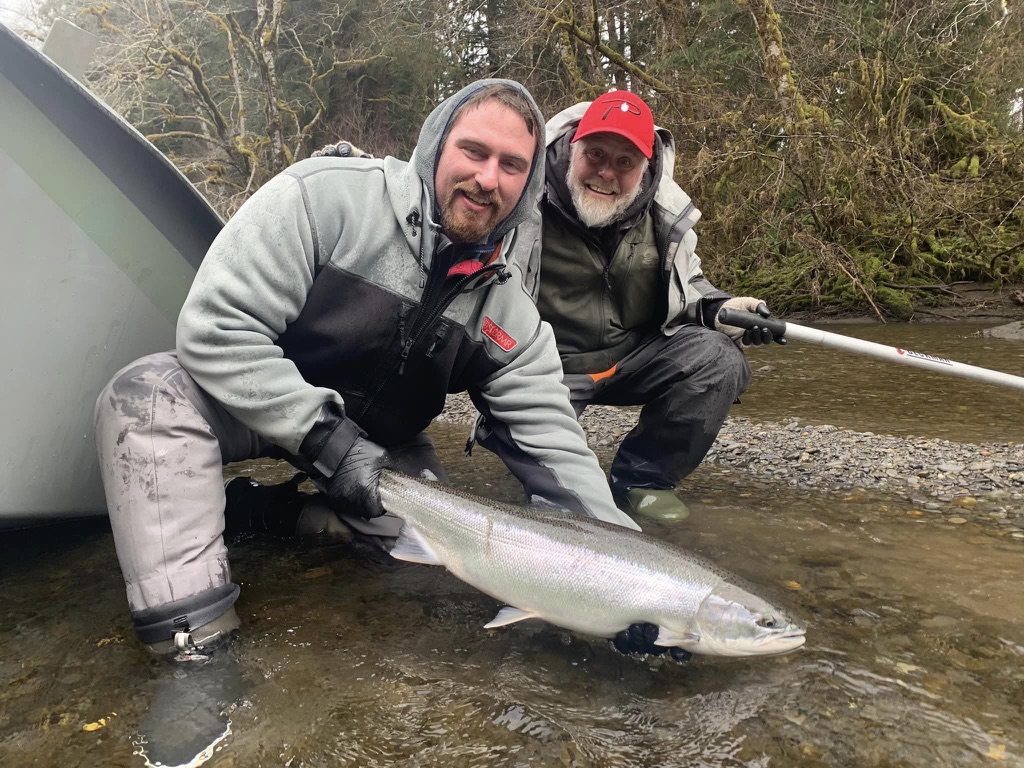
Late Winter Steelhead Fishing
Winter Steelhead fishing… where do we start? First off, winter Steelhead fishing in Washington is unique and different from many of our other fisheries based on one simple fact, the weather. The winter generally brings cold, dark, and wet days which makes this type of fishing a bit more extreme. So then, why do we do it? Great question, but the bigger question is, why would we not?
There is an allure to Steelhead fishing that is hard to describe. I know that there is nothing that I would rather do. On top of inclement weather, Steelhead are more elusive than our migrating salmon and less predictable, making them more difficult to catch. Changes in river conditions during the wet, winter months are constant, forcing us to drop what we are doing and go when the conditions are best.
We also need to change up our techniques based on river conditions. One more thing worthy of mention is that there are limited hatchery program opportunities left, so much of our Steelhead fishing is the catch and release of wild fish. I find that wild fish tend to fight better and to me, there is nothing quite like battling an amazing fish and holding onto its tail as it builds up the energy to swim off to where it came from.
For those of you interested in winter Steelhead, I would like to share some information that might help in getting started. I am only sharing what I have learned but I hope that the information is useful. Also, if you have followed my articles in other outdoor magazines, then you probably know that I spend a lot of time fishing with professional guides all over the Pacific Northwest. This helps as I can share a perspective that has been obtained across many experiences and years of fishing.
Most of my Steelhead fishing has been done in the rivers in NW Washington, SW Washington, and the Washington Coast, specifically Forks and the Quinault and Queets Rivers within the reservation. There are so many options available, so I recommend that you start with a river that is near you and learn a little about it…the rules, the opportunities, and most importantly, some good guides who know the river well. I encourage you to spend the money to fish with a guide to learn what works and understand how to target fish in different conditions. Know that every guide has a different opinion and approach, so try a few to gain a broader perspective.
Once you have spent time on the river with a guide or two, you can focus on the gear that you need. Believe me, you can spend a lot of money quickly so make sure that you get it right. To start, you should have a nice pair of waders and wading boots and a waterproof jacket. Getting cold and wet will ruin your day in a hurry. Next, and just my opinion, focus on 2-3 techniques that you would like to try and focus on the gear needed for those specific approaches. I find that it is best to master a few techniques before expanding your toolkit.
There are many popular techniques for catching Steelhead such as casting or trolling plugs from the bank or shore, throwing spoons and spinners, float fishing beads, bait, jigs and other offerings, drift fishing or bobber dogging beads, yarnies, bait and other offerings, and much more. So many different options to choose from and they all work.
If had to pick 2-3 techniques, here is what I would do. It’s hard to choose because they all work and some work better at certain times and under certain conditions. I like to float fish maribou jigs and soft plastic worms on jig heads, and I really like to float fish beads. My float fishing approach for beads combines a float, inline weight, a long leader with some split shot in the middle, and a soft bead that bounces along the bottom. Aside from these techniques, I love to throw spoons and spinners. If I am fishing from a drift boat as opposed to bank fishing, I like to troll plugs in long stretches of slower-moving, deep water.
If I was to start fresh right now, I would have a lot less gear in my garage. Now there are many different types of rods and some work better for certain techniques. If I had to pick one rod to use for multiple techniques, I would go with a 9’6”, 6-10# to 8-17# rated spinning rod with a 30/3000 or 35/3500 size spinning reel. I prefer a bit lighter rod to maximize sensitivity and have found that 30# braid works best for my mainline along with a 10-15’ bumper of fluorocarbon. This is a great all-around rod and reel setup that will allow you to employ most of the methods that I listed above.
If you want to focus on float fishing, I recommend a 10’6” rod that is designed for this purpose. The added length really helps you mend your line easily. For “old school” drift fishing, I prefer a one-piece 7’6” rod but most of the time I am bobber dogging, which is simply drift fishing with the addition of a float/bobber to pull your gear naturally along the bottom and downstream. A 9’6” rod works great for bobber dogging, and you can easily break it down to fit inside your car.
Once you have your clothing, rod, and reel, you can focus on terminal tackle. For this, I recommend going to your local tackle shop as opposed to a “big box” store. You will get valuable advice that will help you to purchase the best gear. Also, lean on what you learned from the guides you fished with, and make sure to take pictures of their gear setups and rigging when you fish with them. At this point, you’re going to need a collection of swivels, bobber stops, small beads for your bobber stop, and leader material, generally fluorocarbon. Note that if you don’t want to tie your leaders immediately, you can purchase them pretied.
It’s also a good idea to have a selection of hooks in sizes from #4 to 1/0 or even 2/0 in some cases. Purchase a box of soft beads in a variety of sizes and colors, some maribou jigs in pink/cerise/orange combinations and the red/white/black nightmare patterns, as well as 1/8 or 1/4oz jig heads (I prefer white) and some 3.5” plastic/rubber worms. Don’t forget a selection of weights. I am a big fan of the stainless-steel weights from Dave’s Tangle Free. You have enough gear to get you through a winter of learning and chasing Steelhead. Between maribou and worm jigs and beads, you can fish in just about any condition. It would not be a terrible idea to have a few spinners and/or spoons as well. They are fun to toss when nothing else seems to be working.
Now, you have learned the basics from one or more guides, you have learned how to fish a specific river system, you have purchased a handful of the gear that you need and the time has come to go out and give it a shot. Believe me, you don’t have to go buy a drift boat to fish. There are plenty of opportunities to wade and bank fish. Also, I encourage you to continue to fish with guides if you want to boat fish or make a friend who has one. Believe it or not, many fishermen who own boats are looking for fishing buddies, so join a Facebook group to make some friends.
Winter Steelhead fishing is an amazing pastime and until you have spent some time doing it, you really don’t realize how special it is. One warning, don’t expect to go out and catch a Steelhead on your first trip. They are called a fish of 10,000 casts for a reason. I can say that they are very special fish, and you will never forget your first, or for that matter, any Steelhead that you catch. Now, get out there and good luck.
")
/articles/late-winter-steelhead-fishing
Spring Kokan-Energy
After our very cold January followed by the big thaw that brought us almost summer-like weather, more than our toes have thawed out. The average kokanee-obsessed sportsman is suddenly waking up with thoughts turning to spring kokanee fishing, kokan-energy.
If so, plug in and use your kokan-energy to get ready for this year’s kokanee adventures. Spend the time making sure everything is in tip-top condition. Check out your boat, gear, and tackle while developing a game plan for filling the freezer with mini sockeye. Let me share some ramblings that may help you prepare for this year’s Kokanee crusades.
If you store your boat outside and are a seasonal user you have some work cut out for you. Garage-stored or year-round boaters have a task or two to attend to also and now is the time to get at it. The number 1 most important item on your pre-season chores list is your fuel system. Even if you used a fuel conditioner or stabilizer in your portable tanks get rid of last year’s fuel. Pour any gas from the portable tanks into the lawnmower gas can. I have nothing against lawn mowers but a little SeaFoam will cure many small engine fuel-related ailments that you don’t want to deal with on the lake.
For built-in tanks, hopefully last season you treated the fuel with each fill up. Even so, it is a good idea to drain the fuel filter bowl and replace the fuel filter/water separator cartridge as appropriate. If your rig (built-in tank or portable) is not equipped with a fuel/water separator, now is a great time to install one.
Check all fuel lines and fuel line fittings. Replace anything that is brittle, cracked or otherwise damaged. If you are a seasonal user and your boat was winterized this task is much easier. Next check fluid levels for your hydraulic steering, power tilt/trim units, lower unit/gearcase and your 4-stroke motor oil. Use your motor manufacturer's recommended products and do not top off or mix the various products.
Pull the propeller and check the shaft for fishing line or damage. Remember to lay all the nuts, washers, sleeves, or adaptors out in the same order they came off the shaft. This makes reassembly much easier and remember that most thrust washers have a right way and a wrong way to install them. Look at the propeller, if the blade edges are showing an excessive number of nicks/dings, now might be the time to send it off to be rebuilt. Even slightly damaged blades will affect performance and running a boat with severely damaged blades can lead to all kinds of shaft/seal problems down the road.
Each spring, be sure to top off the batteries with distilled water. It’s a good idea to get them on the appropriate charger for your battery type and bring them up to a full charge. If you find corrosion on the terminals remove the battery from the boat and clean it off with a mild solution of baking soda and water. Once everything is clean, it is also a good idea to use one of the various corrosion guard offerings. As long as you have 12-volt wiring on the brain you should also go through the rest of your electrical installation and look for loose connections and damaged wiring.
Mice and other rodents can cause a lot of damage during the off season. Check all the switches and breakers to make sure they are working. Then hook up the fish finder, VHF chart plotter, VHF, trolling motor and any other major electronics you are running to make sure they have power. Check all the lights to make sure they work. Electrical gremlins are difficult to trace and best investigated in your driveway.
Independent of the weather, my retirement job has me on the water running a small boat as many as 6 days a week. The winter weather is not forgiving and often rattles or jars nerves and electrical connections loose. I have lost the radio, wipers, tilt/trim motor and the bilge pump while running in winter chop. I just deal with things as required but you don’t want to spend your precious fishing time troubleshooting electrical problems.
After all things electrical are functioning as expected, hook the engine up to the garden hose (be sure to familiarize yourself with the manufacturer recommendations) or dunk it in a livestock trough and start your baby up. If your rig has water pressure and temperature gauges check them now. Make sure the tilt and trim are working. Check the steering, especially mechanical steering, to see if there are any problems. Also, before you shut the engine off pull the kill-switch to make sure it works. Check all the switches and breakers to make sure they are working.
Inspect the condition of your downrigger cable or braid. If you are running a stainless steel cable and it is rusted or kinked, replace it. If you are running one of the synthetic braids cut off a few feet and re-tie it. You don’t want 10-15 pounds of lead to suddenly head for the bottom, potentially taking your rod and rod holder with it. However, if it does, it may be an indication that your release clip was a bit too tight. Also check for loose fasteners, worn or missing parts and corroded electrical connections. Fix anything that is even remotely questionable.
Give your trailer the once over. Now is the time to check the trailer lights and trailer brake fluid levels. Also, check the tire pressure on all the tires including the spare. Ensure that all bunks and/or rollers are in good condition. Check your safety chain, winch strap or cable and tie down straps and replace them if they are questionable. Check your lights and if they need replacing consider replacing them with waterproof LED lights. Initially, they are more costly but with increased reliability they will pay for themselves in no time. As an added safety benefit the LEDs are much brighter than the standard 12-volt incandescent lights. Now is also a good time to check and maybe even repack your trailer bearings, better safe than sorry.
I know, all your rods are piled up safe and sound in the corner of the garage and better yet everything worked fine last year so you have nothing to do, wrong! It is the start of what should be a productive fishing season and you don’t want to lose the fish of a lifetime because your favorite reel has a case of the herkie-jerkies. Although with most reels it is easy enough to replace the drag washers, sometimes getting the replacement parts can be a challenge. When you disassemble your reels use simple green to thoroughly clean the reel components. Rinse and then dry the parts using the low setting on a blow-drier or heat gun before reassembly. Once the parts are clean inspect everything, look for unusual wear and replace anything suspect. Use advanced synthetic lubricants and reel grease sparingly during the reassembly process.
If you are running mono, replace it with new line. Take your reels to a high-volume tackle store (Think Holiday Sports in Burlington or similar) and have them bulk-fill your reels. Their line should be fresher, and most tackle shops recycle your old line.
Also, give all your rods the once over. Make a point to verify that each line guide is not cracked or worn. You can use a cotton swab and swirl around in each guide. If the guide catches any cotton fibers the guide needs to be replaced. I have lost a few notable fish due to cracked ceramic guide inserts.
On any given trout or kokanee trip I pack several pre-tied rigs and various components to craft more. Often several of them were tied the previous year. Last year we caught a lot of fish and the 12# fluorocarbon I use to tie gear looks frazzled. It’s time to retie much of my Kokanee arsenal. Fishing with sharp hooks is critical when chasing kokanee. Check your hooks and replace them as required. Look over your gear, and retie anything questionable.
A few years back, one of the kids and I were fishing at the Lake Stevens Kokanee Derby. We ended up losing a huge kokanee. When I looked at the rig afterward, the trailing hook had come unraveled. It was a home-tied kokanee fly and after catching many fish it had just failed. There’s peace of mind in knowing that your gear is in tip-top condition.
Now is a great time to develop your Kokanee game plan. With all the PNW Kokanee lakes to choose from, my recommendation is that you choose a Kokanee lake close to your home. Somewhere where you can fish both on the weekend and during the week as your schedule permits. Don’t fret about the size of the fish or even the numbers. This will be your learning/confidence building lake. Learn your boat, fish finder, downriggers, trolling speed, lure presentation and generally become the local expert while building confidence in your kokanee angling abilities. Then, whether you’re fishing a new lake or fishing a frequently visited lake the lessons learned at your home lake will help you catch kokanee with confidence.
Kokanee are filter feeders, and the bulk of their calories come from plankton blooms. There are windows any given day where a bloom or hatch will occur, and the kokanee will briefly leave their comfort zone to feed. Because the bite may go off at 2:08-2:24 with your gear running at 43’, it is best to choose a kokanee lake close to home and as said before learn it. Especially when late winter or spring kokanee fishing, keep a detailed fishing log.
Be the local expert and share your hard-earned knowledge. Back at the ramp… “Yeah, it was great fishing today… Good luck, tight lines and may your cooler be full”
Although I align my tactics for a given lake, seasonally I don’t really change my overall approach much. The usual kokanee drill: a small dodger, lure with tuna corn is a great place to start when hunting for spring kokanee. Make sure you have your favorite scents, maybe a container of worms and additional leader onboard. Not always but occasionally you will need to revise your leader length. When trolling for spring kokanee you will want to run 0.8-1.2 MPH. “S” turns or tools like the iTroll “Hunt” mode help. Make sure to make a mental note of what’s working when you get bitten. “Monkey see, monkey do” strongly applies to kokanee fishing. Repeat what works.
Our dodger box has more dodgers in it than most but during the spring Kokanee fishery my go-to dodgers are painted dodgers in various colors. Using either spinner rigs, flies or a very small Spin-n-glo behind the dodger seem to consistently produce kokanee during the spring fishery. After you hook your prize, gently fight the fish. Always lead the fish to the net, don’t repeatedly stab at the fish with your net and hope that the slimy bugger ends up in your cooler. As with any kokanee fishery, a long-handled net will increase your actual catch verses hook up statistics.
During the spring the lake temperatures should be down. But still make sure you still care for your catch. Bleed them and keep them on ice or even better in a slurry (ice, water, and salt) in your cooler. You’ll want to preserve the quality of your hard-earned prize.
Kokanee are a noble opponent. They often make short runs, jump and go bonkers at the net. Summer fish are more aggressive, but spring kokanee take more finesse to get them in the net. After grilling, smoking or chowderizing hundreds of Kokanee, both the summer and the winter fish are excellent table fare. But the early spring fish are outstanding for whole or fillet panfries and grilling.
The above is just a starting point. Choose a lake, learn it and you’ll soon be the local expert! Trolling for Washington State kokanee can be frustrating. But, with the management challenges impacting most of our salmon fisheries; a bit of kokanee frustration will quickly become an addiction. Enjoy your spring koka-energy!

/articles/spring-kokan-energy
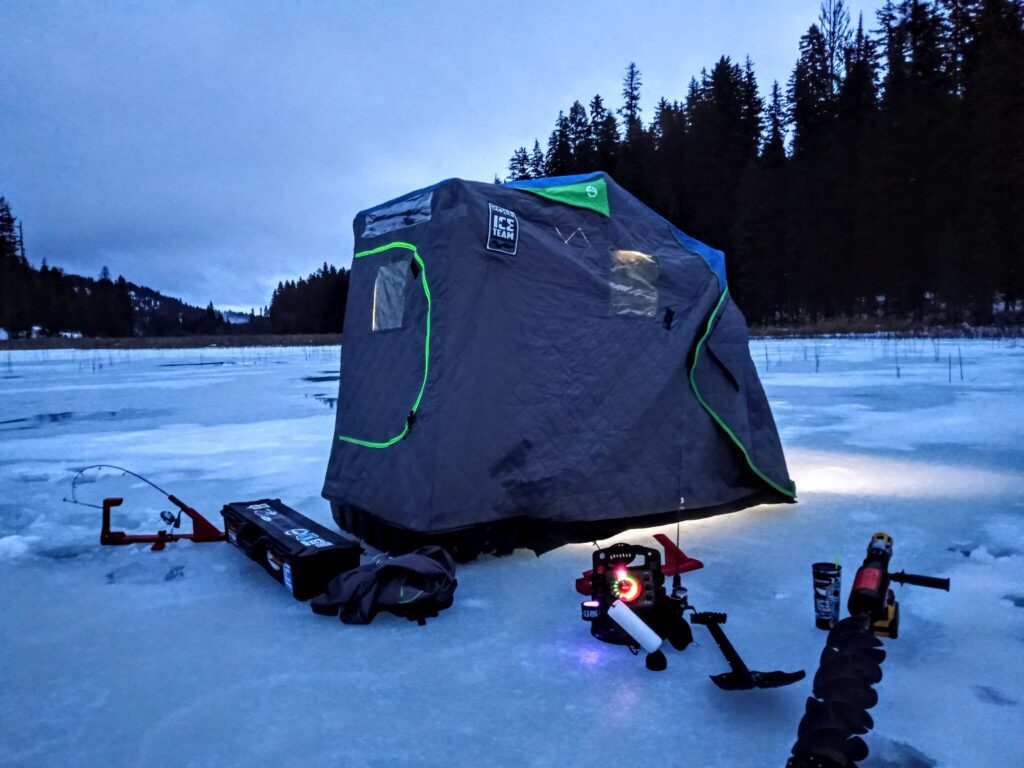
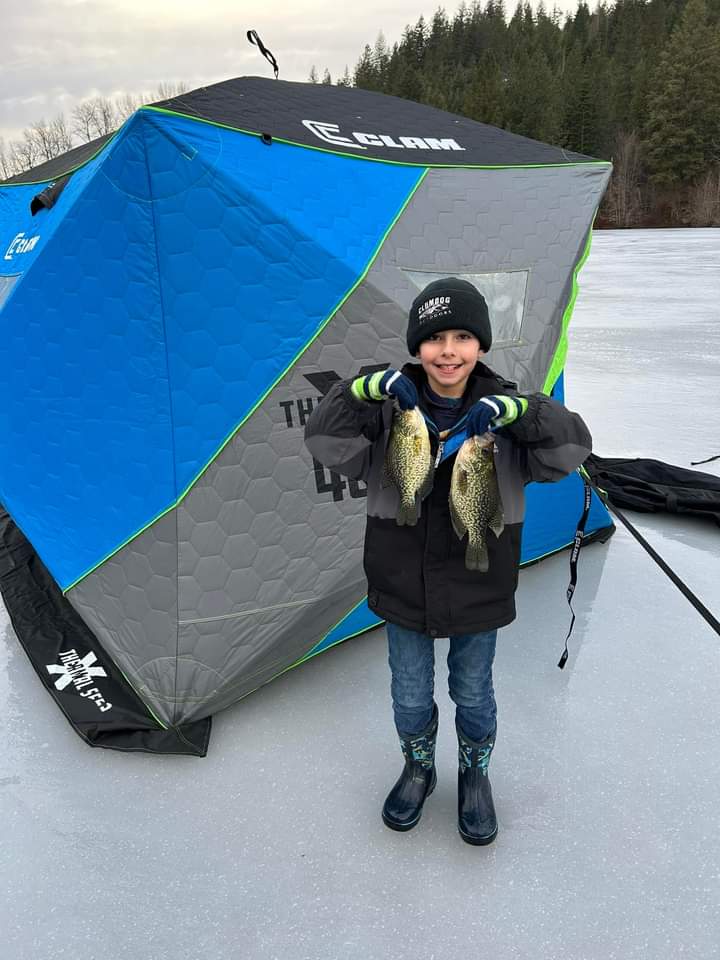
Choosing The Right Ice Fishing Hut
Ice fishing is a unique and rewarding outdoor activity that requires specialized equipment to make the experience enjoyable. One crucial piece of gear that can significantly enhance your ice-fishing adventure is a shelter. Two popular options on the market are hub shelters and flip-style shelters. In this article, we will go over the reasons why anglers might prefer one over the other, exploring the benefits and considerations that come with each choice.
Hub Shelters: The Central Hub Of Comfort And Versatility.
-Spacious Interior: One of the primary advantages of hub shelters lies in their spacious interior. These shelters typically feature a hub on each side, and top, that serves as the support point for multiple poles, creating a roomy and open fishing space. Anglers can enjoy ample room for movement, accommodating multiple people comfortably.
-Quick set up: Hub shelters are known for their quick and super easy setup. With a simple pop-up mechanism, anglers can have their shelter ready in minutes, allowing more time for fishing. This convenience is valuable in extreme and inclement weather conditions when the swift assembly is crucial for staying warm and focused on the catch. The design of hub shelters, with multiple support arms radiating from a center hub, contributes to their stability, especially in windy conditions. With proper support, the stability ensures that the shelter remains firmly anchored to the ice, providing a secure environment for all anglers.
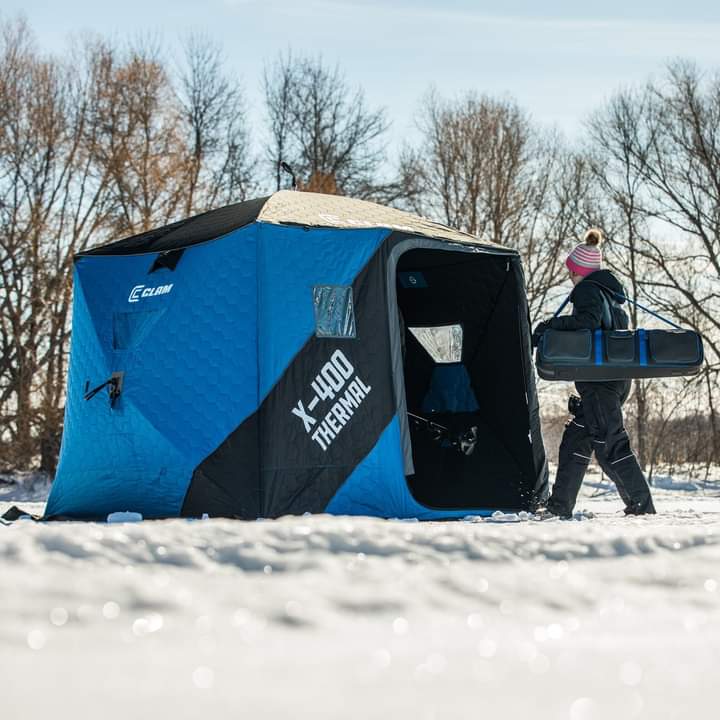
Hub shelters often come with customizable features, allowing the angler to adapt their set-up based on personal preferences and weather conditions or using an overnight setup. From adjustable ventilation options to detachable flooring, these shelters offer a level of customization that enhances the overall ice-fishing experience.
Flip-Style Shacks: Mobility And Quick Strikes.
Flip-style shacks are favored for their portability and ease of transport. These shacks typically come in a compact, sled-like design that can be easily towed across the ice. This portability is especially advantageous for anglers who prefer running and gunning from one fishing spot to another quickly.
The flip-styles are equipped with sleds, enhancing their mobility on the ice. This feature allows anglers to tow their shelter to different locations without the need for additional equipment. For ice anglers, the defining feature is the quick setup and take-down process. Anglers can simply flip open the shelter, allowing immediate access to gear and the fishing area. This rapid deployment is ideal for anglers who like to stay on the move, running and gunning to explore various spots, making the flip-style shelter a valuable companion.
Ultimately, the decision between a hub shelter, and a flip-style shelter depends on individual preferences, fishing style, specific conditions, number of people, etc. Both options offer unique advantages, providing anglers with the flexibility to tailor their ice fishing experience and set up to suit their needs. Whether you choose the central hub for a spacious shelter or the quick mobility of a flip-style, investing in the right ice fishing shelter is a key step towards enhancing your winter fishing and adventures!

/articles/choosing-right-ice-fishing-hut
Winter Trout
These are some of the best days on the water, in December and January, when a lot of other sportsmen are watching football. Fly-rodders watch the weather and hope for a hatch of midges and look forward to the little black stoneflies, but there are better ways to tempt bigger trout in December and January. Plastic worms and minnows can tease big trout out from beneath the undercut banks and beads, tailored to size and color can turn on the bite.
TWITCHING PLASTIC
Plastic worms tend to produce as many fish as natural baits. And you don't have to dig through the compost pile to find them.
Adapted from steelhead drift fishing the best rig is a six-pound main line tied to a barrel swivel. A sliding sinker on the main line is a good way to get the bait down but another option is to leave a tag on the main line knot and crimp on removable split shot. The leader should be 20 inches long terminated at a No. 10-8 single egg hook.
Rig to drift the edge of a seam with just enough weight to tickle the tops of the rocks. Jeff Warner, founder of X Factor Tackle, relies on three main colors in cold winter water - hot red, fluorescent pink, and natural worm.
Warner's go-to for brown trout on his home water is a 1/16-ounce jig head on a No. 4 hook and an X-Factor Teaser minnow. He fishes without a float.
"In my experience, it is better to allow the bait to do its work as an injured bait fish. I don't want a natural drift, I want violent rips and jerks. It's why I like the lightweight jig. I don't need it to be down on the bottom. It lets the bait look more erratic than it does with a heavy jig head."
Jeff Warner
Warner's favorite on a bright sunny day is motor oil with red flake. Warner recommends a plastic minnow in the tail-outs and along the seams and ripping it back.
"I like to cast it upriver and then work the clock so to speak. Even cast it straight downriver and twitch it. If I don't catch a fish by that time there ain't one in there."
Jeff Warner
The bite can be hard to detect. Keep the index finger on the line to stay in touch with the rocks and set the hook at the least tug that signals a grab.
FLY ROD EGGS/BEADS
When fishing egg imitations and hard beads, the big challenge is to get them at the level the fish are holding and allow a dead-drift presentation.
Try to position the bead about two inches above the hook. This can be accomplished in several different ways. One easy way to do it is to nail knot a piece of clear mono on the leader and position it two inches above the hook acting as a stop.
Set the indicator (a good one is the easy-to-cast plastic Thingamabobber) and put split shot on above the tippet knot (or swivel) and set the float about the depth of the water.
When the trout bites the bead the angler reacts with a short upward lift which tends to pull the bead through and pin the hook in the outside corner of the mouth.
With whitefish spawning in western rivers in late January and February we have bait to match. Trout that key on whitefish spawn get used to gobbling the yellow eggs and its why some fly-fishermen tie on yellow wet flies in February without knowing the reason why the trout are biting. Summer steelhead may also spawn in January and February, in which case, the trout are eating orange eggs. In any case, small orange beads or tiny yellow eggs can turn a rainbow's head this month.

SOFT PLASTIC BEADS
One of the greatest moments in drift fishing is to watch a trout peel away from its holding lie and follow a soft orange egg downstream then crush it. A squishable, scented egg imitation tumbled along the gravel with a drift fishing rig or a bottom-walking drop shot setup is a good bet in December.
My favorite hook for this work is a Daiichi salmon egg bleeding bait hook sized No. 12 up to No. 8. Again, the soft bead is best positioned two inches above the hook, which can be accomplished by using a nail knot, a blood knot, a sequin or similar bead stopper.
One of the mistakes we make is using an indicator in shallow, clear water. If the fish and the bottom is visible, dispense with the indicator and just watch for the take.
A mistake we often make is allowing the weight to control the movement of the egg. This is why a sliding sinker is sometimes the best choice. And why a drop shot weight might be the best choice with a tag end of a surgeon's knot used to splice on a bit of 4-pound fluoro. That bait should present as freely as possible in multiple braided currents. The egg wants to be free!
# # #
For a copy of the Fishing Central Oregon book, send $29.99 to Gary Lewis Outdoors, PO Box 1364, Bend, OR 97709
To contact Gary Lewis, visit www.GaryLewisOutdoors.com

/articles/winter-trout
The Best Fly Ever Made
Strip, strip, strip… the intermediate sinking fly line passed through my fingers in three-inch increments. Varying the retrieve, sometimes fast sometimes slower, pausing and resuming my retrieve, I floated along in my belly tube, taking in all the remote mountain lake had to offer. A tree-lined shore, snow-covered mountains for a backdrop, and not another soul in sight.
Suddenly the line came to a hard stop, jerking my rod forward, the frantic pulling of another chunky rainbow signaled “fish on”. Catching up my line to the reel, I played the healthy native trout to me, sliding the knotless net under her belly. The glistening distinctive markings of the bow glowed vibrantly in the evening light. Gently removing my barbless fly, I cradled the tired fish while it rested. In a few moments, the rainbow impatiently strained against the confines of the net, eager to return to the cool depths of the lake. Safely recovered, I tilted the net and watched the fish dart away, a splash of cold water in my face as if to say, “don’t fool me again!”.
If you had just one fly in your arsenal to catch trout, what would you pick? The hardcore anglers of course will dismiss this question as irrelevant and silly. Fly fishing is all about matching the hatch, and there are literally hundreds of variations of flies – dry, wet, nymph, the possibilities could fill up several tackle boxes. Picking one sounds like a fool’s errand, doesn’t it? Well, I will cast my vote and be that fool. Drum roll please…
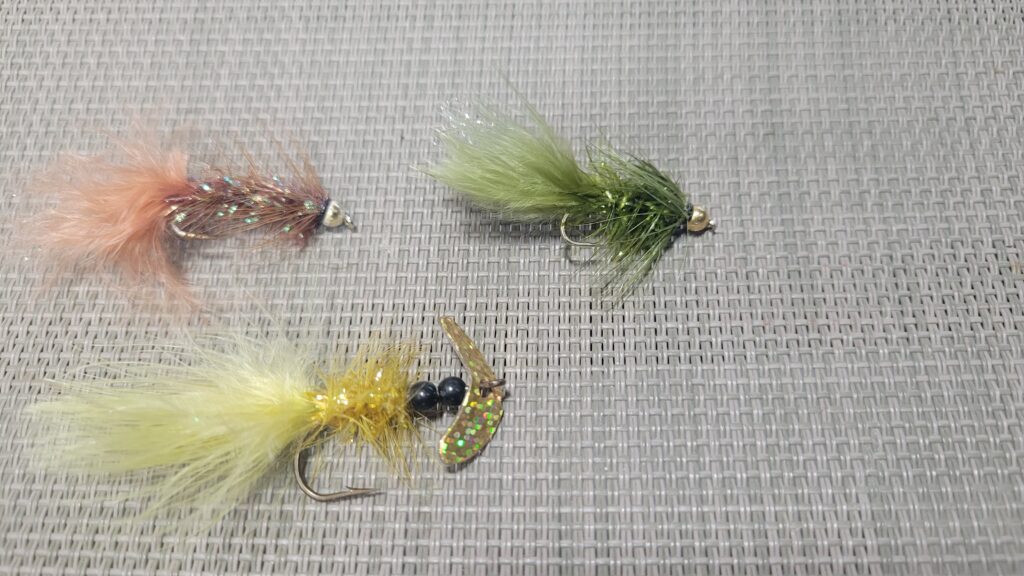
My favorite, go to fly is – the venerable Wooley Bugger.
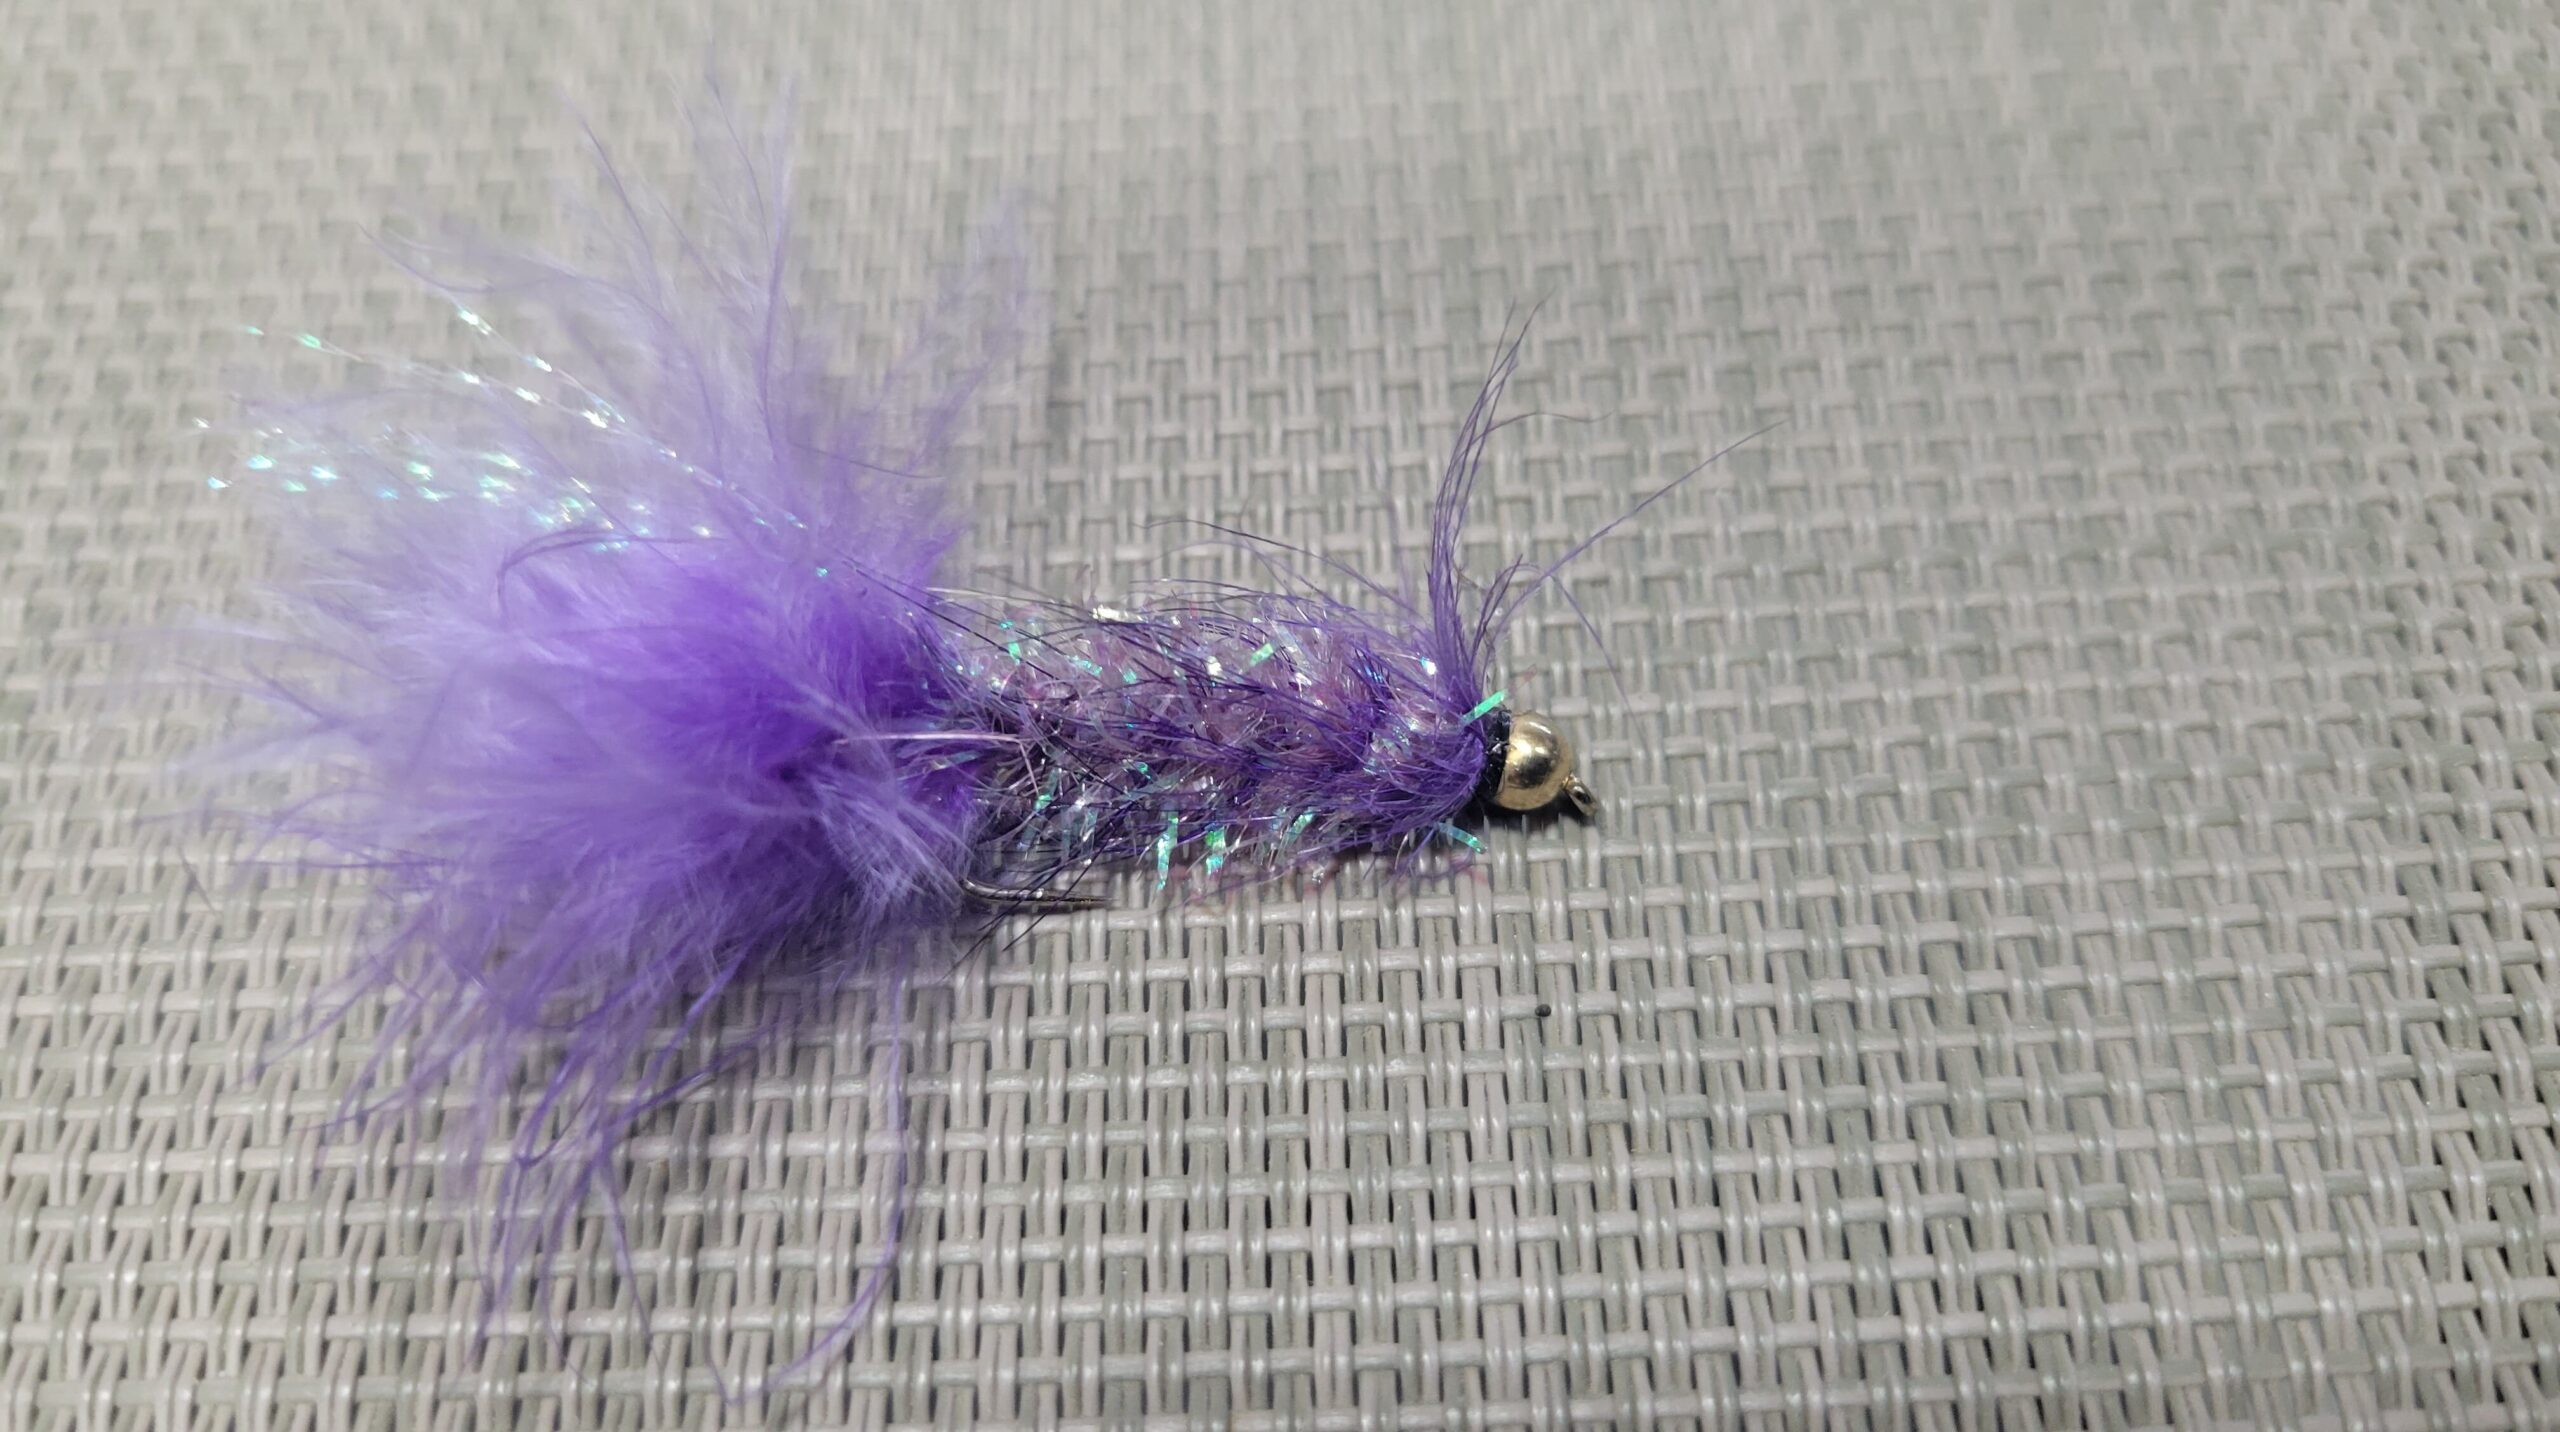
Was that your choice as well? If not, let me expand on why the Wooley Bugger is often the first fly I will cast out on a new body of water, and some of the qualities that make this fly, in my opinion, so essential to be in your tackle box.
First, a Wooley Bugger is a wet fly which can be used in lakes, rivers, ponds, and even saltwater fishing. Wooley Buggers come in a variety of styles and colors and can be considered to imitate many different food sources for fish, including small minnows, leeches, nymphs, and anything else swimming around a lake or river. As such, Wooley Buggers are the ultimate “searching” fly, perfect for exploring new bodies of water with.
Wooley Buggers lend themselves well to more than traditional fly fishing. They can be adapted for many styles of angling and fish species. Years ago, Uncle Wes Malmberg took me to a SW Washington Lake, and long lining a Wooley Bugger with a Mack’s Smile Blade off the back of his 14 foot aluminum boat we spent a relaxing morning catching and releasing rainbow after rainbow. A couple split shots was all that was required to sink the fly under the surface and entice fish after fish to grab on. Fished bait and scent-less, we easily caught and safely released several dozen fish that day. Such a simple but deadly effective method! I immediately went home and tied up several new colors to add to my collection.
For the beginner fly-tier, the Wooley Bugger is likely the first fly you ever will learn to tie. The reason is this fly is simple to make, and is generally on a larger, long hook shank, making it easy for beginner fingers (or those with older, arthritic hands). As such, it’s a great “introduction to fly-tying fly”, before tackling those challenging #20 dry flies and nymphs! A quick search on the internet will provide you with a multitude of videos and tutorials so I won’t go into the actual tying here, suffice it to say if this is an interest, you’ll find plenty of information on how to tie the Wooley Bugger. It’s a great first fly to tie and is hard to make a bad looking one.
Another application for the Wooley Bugger that you don’t hear about often, but can be deadly effective, is trolling behind a sling blade for kokanee. Go to colors are pink, red, and orange. Add a Mack’s Smile Blade and a single kernel of corn, short leader of 8 inches, and you are in business. The single hook provides excellent penetration on strikes, but if you’re anxious about that single hook tying on a small treble hook or trailing hook is certainly fair game.
Now that I live in Montana, more of my time is spent fly fishing. When I arrive at a new lake or pond, if I don’t see rising trout, I’ll start off with a sinking tip line and Wooley Bugger in a natural color, tans, browns, and greens. Casting and stripping back is a tried-and-true method, as his casting out and slowly kicking my belly boat along, waiting for that solid jerk signaling another fish fooled by this classic and timeless fly. Whether behind a fly rod, spinning rod, or trolling rod, the Wooley Bugger will get you on fish. Give it a try, I think you’ll be happy with the results!


/articles/best-fly-ever-made
Squid Jigging the Piers of the Puget Sound
With the arrival of each new season here in the Northwest, it’s hard not to feel like a kid in a candy store. Whether it's fall, winter, spring, or summer, these annual intervals of changing weather and day length always seem to provide new opportunities for the men and women who choose to reap the spoils of the outdoors. If the desire is there, the fun and the food is at our doorsteps.
A commonly overlooked opportunity that starts up in Neah Bay during late August and ends down in the south Puget Sound towards the end of winter, is the squid fishery, specifically the Pacific coast squid, also known as the California market squid.

The Pacific coast squid are relatively small, averaging about 8 inches. They have short lifespans and spend most of their time in the Eastern Pacific Ocean—between Baja California and Southeastern Alaska. They move into the straights of Juan De Fuca during late summer and their numbers tend to peak in the Puget Sound around December and January.
The fishery is often fickle, with some years falling short of anglers’ expectations, while other years the fishery can prove to be quite robust. On these years when the squid are plentiful, the hardest working anglers can find themselves heading home with their limits, which, as of January of 2023, the Washington Department of Fish and Wildlife has set at 10 lbs or a five-gallon bucket filled to the halfway point. Now that is a lot of calamari!
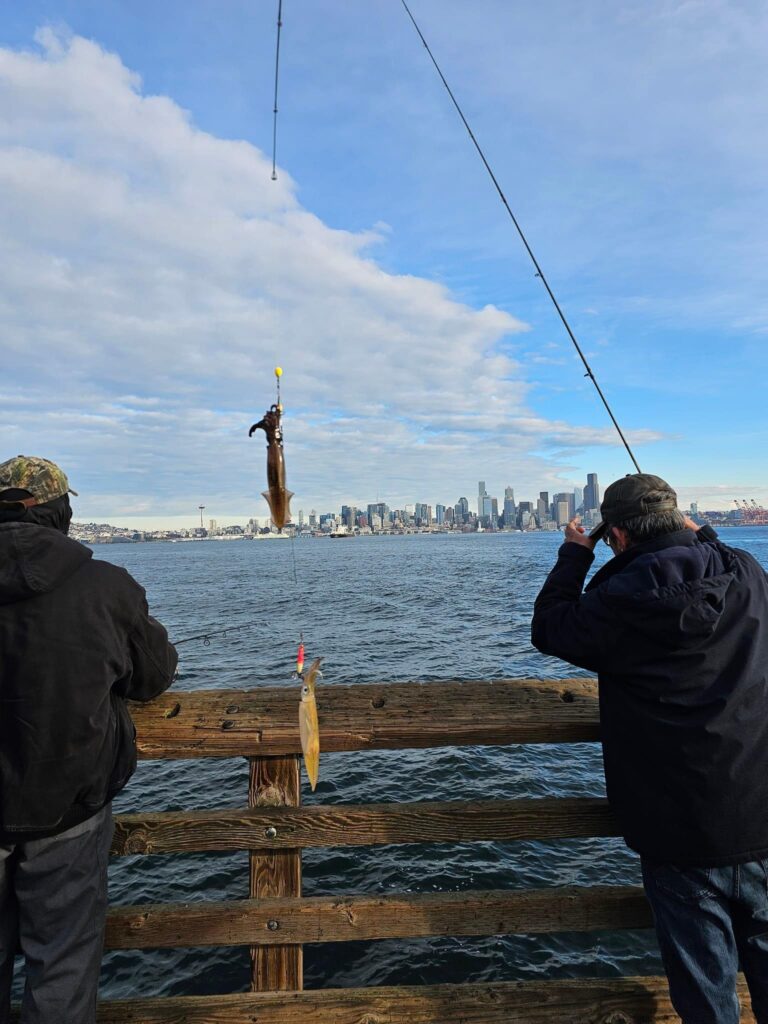
Jigging from a boat or a pier is the most common way to procure these saltwater delicacies, and during the winter you will often find the docks from Everett down to the south Puget Sound alive with folks chasing the Pacific squid. Squidding is a minimalistic endeavor. A fishing rod, a spinning reel, and a squid jig are essentially all that is needed. Squid jigs find their origins in Japan.
They are usually torpedo or bullet-shaped jigs with several spines at the bottom that point upright. These spines don't serve the same purpose as a typical fishing hook. Instead of puncturing or penetrating the squid, they create a bit of a platform for the squid to become entangled in as they latch onto the colorful plastic body portion of the jig.
Many squid jigging enthusiasts swear that nighttime is the best time to catch squid. By in large this holds true, but it’s also important to put some focus on the tides and water clarity. A high tide with decent water clarity can produce squid even during the daytime.
At night, squid are attracted to the lights illuminating off of the piers. The general belief around this is that light attracts phytoplankton, the phytoplankton then attracts zooplankton, and zooplankton attract the fish and other critters that squid like to feed on. Piers already come equipped with their own lights and these typically do a decent job of providing the needed illumination to bring in the squid.
With that being said, the chances of bringing in larger amounts of squid become increased when a more powerful and concentrated light is introduced. Folks will often bring battery or generator-powered lights to shine into the water. Check with local rules to find out if generators are allowed.
While on the topic of rules, it’s important to note that there is a fair amount of pier fishing etiquette to consider while navigating the pier. It’s best to speak with folks who are using lights and ask them if it’s ok to post up next to them. There’s a good chance they might be saving these spots for friends or family and It’s not uncommon for conflict to occur on the pier if people aren’t using common courtesy while acquiring their jigging spots.

Just as the gear is minimalistic, the technique is simple as well. Folks will work their jigs in a variety of ways, but sticking to the basics is what generally will get you on the squid. When casting, you should allow your jig to drop to a depth where squid are holding, lift the tip of your rod and slowly retrieve as you lower the rod tip back down, then repeat the process.
Once you have a squid on your jig, keep tension on the line and the squid should remain there as you retrieve. The method is similar while jigging directly beneath you, though you won’t be doing any reeling in of the line until a squid has attached itself. Some people like to do a few quick and hard lifts of the rod and then let it sit near the bottom for a few moments. Though you might not feel the squid strike your jig, the difference of weight at the end of your line once you lift again, will be your indicator that you have a squid on.
So, if you’re anything like me, and consider the sound of a bubbling deep fryer to be just as much of a winter staple as holiday tunes or roasted turkeys, then put on your winter jacket and head to a local pier for your shot at getting that bucket up to its halfway point with these great tasting cephalopods. And remember, there’s no such thing as bad weather, there’s only such a thing as bad gear!
")
/articles/squid-jigging-piers-puget-sound