/articles/categories/gear
The River Less Travelled
I’d never given it much thought until recently, a thought drifted up from my subconscious. This epiphany revealed to my satisfaction a reason for my deep peace and joy I experienced floating rivers on my pontoon. “Huckleberry Finn”. The childhood memory engulfed me, and I realized, all these years later, what a profound influence Mark Twain had on my life, all from a book I read many years ago in my childhood.

I would be lying if I told you I remembered any specific details that I read, rather, it was a realization that the journey of Huck Fin and Tom Sawyer, floating down the Mississippi, had etched into my spirit a longing for adventures, pondering what lies around the next bend, floating effortlessly on a liquid highway, seeing new sights and connecting with nature, and my essence, in a way that gave me a level of serenity essential to my very being. Now, so many years later, I see that it was natural for me to combine fishing with adventures. Indeed, from childhood on, I’ve found my true moments of peace outdoors. Adding fishing to the equation gave me a purpose, an excuse, and as I travelled through the decades of my life, I instinctively gravitated to the combination of fishing with outdoor adventures.
Canoes and overnight trips were the stuff of my early travels, whether a five-day float down Wisconsin’s Kickapoo River, or paddling and portaging the Boundary Waters of Minnesota, I saw the beauty of the outdoors, catching fish along the way. Casting a small Mepps up against a sandstone wall and feeling a beautiful brown trout bend my budget friendly spinning rod, pulling line off the reel, or tossing a topwater spinner into a weedy shoreline, the bubbling chatter of the blade drawing the attention of a green-stripped pike knifing toward it with a V-shaped wake, the anticipation and final smash of the grab – I was literally hooked for life!
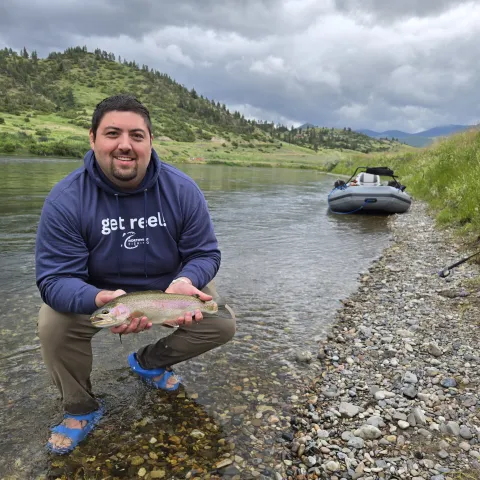
I was fortunate to have moved to Washington during a time when hatcheries put out large numbers of smolts, and returns of hatchery fish made for many memorable days of steelhead limits. My go-to rivers were the Cowlitz, Skykomish, and Satsop. I ran up and down these rivers in an eight-foot sport raft with an eight-horsepower prop (with my own modified, raised transom to avoid rocks). It was a fun time, but there was something missing. I can only thank the subconscious imprint Mark Twain had on me. At a winter Sportsman’s Show, I happened upon a booth where Dave Scadden rafts and pontoons were displayed. I stopped in mid-step and took a closer look at what would soon become my new passion. Dave had a variety of pontoon boats on display, but what really caught my eye was a cherry red two-person twelve-foot pontoon boat. My mind immediately began contemplating the adventures I could have with friends, and two boys who would soon be old enough to join in on trips with me. I remember the boat had features that caught my attention, such as being able to easily convert it from a two-person to a one-person pontoon, and a nifty storage system for coolers or overnight trips. Fighting the impulse to buy on the spot, I went home that night and did my research. Satisfied that it was a good quality product at a fair price, I came back the next day and made my purchase.
The rest, as they say, is history. My cherry red pontoon took me on multiple adventures, including floating the Wilson River with each of my sons for fall chinook. Many a water was explored and many fish netted in my fire-red pontoon. The years added on, and the boat served me well. Twenty or so years later, my retirement years are coming ever closer. Last year, my wife and I moved to Great Falls, Montana, to be closer to our grandchildren, and farther away from the ever-growing Puget Sound region with its claustrophobia-inducing congestion. My backyard river is now the Missouri. My son Matt and I have floated the river several times, and the pontoon performed fine, but I found myself gazing enviously as drift boats and larger rafts floated by. I observed they offered a more stable platform for tossing flies and anchoring up on this big river. The seed had been planted, and it took full root when my wife JoAnn casually mentioned there was some spare cash in a savings account, which I knew nothing of. Husbands know that spare cash and a wife’s “OK” are the final straw. My research kicked into high gear!
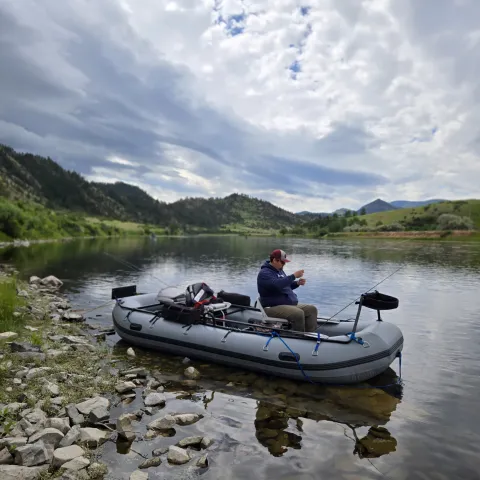
I looked at the variety of drift boats and rafts out there and narrowed my choice down to a raft. I prefer the flexibility and lighter weight of a raft. After looking at several companies and designs, I found myself on the Dave Scadden website. I was instantly impressed by the selection of framed rafts, with sizes and features aimed at whatever budget and needs a boater was looking for. I had determined that in addition to a stable platform, I also wanted a big enough raft to handle three anglers, and space to store overnight camping gear for those Huck Finn adventures. Each year, Montana opens the Smith River to a lottery, allowing a limited number of anglers to float this secluded and scenic 57-mile canyon-lined river. I’ve decided this four-day float is going to be on my Bucket List.
After a call to Dave to discuss my goals, I selected his new 14-foot Dragonfly. With a 6-foot beam, three seats, a casting brace, an inline anchor system, and the rigid dry floor insert feature, the raft was just what I was looking for. Throw in an excellent warranty and my positive experience with my pontoon boat, and I feel confident I’d found a winner.
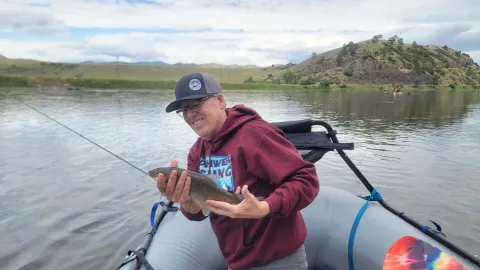
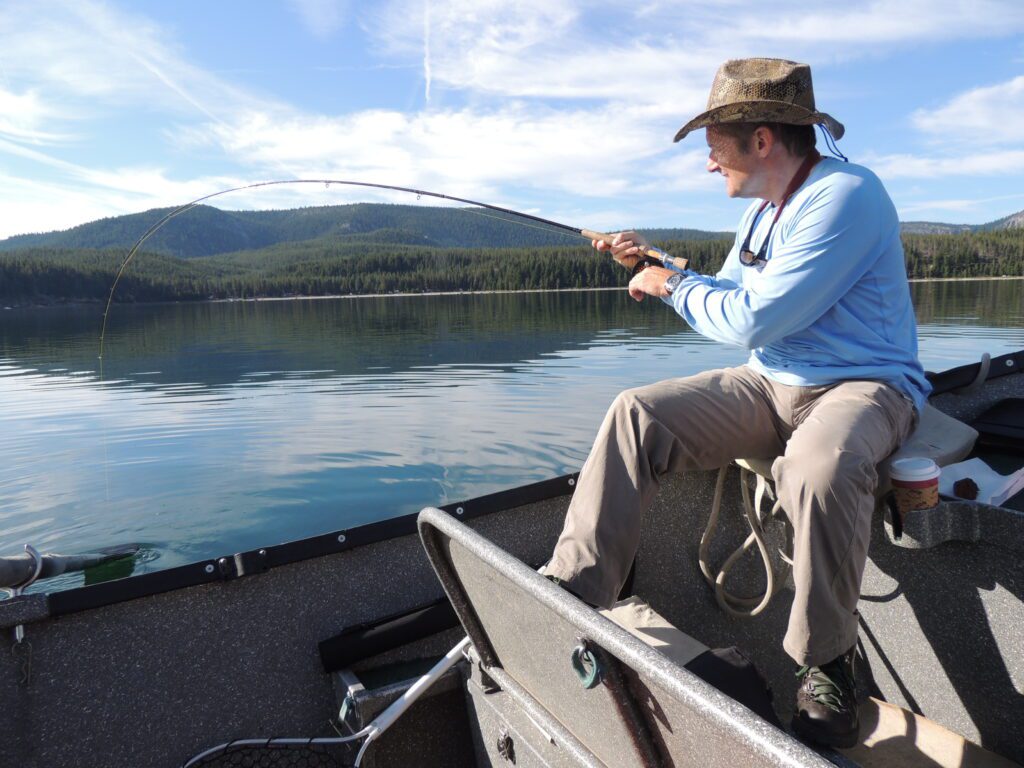
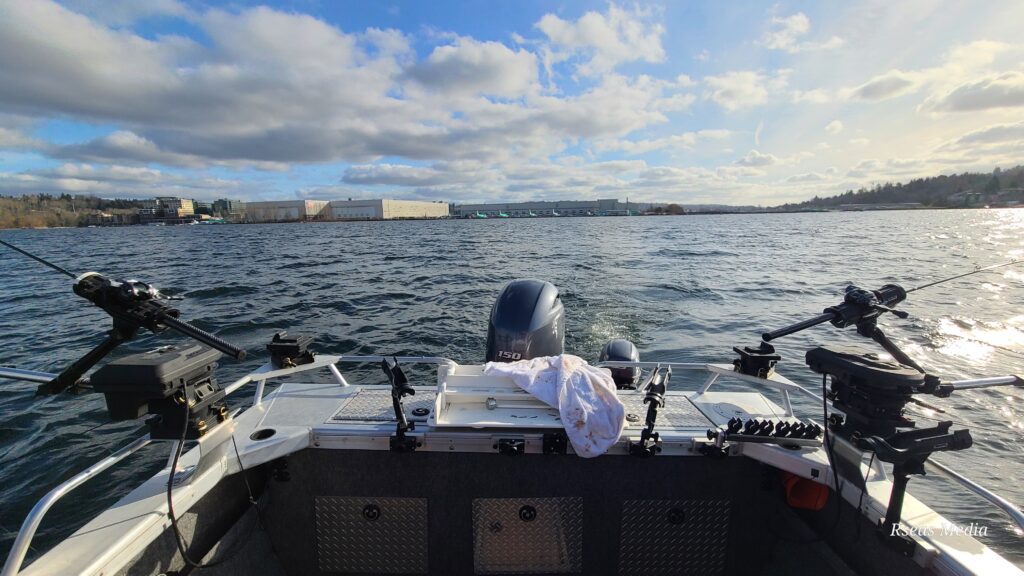
Pairing my new raft with a flat bed 5x8 trailer (to which I added a couple of rollers made with PVC piping), my sons Matt and James, and I headed to the Missouri River for a maiden voyage. Launching below the Holter Lake dam, we floated 5 miles down to the takeout at Craig. Around us were every style of floating vessels – drift boats, pontoons, rafts – we felt right at home. The Dragonfly had plenty of room for the rower and two anglers. While the front angler had a casting brace, the rear angler did not. This would be a feature I will try to add as a DIY project. The anchoring system is also not as robust as a higher-end (and twice as expensive) raft. I can live with it. Again, if you go on YouTube, there are some DIY setups to improve the anchor system.
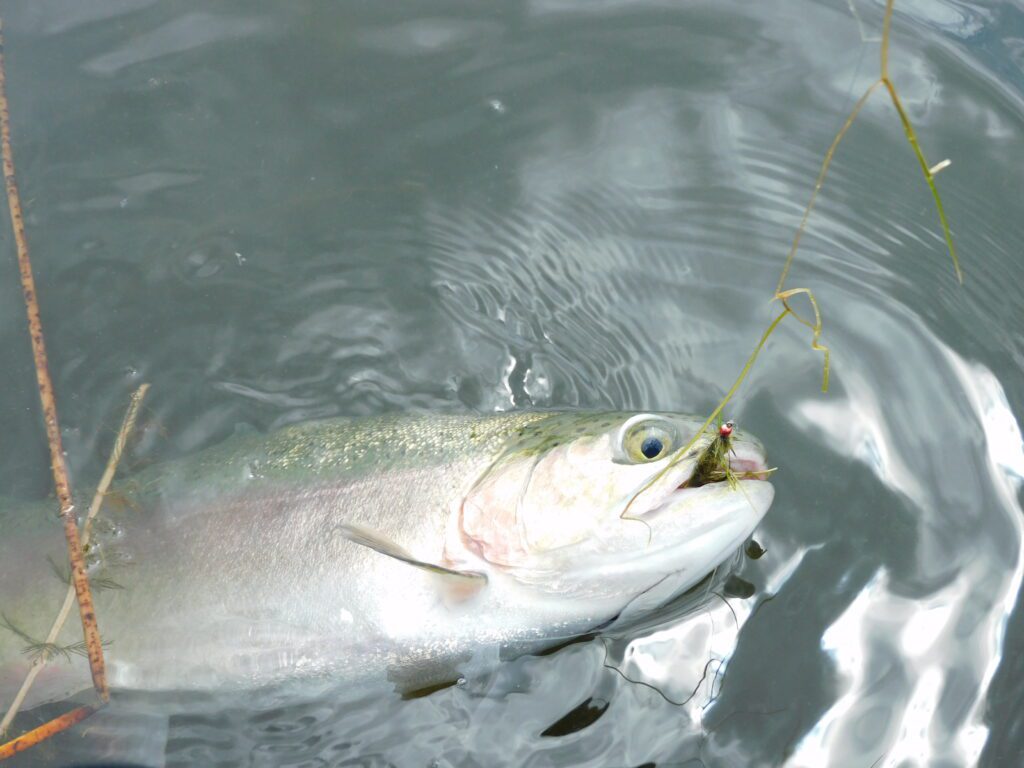
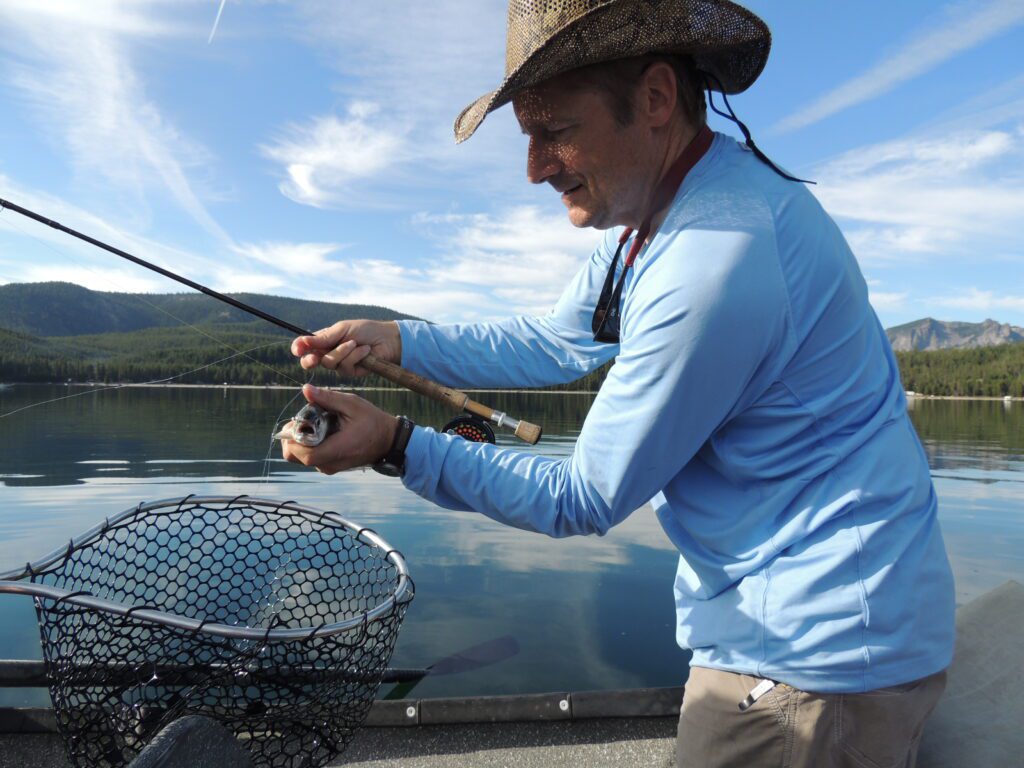
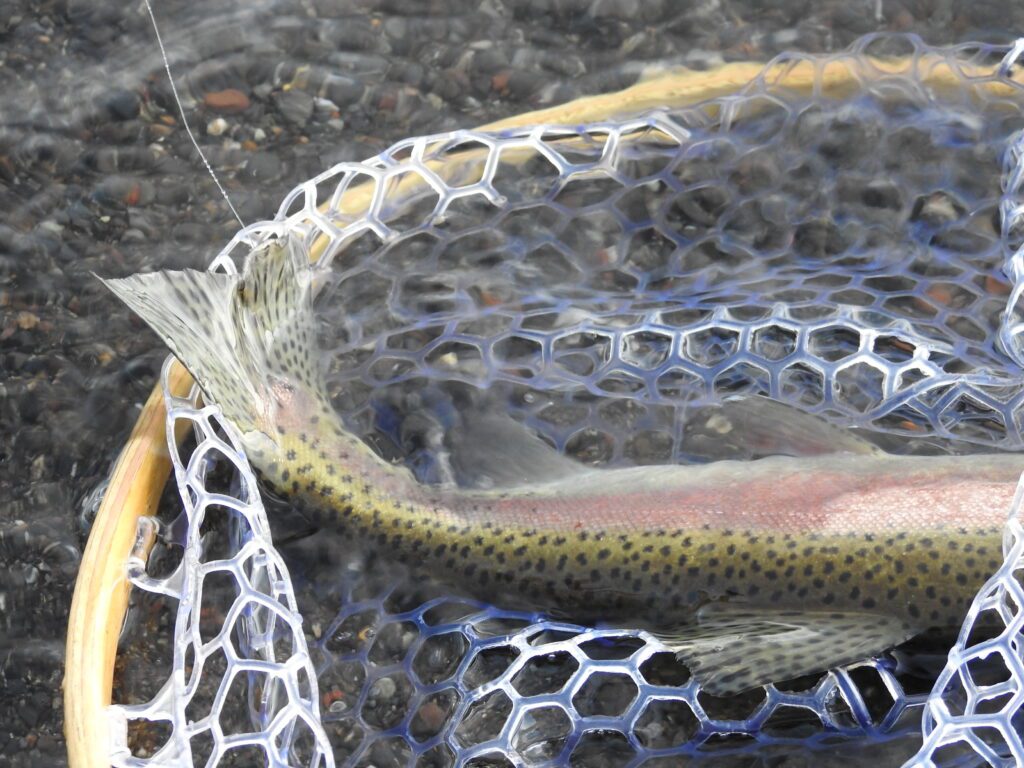
Anchored up and casting nymphs with indicators, James let out a “fish on”, his first ever fish caught on a fly, and his first ever Montana fish. A nice native whitefish came to the net after a bulldog fight. The smile on James’ face was my big catch for the day. Introducing Matt and James to my inner Huck Finn was more satisfying than catching a 20” trout – well, maybe.

/articles/river-less-travelled
Catch More Bass This Summer!
Summer is an exciting season for bass anglers. The bass are done spawning and are actively feeding in both the shallows as well as deeper depths. There are also a variety of ways to catch bass, both largemouth and smallmouth, this time of year.
Perhaps the most exciting way to catch bass during the summer months is using topwater baits. Watching a largemouth bass explode out of the water to smash your lure is always an exhilarating experience! Just make sure you don’t set the hook when the bass comes out of the water. Pause and let them take it first. Easy to say, I know, but hard to do.
When it comes to topwater fishing, have a frog rigged up on at least one rod. Whether you use a standard frog or a popping frog, you have the advantage of fishing this weedless offering in heavy cover, whether it be weeds, grass, or lily pads.
If you are casting into more open water, I like to fish a topwater popper. My go-to popper is a Berkley Bullet Pop in either a bluegill, bass, or frog pattern. The Whopper Plopper made quite a splash in the bass fishing world when it was introduced in 2008, and many anglers insist it’s still a great offering. However, this is a low-confidence lure for me, and while I’ve had a blow-up or two, I’ve yet to catch a fish with a whopper plopper.
And then there are the classics. The Arbogast Jitterbug and Hula Popper have been around for over 70 years, but they still work, especially in the evening hours. Speaking of which, when is the best time to fish with a topwater lure? Conventional wisdom says you should fish topwater lures in the early morning and in the evening. However, if the weather is cloudy, you can experience good topwater fishing all day long.

LIPLESS CRANKBAITS
Lipless crankbaits like the original Bill Lewis Rat-L-Trap or my favorite, the Berkley War Pig, are great search lures. You can cast them a “country mile” and retrieve at a fast or moderate pace, which means you can cover a lot of water while looking for schools of bass. Places to fish lipless crankbaits are in shallow water (two to eight feet deep), especially parallel to brush lines, weed lines, or near points of land. These lures also work well over submerged grass or weed beds. One thing that can be particularly effective is to pause your retrieve, just for a moment, from time to time while you reel.
SPINNERBAITS
The spinnerbait, like the lipless crankbait, is used to search for schools of bass. One advantage the spinnerbait has is that, by design, it is more snag-proof than lipless crankbaits or topwater plugs with treble hooks. The spinner bait can be fished a couple of different ways in the summer. You can fish it mid-depth with a moderate retrieve, just under the surface of the water, creating a wake, with a fast retrieve. Or slow roll it, letting the spinnerbait sink to the bottom in six to 15 feet of water and bringing it slowly back just off the bottom. While ¼ and 3/8-ounce spinnerbaits are widely sold, I prefer to use a ½ or ¾ ounce spinnerbait, especially if I am fishing deep.
DEEP DIVING CRANKBAITS
High summer temperatures will drive those bass into deeper waters, especially smallmouth bass. So, how do you reach them? With a deep diving crankbait! Rapala and Berkley are two lure companies that make quality deep-diving crankbaits. I tend to use two types of crankbaits in the summer months. That would be lures that dive 8 to 12 feet deep and lures that will dive to 25 feet deep. Once you locate the fish, you can stay put and cast to them or switch over to a jig to pull bass out of the deep. As for crankbait colors, I try to “match the hatch” and use patterns that are forage for bass. Trout, perch, bluegill, and largemouth bass patterns all work well if these species live where you are fishing.
JIGS
I always have a weedless jig with a crawfish trailer tied on to one of my rods because they catch bass in the spring, summer and fall months. They can be fished in partially submerged brush, under docks, around beaver huts, trees and other areas where bass live, but other lures would get hung up.
Jigs can also be fished in deeper water on sloping banks, on underwater humps and other structure. Your choice is also wide. In addition to weedless jigs, you can fish neko rigs, which work great for smallmouth bass, and swim jigs, which have become a favorite for many bass anglers.
SOFT PLASTICS
You can’t go wrong fishing soft plastic baits. Drop Shot fishing with a weight a foot or two below a hook tied on the same line can work great, especially on heavily pressured waters. Put a small 4-inch worm or other small plastic grub or swimbait on your hook and just drop it to the bottom. Texas-rigged worms still work great for bass on the bottom, as do the tried-and-true Carolina rig, where a weight and glass bead are placed above a swivel. A foot to 18 inches of leader with a worm is tied behind that. Finally, tube baits, which were all the rage 25 years ago, still work fine today for bass.
The bottom line is this: When it comes to catching bass this summer, you have a lot of options. Don’t get stuck on one or two baits. If they are not working, try something new. As you can see, there is more than one way to catch a bass.
John Kruse
/articles/catch-more-bass-summer
Of Damsels, Dragons, and Snails for Stillwater Trout
Be the best big stick by slowing down the presentation and lightening the tippet.
Last year, in early June, we fished a small reservoir in the high desert. Like a lot of private waters in Central Oregon, the lake had tules along one side and willows on the other.
We started in float tubes, backing into the water, then settling in.
My dad called out that he was seeing lots of damselflies. For which I thanked him and immediately tied on a damselfly imitation.
Kicking away from the launch into deeper water, I observed midges, PMDs, snails, dragonflies, and damsels.
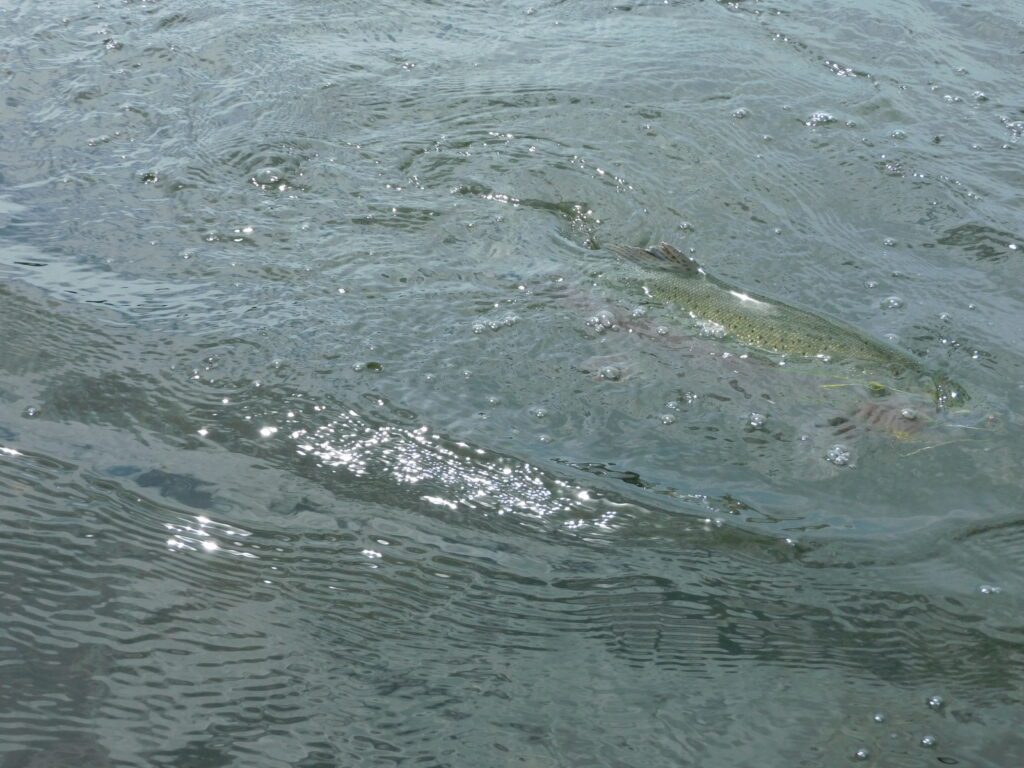
My first fish to the net was a 21-inch rainbow. Dad was on the other side of the lake and could not get a picture for me. While I was using a damsel, I was thinking about how I usually like to start with a Renegade or a Brown Hackle or some other snail imitation.
A person has a chance in the first hour of daylight to catch trout close-in to the tules on snail patterns before the fish sense the vehicle traffic or start to feel pressured by people in float tubes. But a lot of my friends don't want to fish using snails. It is not something they think about. Why would fish eat snails? And what do snails even look like? I think the real reason a lot of us don't fish using snails is because we are too restless. The snail just sits there on the surface or just under it. Until a trout eats it. It is so simple to fish snails.
The best thing to do is walk along the reed beds and scout the weed lines with polarized glasses. Look for swirls. Look for shaking tules. Watch for fins and tails or the white gum line as a trout opens its mouth and flares its gills.
Pattern choice is as simple as it gets. A No. 10 Woolly Worm. A Brown Hackle. A Renegade. These are all suggestive of snails when fished at snail speed. Cast or dap, and let it sit. Wait for the butt of the fly line or the leader to move. The fish will often have to change course to take the fly, so as the trout turns, it will feel the fly and spit it. Don't wait to feel the take, set the hook when the leader starts to move. After the sun comes up, the fish tend to retreat to deeper water, and now is the time to switch to a leech, damsel nymph, or dragonfly nymph.
While it is tempting to use old standbys like the Woolly Bugger or even the Thin Mint, don't forget, the fish have seen all these flies before. We can catch more fish if we use lifelike patterns that are faithful to the profile, contrast, and color of the food source, but also incorporate rubber legs, gill movement, and eyes.
It's okay to experiment with retrieve, but in general, these critters don't move fast and can spend a lot of time at rest. One-inch increments are my rule for retrieves. Unless I am fishing a minnow imitation.
We need to be more patient and precise with our presentations. Once I watched a guy in a float tube. He was using the right fly, but his tube was underinflated, so when he kicked, he leaned way back, transmitting all of that back-and-forth motion to his fly rod and his fly. His fly was probably making two-foot moves. No bug does that. Some guys don't like to be told what they are doing wrong, so I just kept my mouth shut. While the guy's buddy caught half a dozen trout that morning, this guy didn't land one. The difference between a poor day of fishing and a good day might just be the way the fly swims.
A good presentation is one where the bug swims and rests naturally. Since real bugs don't get towed around on lines, we have to minimize the way the line affects the movement of the fly. The smaller the tippet, the more that the fly will work in the water like the tyer intended. If you have been using 3X, go down to 4X tippet or even 5X on smaller flies. Don’t forget, fluorocarbon was made so that you can catch more fish. And the guy with fluoro will probably out-fish the guy with mono five-to-one if everything else is equal.
Like it or not, you might have to learn a new knot. Try a non-slip or a perfection loop and see how the fly behaves differently at rest. My biggest fish of the morning was a 25-incher with a thick wrist, one of my best trout of the year. But it was in the late afternoon with a low-pressure system coming in when I earned a 20-inch rainbow.
"What are you using?" Dad wanted to know.
"A damselfly."
"Oh, good idea," Dad said. "Why didn't you tell me earlier?"
"Because you told me, I figured you already knew."
"Oh yeah, I'm pretty smart," Dad said.
# # #
For a copy of the Fishing Central Oregon book, send $29.99 to Gary Lewis Outdoors, PO Box 1364, Bend, OR 97709 To contact Gary Lewis, visit www.GaryLewisOutdoors.com
/articles/damsels-dragons-and-snails-stillwater-trout
Kokan-Eye Eyesight Colors and Presentations
Make no mistake, kokanee can see up, down, and all around. They see close up and farther out (depending on water clarity) at the same time, but not as clearly as we can. They can see effectively behind them as they swim, because their undulating swimming motion turns the head just far enough to see very near the plane of the tail.
Color Shift At Depth
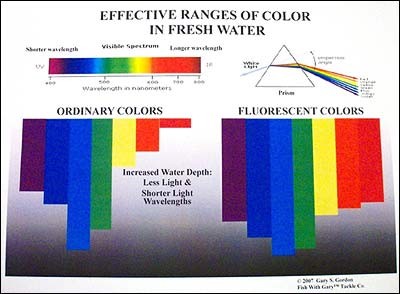
Since sight is part of the effective formula, you must make sight important in your presentation. The very last thing you want is for your lure to be camouflaged. You want it to be noticed. You work against yourself if your target winds up being camouflaged because you have not accounted for the three things that change your lure's appearance at depth:
- Lack of light at target depth;
- Color shift (attenuation), making your lure dull gray; and
- Lack of contrast (conveys information about shape and form)
Consider what it is that you are trying to do. You want your setup color-wise to be different than the water surrounding it. If your setup contrasts with the water it is in, it has a far greater chance to be noticed and targeted. Remember, we are seeking a striking response. Your setup must appear different than the predominant color of the surrounding water at that depth.
As we descend the water column, certain light wave frequencies are absorbed (because water absorbs light). Here is the other prong of that absorption concept. As we go deeper in the water column, some of the colors we see at the surface will no longer be the same color at depth. At this point in the discussion, I am speaking of ordinary colors - the color spectrum we can see. Fluorescent colors will be discussed in a moment.
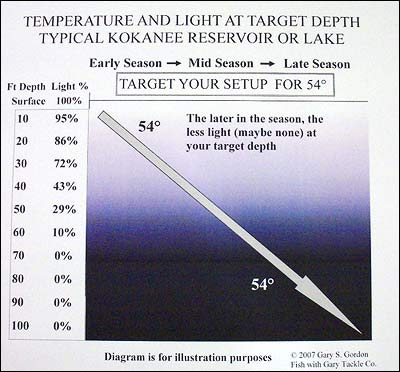
The longest visible color wavelengths are the reds. Shorter in descending order are orange, yellow, green, blue, indigo, and violet. As you descend the water column, the longer wavelengths are absorbed, leaving the shorter wavelengths to continue down the water column. Those shorter wavelengths will ultimately be absorbed, even in the clearest of water, provided you go deep enough. The kokanee fisherman is dealing with depths generally down to 100 feet, give or take. The typical kokanee body of water will have no light in the later season beyond 75 feet. In the very early season, there may be no light at 30 feet.
As you recall from last month’s article, the proper target depth for kokanee fishing is 54 degrees. And since that temperature descends the water column as the season wears on, the resulting less light at your target depth also means that certain ordinary colors are no longer what they appeared to be on the surface because their wavelengths have been absorbed. If you use such a color at depth, your presentation will be gray and not have much contrast to the water it is in.
A lure of ordinary red will virtually disappear in but a few feet of water. Soon to follow would be the ordinary orange, ordinary yellow, and then ordinary green. Also, about that time would be ordinary indigo and ordinary violet due to the structure of water and the use by phytoplankton of these frequencies. If you take an ordinary red object into a dark closet and shine orange light on it, the red object will appear gray. If you take an ordinary green object, and test it the same way with blue light, the green object will appear gray.
For the object to be seen in its correct color, it has to be struck by a light frequency of equal or higher wavelength. In these examples, if you take a green object and strike it with red light, it will appear green. If you take the green object and strike it with orange light, it will still be green. For ordinary colors, the deeper you go, the very light necessary for that color to be that color, has likely been absorbed in the water before you reach your target depth. Without the right light wavelength hitting it, it will be dull gray and not at all distinctive to the water that surrounds it. The little remaining visible light at depth makes the dullness even duller
Our lures are rarely of a pure color wavelength. But even the mixing of colors (hues) will still be subject to the same color deterioration at depth. Pink is a good example. Pink is not a color of the visible spectrum, but is a mixing of red and white. White is not a color of the spectrum, but is all colors of the visible spectrum. Thus in pink, a little of the color will respond to green and blue wavelength at depth. But the color intensity will be mostly dull. From what you now know, ordinary pink is not the ideal choice for getting noticed at depth.
While this might seem confusing to us above water, it is still the reality of the color situation in the water and at depth. Perhaps some encouragement is in order. To be "expert" of color at depth you need not memorize anything. Because most of our kokanee fishing occurs in green or blue light wave frequencies, we want all of our presentations to show up in green and blue light.
Fluorescent Colors
Enter the amazing world of fluorescent colors. No intense scientific discussion is needed here. What you need to know is this. A true fluorescent color will remain its color when struck by a lower light wave frequency. If a true fluorescent orange is struck by a green light (lower frequency than orange light), it will remain orange. The same is true for all of the fluorescent colors. And that means that if you use true fluorescent colors in your setup, your setup will be seen at depth. True fluorescent colors tend to be brighter as well, making for higher visibility.
Not all materials on the tackle market are of true fluorescent colors. You can easily test whether a color is a true fluorescent by taking your lures and dodgers into a dark closet and then shining a black or UV light on them. If the color seen is the color you saw in full light, you have a fluorescent color. Again, there is a difference in intensity of the color. Just because a material is fluorescent does not automatically mean it is intense.
U.V. light is below the visible spectrum (of lower wave frequency), which means it cannot be seen directly. All U.V. light is dissipated in very shallow fresh water holding kokanee, because the water, plankton and other particulates in the water absorb all of it. It is well documented that there will be no U.V. light in the freshwater column below just a few feet.
I have tested lures labeled "U.V." Most work very well in waters holding kokanee, and in particular, the UV squids should be a part of your tackle box. However, lures labeled "U.V." would be more accurately labeled as "fluorescent." These "U.V." lures come in visible colors. Since UV is not visible, the color you see is fluorescent. As with all fluorescent colors, stimulation by a black light will make the color jump out at you. But these lures are in fact, only fluorescent. But that is why they are good. They still need some visible light at depth to be most effective. They do not glow. Match one of these "UV" (fluorescent) squids with a Fish With Gary™ POWER Dodger, and you have a great setup.
Using true fluorescent materials in your setup will resolve issues of color shift in your favor. While some fluorescent colors will fade somewhat the deeper you are in the water column, they still are not gray if there is some light available to act on them. When using true fluorescent materials, the colors you are delivering at depth are those NOT ordinarily seen at depth. And that is exactly the effect you want. Your setup will be out of the ordinary, and kokanee will focus on it in the near field.
Vital Contrast
Using fluorescent materials is not the only way to get your setup noticed. Remember that you are after contrast, or what I call vital contrast. Vital contrast can be obtained by using different fluorescent colors next to each other or spaced in such a way as to create the illusion of not being connected. Components that contrast with themselves will stand out even more in dull watery depth.
Contrast is the enemy of camouflage. Contrast is the better-developed part of kokanee vision and encompasses about 10 times larger visual window area than does color. The color window is directly in front of the kokanee, but contrast is not only seen in front, it is seen up, down, sideways, and backwards. Contrast vision overlaps color vision. Effectively presented, color is a great contrast. When color and contrast are effectively presented, color and contrast are in front of the kokanee to see and react to them. This allows the kokanee to put its mouth where the color is, which is pretty much what you want!!
Glows
There is another fantastic way to achieve this vital contrast at depth, and that is the use of glows. Glows are termed phosphorescent (or luminescent) as they carry their own light to depth. No intense scientific discussion is needed here either. Glows emit light when the light source that charges them is removed. On the other hand, fluorescent materials appear brighter in light, but do not glow when that light is removed.
Most glows on the market and peddled to fisherman are of very poor quality. Their glow simply does not last even long enough to make it to depth, let alone work for you at depth.
All Fish With Gary™ glows are of the highest quality and are termed extended glows for good reason. The natural glow beads in particular will glow for hours on a simple charge of sunlight for a few minutes. Stimulation of glows by using a black light is not very efficient, and the resulting glow does not last as long as sunlight stimulation.
Glows clearly take on more importance when the level of light is less in the water column. As you descend below light in the water column in later season, glows make visible what would otherwise be invisible. And if the surrounding water is pitch black, the glow of light most certainly is the kind of dramatic contrast that will get your setup noticed.
The Ideal Presentation
The ideal presentation in achieving vital contrast is one that makes generous use of fluorescent materials and glows, arranged in such a way to be in contrast with each other and in contrast with the surrounding water. And this is exactly what is incorporated into the entire Fish With Gary™ Tackle line.
While the dodger blade attracts far field (long distance), the beads, and the spinner(s) on the leading wire are near field (short distance) attractors.
Here is what is going on with the beads and spinner in front of the dodger. Because the beads and spinner(s) are being moved about by the dodger, they are creating short field sound. The spinner(s) do not consistently spin as you would expect. Instead, their movement in the water makes the spinner(s) come in contact with the glass beads. Metal versus glass produces a sound. In this case the two produce an irregular sound that alternates with some spinning, and some "tap-tap" of the metal on the glass.
There is nothing in nature that this imitates, and this sequence of short field sound is itself a contrast to the natural water environment. Add to this is the natural movement of the glass beads working against themselves as this setup is whipped through the water. And all of this is going on while your dodger is still producing far field sound, attracting other kokanee to your setup. A gathering of kokanee is more likely to result in a strike than a single kokanee.
While your sound generating machine is working, your kokanee has been drawn close enough so that the colors and contrasts are within its sight window. A curious thing happens at this point. Having been drawn to the sound, the kokanee will see a particular color and contrast sequence. Once seen, this color and contrast sequence effectively imprints the kokanee with that combination, even if briefly. If your dodger and the upfront beads and spinner are of the same color and contrast, you increase that imprinting. And if your lure is of the same color and contrast, then you give the kokanee a target that it does not fear. That is why it is absolutely critical that your dodger setup and the lure be matched.
The lure is making short field vibrations and adding color and contrast, and adding scent.
So now you have the complete picture. Far field vibrations attract, short field vibrations and colors in consistent vital contrast imprint the kokanee and provoke the strike.

/articles/kokan-eye-eyesight-colors-and-presentations
Chironomids in Stream Channels
If everything is as it should be, there are two flies in the danger zone. For me, in most cases, I want a No. 10 red chironomid hung just over the top of the weeds, while a black chironomid rides about 18 inches above it.
Studies have been made on a number of lakes to determine the main food source for the trout.
Chironomids are midges, which look a little like mosquitoes, but lack that terrible creature’s bite. On many lakes, the midges make up close to 40 percent of a trout’s annual food intake. If there’s nothing else going on, you can bet the fish will eat a chironomid. But fishing a chironomid is different than fishing imitations of other bugs.
Midges don’t have legs or tails like mayfly nymphs or damselfly nymphs. So you want a vertical presentation instead of a horizontal presentation.
As chironomids hatch, they are trying to produce oxygen between their exoskeleton, their nymphal shuck, and the adult body. They come up out of the mud and they suspend about 12 to 18 inches above the bottom, for up to an hour. That makes them vulnerable to rainbows, browns, and cutthroat.
Chironomid imitations work wherever trout make a living. The hardest thing about it is the fish don’t set the hook themselves. You have to watch that indicator all-day
In Central Oregon, we fish chironomids on East, Lava, Little Lava, Hosmer, and even Wickiup for browns. They are a major food source for a lot of insect-eating trout. The tactics do not change that much except for the depth the angler is fishing.
From outside the boat, it looks like a boring way to fish. I beg to differ. Some methods are more suited to small fish, while other strategies are better suited to big fish. But all trout, big and small, eat chironomids. Setting the hook is like pulling the lever on a slot machine. Especially on reservoirs with submerged streambeds like Crane Prairie, Haystack, Prineville Reservoir, and Timothy Lake.
the trick is finding the old river channels. As the average lake temperature warms, the fish move into the cooler river channels and use them as highways to move around. The channels average 12 to 13 feet deep and are relatively weed-free with a sandy or silty floor.
So what you have is a 90-degree angle coming off your indicator. If you move your indicator a couple of inches. You give it a twitch and it rises up a couple of inches then settles back down. Vertical action is what you want with chironomids.
Photo by Gary Lewis
Reds and black are the primary colors most anglers use in Central Oregon, but olives and browns can also work. More important than color is to present at the right depth. The fish is probably more attracted by the silhouette of the midge.
One of the things we tell ourselves is we want to find the depth where the feeders are working. My friend Scott Cook calls it finding the feeders. If a certain depth is paying off, try to bracket all the flies in the boat around that part of the water column.
A depth finder can help locate schools of feeding fish.
Most chironomid fishing takes place at a depth of six to twelve feet below the indicator. I like to use a nine- or ten-foot leader tapered down to a 4X fluorocarbon tippet. Again knotted to a No. 10 chironomid with another chironomid on the dropper.
Any time the indicator goes down, the fish could be 10 inches or 10 pounds and you don’t know until you set the hook.
There are times when the small flies can get bit in deeper water. When trying to fish down at 15 or 20 feet, try using a very fast sinking line - like with a type 3, 4 or 5 - and retrieve it VERY, VERY slow. The trick is to work the fly in a vertical presentation, retrieving it up through the water column.
# # #
For a copy of the Fishing Central Oregon book, send $29.99 to Gary Lewis Outdoors, PO Box 1364, Bend, OR 97709 To contact Gary Lewis, visit www.GaryLewisOutdoors.com
/articles/chironomids-stream-channels
Making Sense of Scents
Where superstitions rule on my boat, making sense of scents is a bit of a challenge. What scent, how often to apply it, and washing things down at the end of the day are all done with a nod toward my personal superstitions. Get it wrong, and I’m facing seven years of bad luck! Whether or not you’re superstitious, here are a few smelly tips to help ensure luck is on your side.
The application of scents to your lures and bait can act as an attractant or bite stimulant. It can also mask odors that repel fish. You can help reduce offensive orders by keeping your hands clean and free of sunscreen, bug repellent, petroleum products jellyfish goo, and tobacco products residue. On the day of your fishing trip, try to use unscented soaps or a light vinegar solution to wash your hands.
The use of scents should complement your game plan. They should work together with your presentation, location, and gear set-up.
There are numerous scent formulations out there: gels, liquid, sticky liquid, wax, oils, and water-soluble. Most scents are available in different “flavors".
Frequently scent oils are used to infuse other bait to create a hybrid cocktail that your target species will find irresistible.
With most sticky liquids, gels, paste and waxes you simply apply a small amount to your lures and let it work its smelly magic. Apply a thin even layer to the underside of spoons, spinner blades and plugs. Assure that the application doesn’t hinder the lure action. Scents can be very effective when applied to your dodgers or even downrigger balls.
Water temperature is your driver for how frequently to refresh your scent. With warmer water, you should pull your gear and refresh the scent more frequently. For most fisheries, I check the gear every 20 minutes or so and reapply the scent at that point.
When using some of the paste type of scents it is a good idea to wipe your lures down between each application. Otherwise, you may experience waxy buildup which could affect the lure’s action or even your hearing. What was that, did I just hear a groan?
If using a scent cocktail that includes dyes, it is a good idea to wear nitrile gloves and work over a towel or a work surface separate from your boat. Bait dyes are potent and will stain both your boat and skin. There were many times during my suit and tie days when I was giving a presentation with orange, pink, or blue fingers
Liquid scents can be used to marinate herring, shrimp, white shoepeg corn, chicken livers, salmon eggs, and dough baits. Place your bait of choice in one liquid scent or another overnight.
One of my go-to kokanee baits is tuna corn. A day before a trip I upend a can of white shoepeg corn into a mesh strainer and let it drain overnight in the fridge. Then I open a tin of packed-in oil tuna and pour the excess oil into my drained corn. I divide the corn/tuna juice mix evenly between some small containers or Zip-Lok snack bags and then add a different scent of oil to each container or bag.
Many freshwater salmon anglers marinate herring, sardine fillets, or shrimp in their secret mix of scent oils and amino acids then use the enhanced bait for trolling or wrapping their plugs.
Regarding flavor, everyone has their personal favorites for a given fishery. I find that garlic, anise, and carp-spit oils work best for Westside kokanee. For most Puget Sound salmon fisheries, I am partial to Anchovy. For general freshwater fishing, you can’t beat nightcrawler/garlic or anise. These are a few of my personal preferences (superstitions). There are a gazillion different scents available. Here in the PNW, scents like anise, sand shrimp, krill garlic, or bloody tuna seem to enhance any fishery.
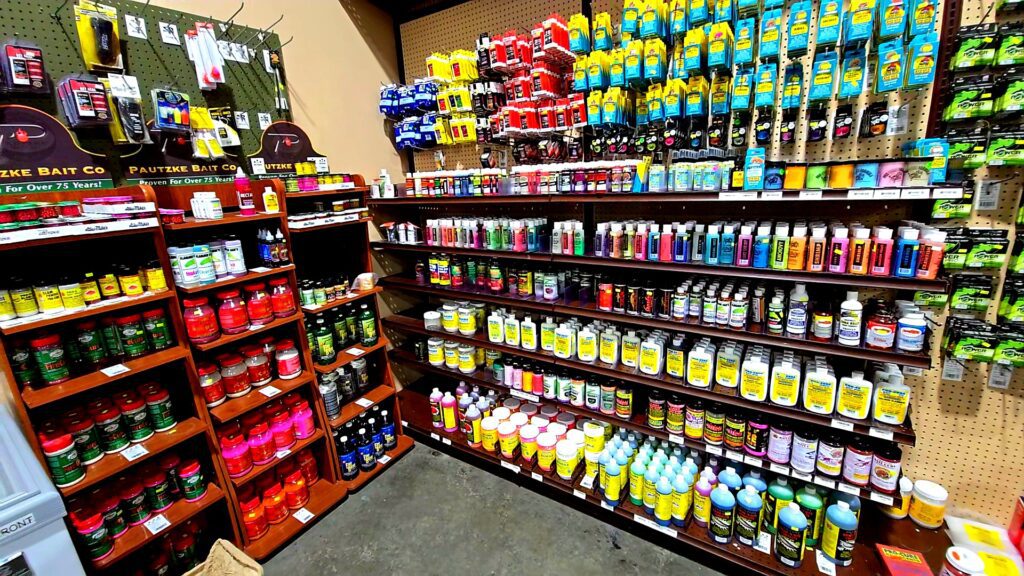
It would be a good idea to visit a tackle shop in the vicinity of your fishery to pick up the local favorite. With its proximity to some solid fresh and saltwater fisheries, Holiday Sports in Burlington is a great source for local fishing information. Their scent corner is well stocked with numerous brands and different scents.
Any scent discussion must include a segment on proper storage. Scents have different shelf lives depending on the product. Generally, they are:
Super Gels, Sauces and Paste: 7–10 years
Bait Oils: 3–5 years
Water Soluble: 3–5 years
It would be a good idea to use a permanent marker to mark the purchase date on your scent bottles. Typically, you’ll run out before they are ineffective but knowing when you purchased them gives you something to talk about. “I caught that huge walleye on 10-year-old worm sauce”.
A couple of thoughts on storage:
On the boat store your scent collection out of direct sunlight in a cool place. While fishing I put a wet towel over my scent containers on my workstation, making sure to keep it damp as required.
At home store them in a dry, cool place. Preferably a metal cabinet in the garage or in the bait/beer fridge. The mice in my garage love to chew through scent bottles.
At the end of the day, make sure you clean your gear. Being superstitious I use Lemon Joy to wash all my lures and attractors. Lemon Joy or not, just make sure you clean everything after each trip.
Where your local knowledge, trip planning, gear set-up, and presentation are important in a successful outing, the use of scents will help you consistently fill the fish box.
Proper scent storage, application, and clean-up will go a long way in making sure your fishing trip doesn’t stink!
/articles/making-sense-scents
Essential Kokanee Science
So, you want to become a better kokanee fisherman? Yes, we all do. I assure you that you can be, but it takes some effort. It is not just getting out on the water, but it is using solid knowledge about kokanee that will make you more effective when you are on the water.
A while back I put together a wheel showing the inter-related concepts that occur in successful kokanee fishing. For a starting point of this paper, please consider:
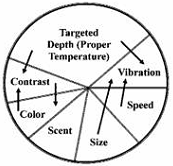
The idea is that if you get all of these factors right in your presentation, then you are fishing with 100% efficiency. There is some truth that IF you are in the right temperature zone, using a correct dodger at the right speed, then you are hovering around 50-55% effectiveness. Even a blind sow gets an acorn occasionally. But you will be at 0% effectiveness if you are not in the correct temperature and using the wrong presentation setup. As a fisherman, you already know that from practical experience. Taking the time to learn about all of these related factors will most likely help you become a better overall fisherman for kokanee and other species as well.
The single best predictor of kokanee location is temperature. I am not talking about surface water temperature, but rather the correct temperature down in the water column, or temperature at depth. For kokanee, the preferred temperature is close to 54 degrees. They can indeed be found at temperatures between 44 and 59 degrees. Below 54 degrees the kokanee are less active. Much above 54°, any extended stay will have detrimental or even lethal effects. Kokanee biology functions best at 54 degrees, and they will seek it out if it is available.
That temperature provides the most efficient growth from feeding. That temperature also allows for the least amount of energy consumed for swimming and generally being in the business of being a kokanee. Wherever that 54 degrees is in the water column, that is your target depth. Early season temperatures may not be as high as 54°, which accounts for sometimes slower fishing. There are a few reliable devices available that you can use such as the Fish Hawk model 840. Search Amazon for more options.
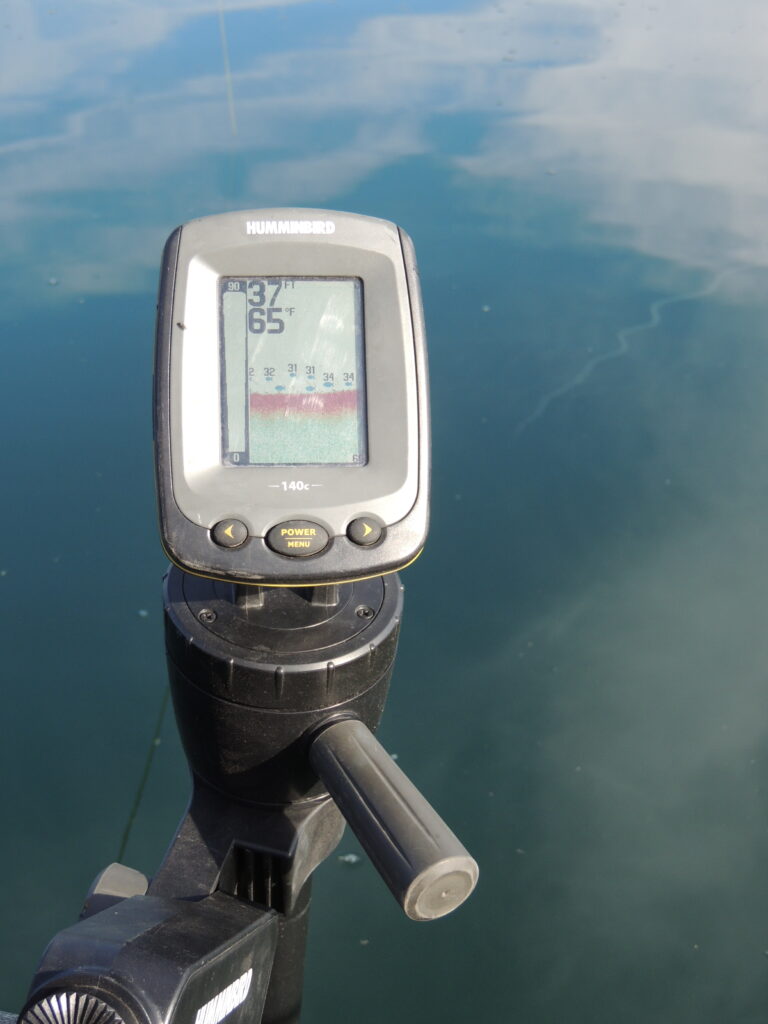
Since kokanee have a very elongated air bladder, you can use your fishfinder to determine their approximate depth. Kokanee will show a bright orange with a color fishfinder. Take an average depth of the images and have that as your initial target depth. Set your presentation within five feet top and bottom of that target depth. If the fish that hit your presentation are smaller than what is generally being caught, lower your target by five feet. Continue this process until you are zoned in.
Generally, kokanee fishing picks up in the spring, when water temperatures are warming, and continues through August. This period can be broken down further into categories, each with distinctive features and methods for the best approach to your fishing. But to grasp the reasons for the differences, some additional discussion is necessary.
Zooplankton is animal plankton. Zooplankton can move about without being totally dependent on current and wave/wind action. For our kokanee, the most important zooplankton are daphnia (water fleas). Daphnia are intolerant of light and when sunlight hits the water, daphnia descend down the water column. In spring, the kokanee are waiting for them from below. The chase often ends (or continues) with kokanee jumping out of the water, much to our entertainment.
The absolute enemy of kokanee is the tiny mysis shrimp. Mysis eat the phytoplankton at such a rate that it virtually eliminates the food supply available to young kokanee. If there are no young kokanee, soon there will be no mature kokanee. These lessons were learned too late in Flathead Lake and Lake Tahoe.
As long as the kokanee can find that plankton in their preferred temperature range, all is good. Kokanee gorge and grow and grow and gorge. But as the season progresses, 54 degrees continues to lower in the water column and reaches a point where there is no growing phytoplankton where the 54-degree temperature depth is located.
The temperature range has dropped in the water column to the point where 54 degrees is below 10% light. The result is that the phytoplankton, though abundant, is in a temperature that is too warm for the kokanee. When that happens, kokanee will stop eating. And stop growing too. This is when kokanee enter the pre-spawn period. And changes start happening to the kokanee, as their stored energy (from gorging) is then directed to those body parts necessary for spawning.
A key factor for growing large kokanee is how long that 54 degree zone can remain within the growing plankton. Keeping that zone in the phytoplankton is influenced by inflows (the cooler the better), reservoir depth, and amount of heating (infrared) by the sun. If the water warms too quickly, kokanee will not have enough time to feed to achieve their maximum potential size. And there can be even more dramatic size downward if there are too many mouths for the available food supply at the temperature where kokanee prefer. Obviously, the spring weather and natural spawn success have a lot to do with it in either case. A mild spring, with an excellent slow melting substantial snowpack is ideal.
You can easily confirm the pre-spawn time. If you land a kokanee and clean it, and if the stomach is empty, that not only tells you it is pre-spawn, but it also tells you that the 54 degrees is now below that 10% light threshold in the water column. Fortunately for us, kokanee will continue to strike out at a proper setup, even in reduced light. Even in no light.
Understanding this fundamental principle that water absorbs light and that there is always less light at depth is the first step in deciding what dodger and lure combination (the setup) to fish.
To proceed further, we have to understand another two interlocking principles. Kokanee are first attracted to proper vibration, then to color. It is not the other way around. Proper vibration and color cannot be separated.
Yes, scent does play a role, but even the correct scent will not make up for a bad presentation at incorrect depth, speed, and dodger/lure choice. In fact, a bad scent choice will condition the kokanee not to strike. That is one of the best reasons to have scent choices on hand and to move to new fishing areas with a different scent. Simply staying in the same area but changing scents will do nothing to remove the bad scent already in the water. Only time and current can do that.
Regardless of species, we have all seen at times fish come and have a look at our presentation, only to swim away. When we send a setup to the target depth we are trying to accomplish two things. We want our setup to attract our target fish, and we want our setup to provoke a striking response to our lure. The whole point of kokanee fishing is to catch kokanee (and enjoy being on the water of course). But we do not put microscopic plankton or tiny daphnia water fleas on our hooks and go from there. As it turns out, kokanee are in fact attracted to colors, contrasts and objects that do not exist naturally in their environment.
Leading the proper setup is a dodger. The lure is then attached to the dodger by a short leader. Frankly, the shorter the better - a minimum of five inches but no more than 14 inches (except for apex types). The deeper your target depth is in the water column, the shorter the leader. For squids, RGTs, hoochies and bugs a five-inch setback is more productive than a 14-inch setback regardless of target depth.
But what does the dodger really do? The dodger is the most crucial part of your setup.
As the dodger moves forward through the water, it displaces water. When water is displaced, it creates a wave. The kind of wave and its intensity is determined by the shape of the object moving in the water and how fast it is moving. While a sleek shape will still make a wave, a shape that moves side to side will produce more intense waves. Squids, RGTs, hoochies and bugs are sleek. But while they still make a wave as they are pulled through the water, they do not make much of a wave. Yet place them a short distance behind a dodger that is moving side to side, and you have given your sleek presentation abundant action.
This back-and-forth displacement of water is creating a particular kind of wave: a low-frequency sound wave. Even though we cannot hear it, the important thing is that kokanee can hear it. How they can hear it deserves some comment. Kokanee have three tools to aid in sound detection. The first is their inner ears up front. The second is the lateral line on each side. Lateral lines are really a series of pores that contain a network of sensory structures called neuromasts. The third is the very elongated air bladder that kokanee have (much longer than in other freshwater fish). This air bladder acts like a drum in picking up sound waves. The three tools work together to give the kokanee a three-dimensional picture of what direction the sound is coming from.
Be assured that the sound you are creating with your dodger travels outward, upward, downward, backward, sideways and forward at speeds way in excess of the speed you are trolling. And kokanee can swim way faster than you are trolling.
If you are to be a successful kokanee fisherman, then you want your setup to make the kind of sound waves that will in fact attract kokanee. This is to also say that if you want to be a successful kokanee fisherman, you do not want your setup to make sound waves that repel kokanee. In my opinion, using flashers either ahead of the dodger or on the downrigger ball produce just the kind of sounds that repel kokanee. The reasons are basic.
Every manufacturer of flashers claims that their action produces sound that mimics wounded baitfish. And that they do, without question. Essentially flashers are predator attractants. Except kokanee are not attracted to wounded baitfish. But fish that eat kokanee are attracted to wounded baitfish. Any right-thinking kokanee (a survivor) has learned the sound of predators and what attracts them.
Kokanee hear that sound and go the opposite direction. You might in fact pick up a kokanee using flashers because there is always a really dumb one in the mix. But you will scatter the rest quickly. Many times I have heard and read that when the fishing is slow, use flashers. Bad advice. If the fishing is slow, change your setup to a larger dodger and different matching lure. Change location. Change scent. Change speed. Adjust depth.
Next month I will go further into kokanee eyesight, colors, and presentation to up your kokanee success.
Gary Gordon | Fish With Gary Tackle Company
")
/articles/essential-kokanee-science
Five Great Lure for Spring Bass Fishing
I love fishing for bass in the Spring! Bass are as big as they are going to get all year and as water temperatures warm and bass prepare to spawn, the bite can be amazing! By early May in the Pacific Northwest, with water temperatures around 60 degrees in many lakes, you can easily catch and release twenty-five bass a day. Here are five lures I love to use in the spring to help me get that done.
FOOTBALL HEAD JIG
A weedless jig is a lure that works all year long. The football head jig can be pitched or flipped into a variety of places bass like to hang out to include under docks, into brushy cover, rocky or gravel areas, beaver huts, flooded timber and the list goes on. I like to use a quarter, 3/8th ounce or half-ounce jig depending on how deep I am fishing.
One way to fish a football jig is to let it hit bottom and then slowly jig it back towards you. Most bites occur as the jig falls back towards the bottom. Another way is to us a sweeping motion with your rod, allowing the jig to drag across the bottom.
I always put a soft plastic trailer on any jig I am fishing with for bass. Good colors to use are black and blue or a green pumpkin.
CHATTERBAIT
A lot of bass anglers swear by the chatterbait for springtime fishing. This bait features a metal blade on top of the jig head that flashes and vibrates through the water. The chatterbait was popularized by Z-Man, and their original Z-Man ChatterBait still catches fish, especially in the spring. Many anglers, me included, let the chatterbait fall to the bottom and then retrieve it at a moderate pace next to brush or weed lines or near woody structure. If that does not work, try a very fast retrieve, even in colder water. That is a tactic Kyle Clark, an avid tournament bass angler and the owner of PNW Fishing Adventures, swears by.
A three-eighth to half-ounce chatterbait is a popular size to fish at depths of 10 feet or less. Popular colors are white, brown/black, black & blue and in stained water, chartreuse.
SENKO
When the bass are on their spawning beds a soft plastic worm called a Senko is hard to beat. This is a shallow water offering and precise casting while sight fishing for bass is a key to success. The number one color to fish is green pumpkin but at times, a purple worm with blue fleck can outshine the green pumpkin. I personally like to fish with a five-inch Berkley Powerbait Senko called The General, because the bass seem to hold onto it longer. However, many other serious bass anglers prefer Senko baits made by Yamamoto.
The Senko should be fished without weight. You can fish it Texas rigged through the nose and watch it slowly fall towards where the bass are. Others will fish it wacky rigged, with a hook right through the middle of the worm. The way a wacky rigged worm falls triggers vicious strikes from bass as it slowly undulates down through the water. Use a #2 or #1 Wacky hook and if you can find ones with wire weed guards that will help prevent some of the snags, you’ll encounter fishing around flooded timber and shrubs.
LIPLESS CRANKBAIT
The lipless crankbait can be fished in cool waters but really starts to prove itself when the water temperature hits 55 degrees. Bill Lewis came out with the original Rat-L-Trap decades ago. This is a hard lure with a slim profile designed to produce a very tight wiggle. BBs inside the lure provide a rattle as the lure is retrieved.
A lipless crankbait is a great search bait because it can be cast a long distance, and you can cover a lot of water looking for schools of largemouth or smallmouth bass. In the latter half of spring (and all the way into autumn) you can fish the lure with either a moderate or rapid retrieve. Very short pauses as you retrieve often trigger strikes. I like to fish this lure along rocky riprap or just outside the edges of cover like flooded willows or weed lines.
A number of companies manufacture lipless crankbaits. In recent years, I have gravitated to the Berkley War Pig. I have a couple of plastic tackle boxes filled with half ounce, three-inch War Pigs in a variety of colors and they have become a true high-confidence lure for me. In the spring red can be a good color or you can match the hatch and try fishing lures that imitate trout, perch, bluegill, or bass.
FROG
Never overlook a soft plastic, weedless frog for springtime bass. They are generally made with a hollow body and have hooks on the back of the body. The “legs” of the frog provide action that attracts bass, and if you have a concave face on your lure, a popping retrieve will often attract even more bass.
This is a lure designed to cast into the weeds or lily pads where you would not dare throw a traditional lure. Jerking the lure on top of the water and weeds can generate strikes from bass that erupt out of the water to smash the lure. The number one mistake most anglers make while fishing frogs is to set the hook too soon. As tempting as it is to set that hook when that bass comes out of the water, you need to wait until you feel the weight of the fish at the end of your line. That is when you set the hook with a hard jerk and begin fighting that bass.
Conventional wisdom says frogs (and other top water lures) fish best in the early morning and in the evening. However, a weedless from is a lure you can really fish all day, especially on a cloudy day.
So, there you go, five great lures to help you catch more bass from March through June (and beyond). Fill your tackle box with these staples and make the most of your day on the water with more hook-ups. You’ll be glad you did.
John Kruse

/articles/five-great-lure-spring-bass-fishing
Cowlitz River Steelhead Stories
The Cowlitz River is truly legendary for its hatchery steelhead run. It is a reliable producer year after year. Many of us here in the Northwest, myself included, caught our first steelhead out of this river. I'll never forget seeing my bobber go down and watching in awe as a 17-pound steelhead exploded out of the water.
My heart was pounding as I fought to hold on while it furiously tried to shake my lure. It was an unforgettable experience that motivated me to return each year. For better or for worse, steelhead can be tricky to figure out. This is what makes them so sought after and rewarding to catch. A bit of preparation and extra knowledge on your side might just be what tips the scales in your favor. Let's take a look at how to have a more successful trip to the Cowlitz River.
Tackle Tips
Like all fisheries, your first step will be gearing up. All traditional steelhead methods will produce fish on the Cowlitz, depending on the day. You will see plunkers, drift fishermen, and bobber fishermen. Plunkers will generally throw Spin N Glo's baited with shrimp and/or eggs, or plugs. Drift/bobber fishermen use bait, yarnies, jigs, or beads.
I will usually bring 2 or 3 rods so I can use multiple techniques without wasting time on the water retying. Experiment with all these different techniques and see what you like. Each technique has its advantages.
Plunking can be extremely effective because you can target moving fish. Beads are becoming more and more popular because they are a small, natural presentation that works well when fish aren't aggressively biting. Jigs are extremely versatile and eye-catching, especially for fresh fish. Vary up your technique and pay attention to what's working for other anglers as well.
Regardless of technique, it certainly helps to start by arming yourself with knowledge about the species you're targeting. Steelhead are clever and wary. Keep this in mind, even when choosing something as simple as your leader line. Use clear bobbers and light line, preferably fluorocarbon.
Your presentation should be as invisible as possible. Part of the challenge of steelhead fishing is finding the right balance of gear that won't spook the fish but also won't break from a thrashing, jumping fish. Steelhead put up a tough and acrobatic fight. Practice tying your knots before heading out, they will be put to the test.
River conditions are also critical to keep in mind. When the water is low and clear, use small presentations. When it is high and murky, use large presentations. I always recommend having some hardware in your tackle box.
Spinners and spoons can sometimes entice fish that won't bite jigs or beads. Their flash will attract fish from far away. It's a quick and efficient way to work a large amount of water if you aren't sure where fish are holding.
Try fishing seams between fast and slow water. Steelhead also love to hang out around rocks. Read the water and think like a fish. Try a variety of angles and retrieve speeds. If you're using a bobber, you can play with the depth of your presentation. I'd recommend changing up your lure often, even if it's just changing colors. Part of the fun is just changing up your strategy.
Locations
Whether you're fishing from a boat or on shore, Blue Creek will likely be your destination. It is the focus for most steelhead anglers. Blue Creek Boat Ramp can launch two boats at a time and has a large parking lot.
Like most rivers, the Cowlitz is best fished from a boat. It's wide and deep enough that jet sleds are very common, but you will see some drift boats. That isn't to say that bank anglers won't have success. There is plenty of shore access around Blue Creek. If needed, there is an ADA wheelchair-accessible platform near the fish hatchery, relocated from its previous spot in Blue Creek.
If you've never been to Blue Creek, be warned. When the fishing is hot, it gets crowded. Be prepared to hike or wade a bit if you're looking to get some peace and quiet. If you're traveling from afar and need accommodations, Centralia or Mossyrock are probably your best bets. There are good restaurants and hotels in both cities.
As always, check the rules and regulations before heading out. The Cowlitz is subject to emergency rule changes. It's a good idea to check Tacoma Power's website to see the current water visibility and flow. Preparation is key, especially if it's a long drive for you. Good luck out there!
/articles/cowlitz-river-steelhead-stories
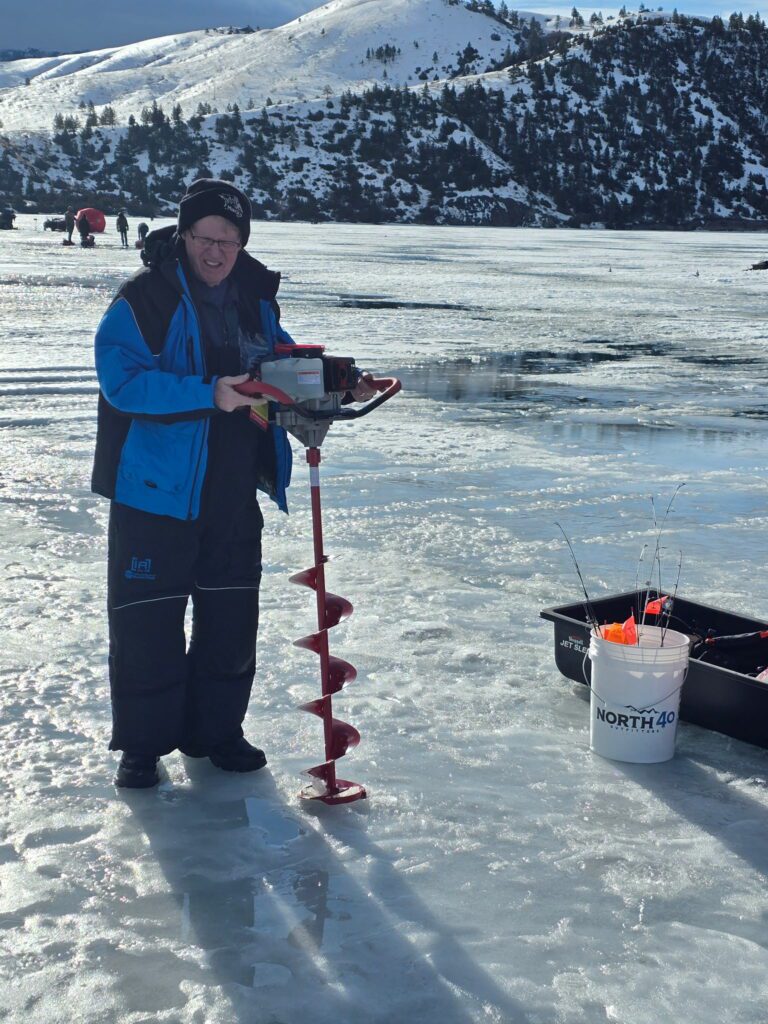
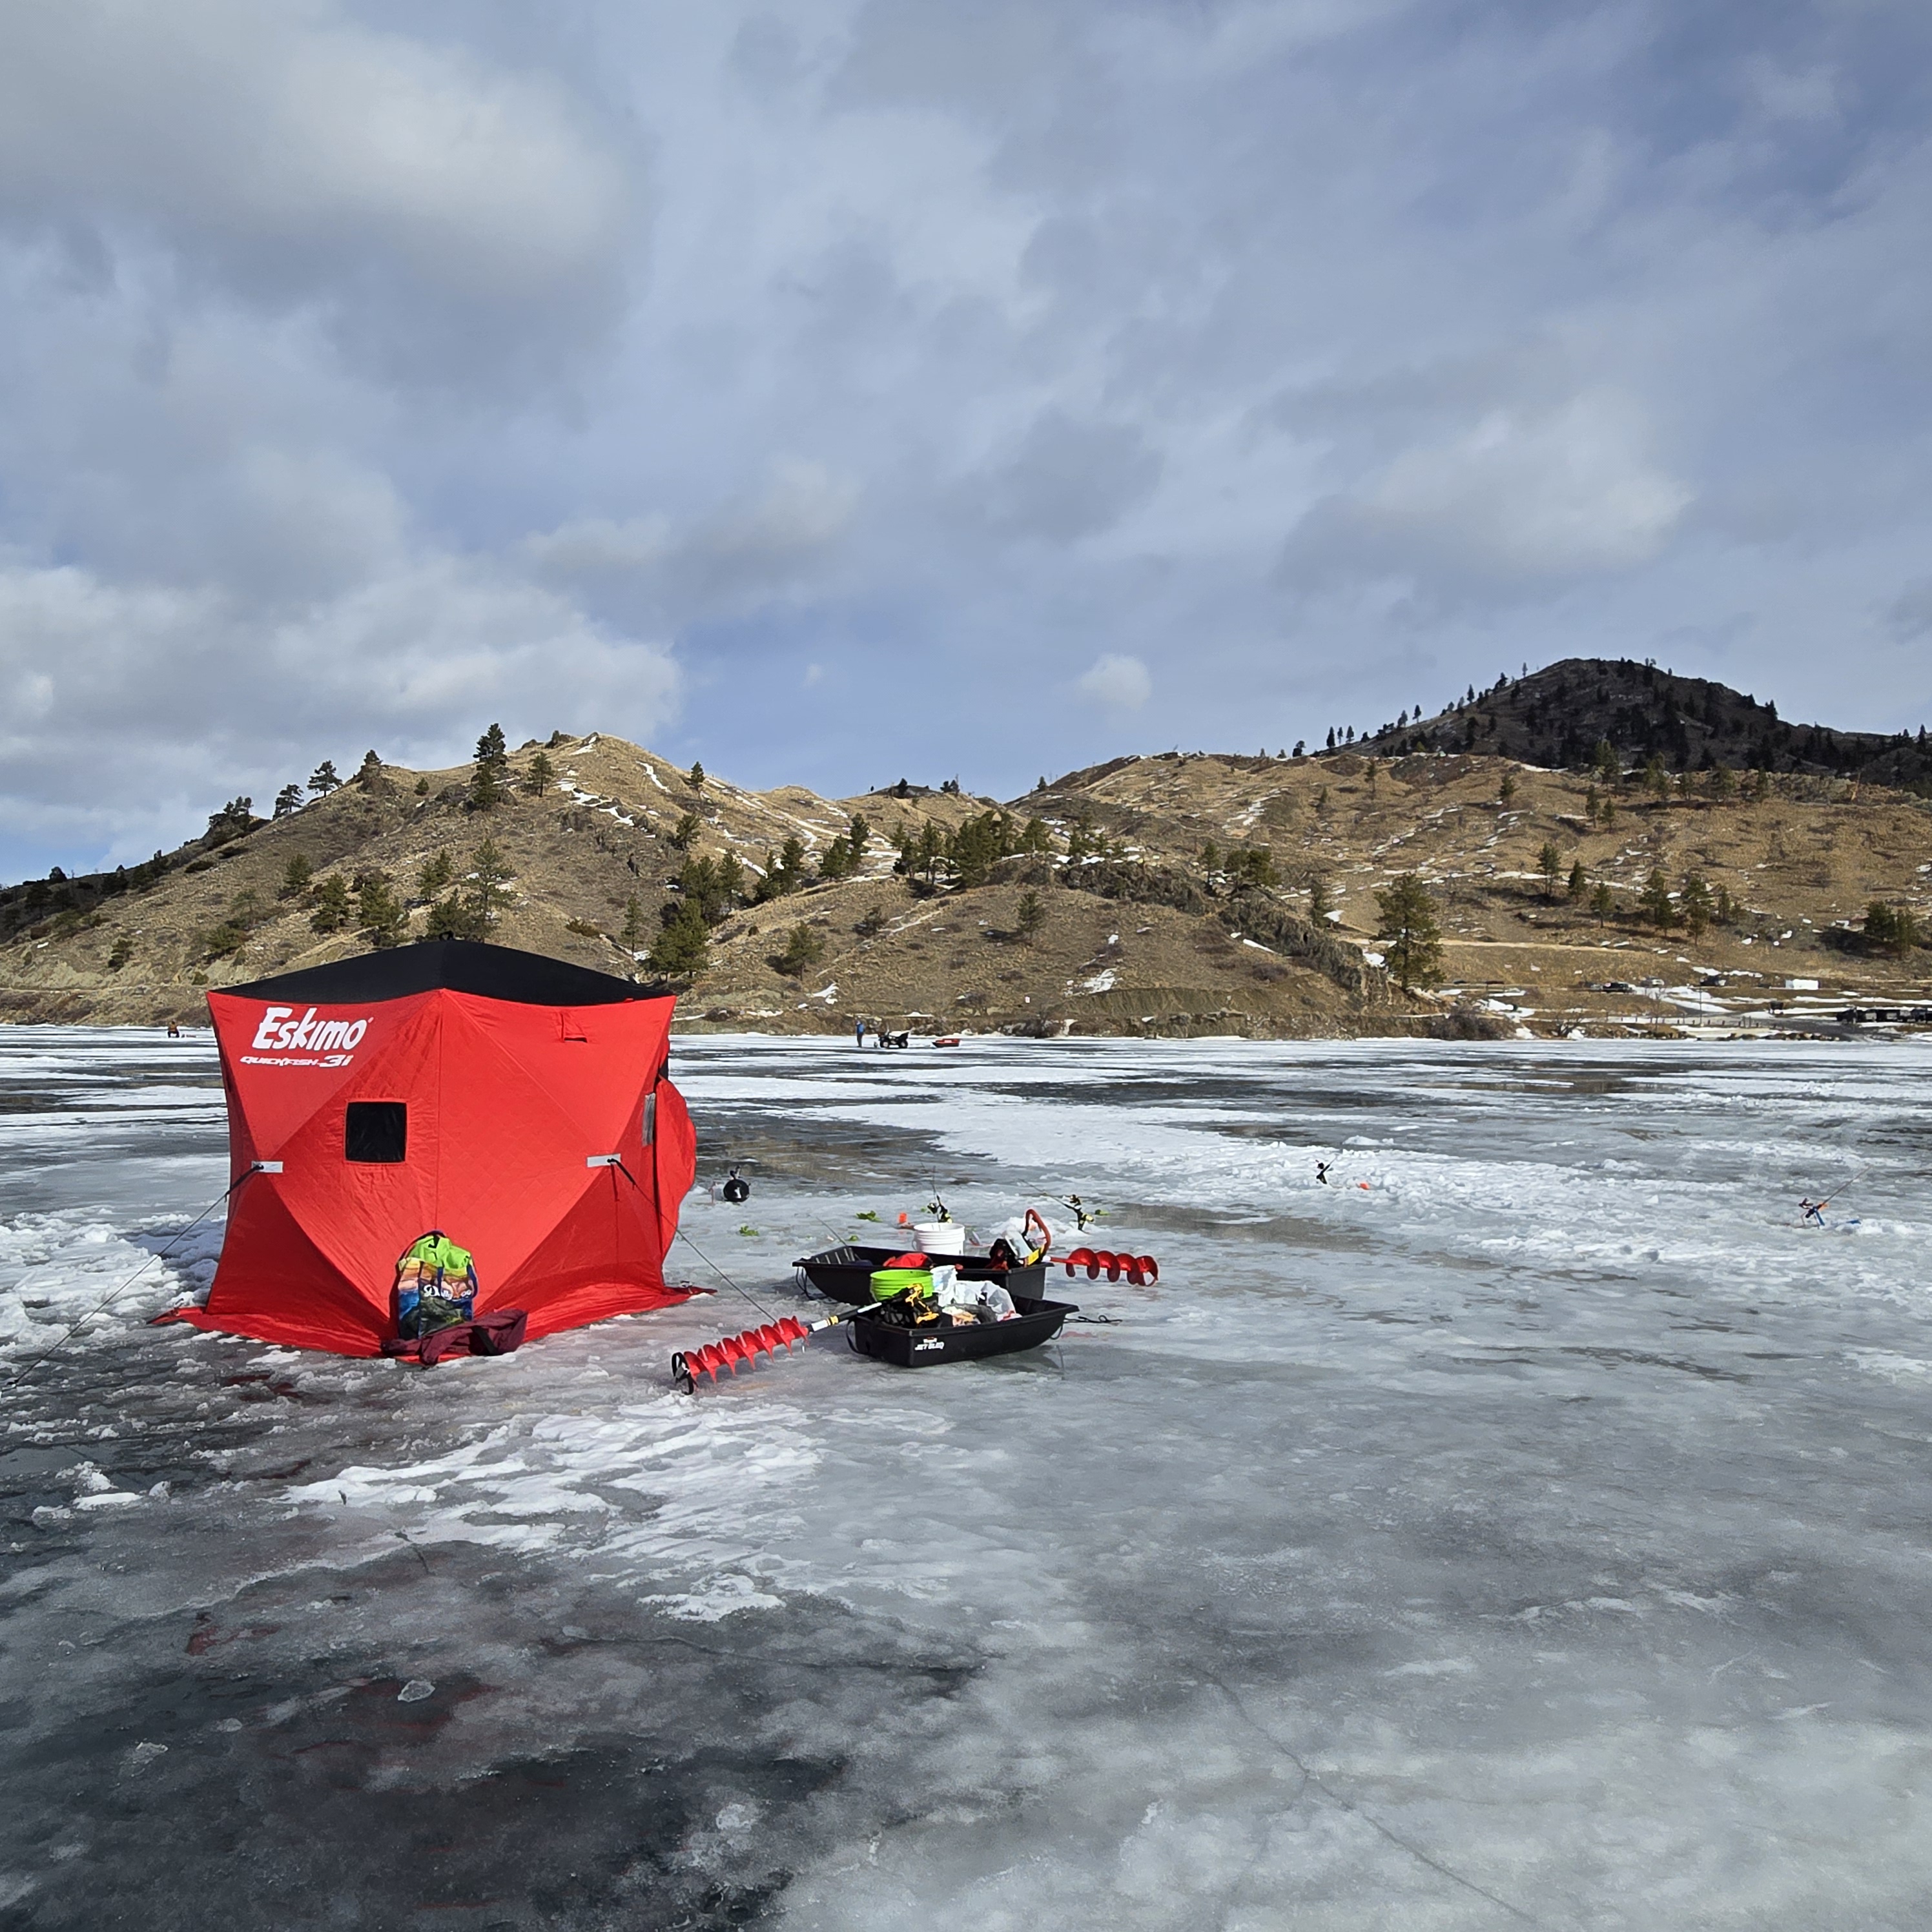
Drill Baby Drill
The evolution of an ice fisherman parallels that of other angling pursuits in many similar ways. There are the initial baby steps, followed by a slow, but steady progression down the uneven road of knowledge. Over the course of time and experimentation, the neophyte grows in understanding of his craft, with the final result being a functioning ice fisherman, capable of venturing out and having a modicum of success.
My journey, I imagine, is not much different from any others. I’ve reached the point where the “watch one, do one, teach one” adage of my nursing profession gives me the credentials to share a little knowledge with readers new to ice fishing.
If you are at the beginner stage of ice fishing, one of the things that may make you scratch your head and seek advice, are the various options of creating a hole in the ice to actually fish. There’s more than one way to drill a hole, so let’s run down some of your options before sinking too much money into an unproductive “hole”.
First, the “caveman” approach. For this technique, you’ll need a hammer. Yes, you’re reading my mind. With a hammer, you can break through previously drilled holes. The advanced hammer technique would be to bring a large chisel and hammer. Before the seasoned ice anglers laugh too much – this technique does work. The problem is it requires a lot of work! And finding relatively fresh holes to open. A variation of this technique is to use a Spud Bar, a full-size 6-foot pole with a hardened blade on the end of it. Again, it will work and as a bonus give you a nice cardio workout to boot. I predict you will quickly move up the ladder to more refined hole drilling methods.
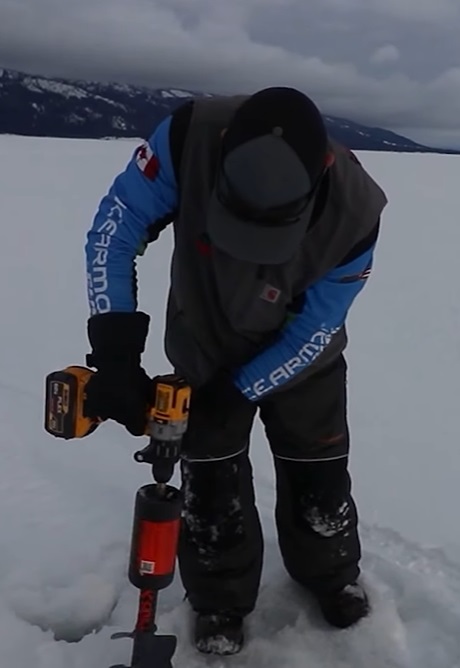
Handheld augers have several advantages for new anglers. First and most importantly, they work. Second, they are an affordable solution if you’re on a budget or still at that phase of deciding how deeply you want to plunge into this winter sport. Third, they are carbon neutral (and as such the State of Washington should give its users a tax break…). Finally, they are also a great cardio workout. That said, when my 33-year-old strapping son tells me it’s a lot of work, as a new Social-Security-receiving citizen, I know I can pass on manual ice augers.
Which brings us to power augers. Our ancestors didn’t conquer fire for nothing!
As you explore the world of powered ice augers you’ll find three different styles, all of which work and each of which have their own advantages and disadvantages.
First, let’s look at the electric drill ice auger. Electric augers have a couple of nice advantages. First, they are not as noisy as gas augers. That’s important to some of us who value the peace and quiet of ice fishing, not to mention not scaring fish. Second, they tend to be lighter than gas augers. As you get more into ice fishing, you’re going to find your sled filling up with more “essential stuff”. Having a lighter ice auger means you can carry other “stuff”, i.e. crap. Electric ice augers can be further broken down into two subsets – self-contained augers and drill-attached augers. The self-contained have everything you need to start drilling. The electric drill auger requires a separate drill that attaches to the auger, and batteries to run it. This drill should be brushless for longevity and should have a minimal amount of power available, around 700-inch pounds with an ½ inch drill chuck and at least a 4amp battery. An underpowered drill will not get the job done and will likely destroy the drill in short order.
Electric drill ice augers work, and many people use them. That said, they have a big negative: batteries. Drilling a 6” deep hole is a piece of cake, but when you get into 12-18” of ice be prepared for a slower process, and more importantly, rapidly depleting batteries. Today’s batteries do not like cold weather and require that you bring several extra batteries. That adds both cost and weight to the equation. These batteries aren’t cheap.
The newer self-contained electric drills are lighter than gas, and the batteries last longer. They are also more powerful than most electric drill augers. However, they are also pricey, costing upwards of double the price of a gas-powered auger.
Both hand-powered and electric augers lead us to another disadvantage – less opportunity to drill more holes and move around. When that battery is done, it’s done. This brings us to the next ice augers class.
Gas-powered ice augers give anglers a tool that doesn’t limit one’s day of drilling. With a tankful of gas, you’ll be able to “run and gun” with the best of them. Drilling holes is easy and fast. The negatives of gas augers are the weight, the sound, and the odor. A variation on the gas auger is a propane auger. The only disadvantage I’ve heard about propane is that the bottles can freeze up in colder temperatures. Gas augers also can have issues with reliability and starting and require routine maintenance to be in top working order. The noise of a gas drill can spook fish as well.
I used an electric drill auger last year, and while it did the job, I was frustrated by the slow drilling and the depleted battery issue. After finding a lighter-weight (26-pound) gas auger on sale recently, I pulled the trigger. I’m excited to give it a try, especially on those 12-18” thick lakes and reservoirs.
As you can see, there are several options for drilling holes in the ice, each with its own set of advantages and disadvantages. It boils down to personal preference and cost.
Whichever route you go, stay warm and safe on the ice!

/articles/drill-baby-drill