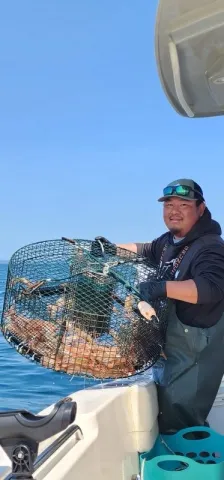
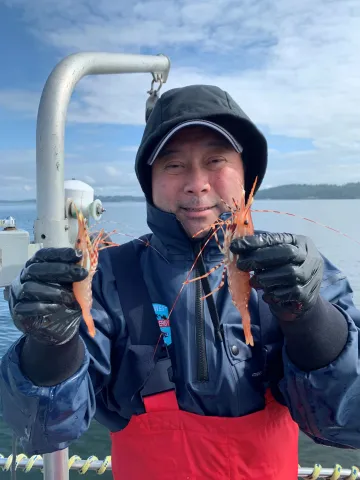
It's "Shrimp-tacular" Season! by Mark Yuasa
When it comes to spot shrimp fishing, May and June are a “shrimp-tacular” time to be on the water in Puget Sound, Hood Canal, San Juan Islands, and Strait of Juan de Fuca.
The recreational spot shrimp fishery will open on May 24 in many Puget Sound marine areas, with additional dates scheduled in several areas into early July. The one area to have an opening prior to May 24 will be Marine Area 12 (Hood Canal), which will have an early opportunity on May 10.
“Test fishery data in Marine Areas 9 (Admiralty Inlet), 10 (Seattle-Bremerton Area), and 13 (South Puget Sound) continue to indicate low abundance of spot shrimp,” said Don Velasquez, a Washington Department of Fish and Wildlife (WDFW) Puget Sound shellfish biologist. “As a result, these areas are not scheduled to open for recreational spot shrimp harvests in 2026 (similar to the closures in 2025).”
WDFW fishery managers selected the shrimp fishing dates to offer opportunities to harvest spot shrimp while distributing participants and reducing the chance of exceeding recreational harvest quotas. Due to high expected turnout, some areas cannot support weekend openings while remaining within their current quota.
To ensure a safe and enjoyable experience, shrimpers are encouraged to monitor weather conditions and avoid launching or leaving the dock if their vessel can’t safely participate. Check with local access ramps and marinas ahead of time to stay informed on potential closures or fee changes. Allow extra time for launching boats, show courtesy to others at the boat ramps, and respect others’ gear while on the water.
Spot shrimping is one of Washington’s signature recreational fisheries that occurs during the spring for these tasty prawn-sized denizens of the deep.
In all open areas of Puget Sound, the daily limit per shrimper is 80 spot shrimp with a total daily weight limit of 10 pounds (whole shrimp) for all species of shrimp combined. Shrimpers who retain only spot shrimp may remove and discard the heads while in the field and before returning to shore. Shrimpers retaining any shrimp species other than spot shrimp must continue to retain the heads until finished and on shore to verify compliance with the 10-pound daily limit.
To avoid going over the daily limit, count your catch not once but twice or three times and put each limit into separate containers. Nothing is worse than being checked and finding out you’re one spot shrimp over the daily limit. Also, keep in mind that each angler can have only two traps and a maximum of four traps per boat, meaning when you are near the point where you only have one last limit to catch, you cannot have four traps sitting in the water.
More information on recreational shrimp fishing rules, seasons, and marine areas is available on WDFW’s webpage, including a webpage on shellfishing gear rules at https://wdfw.wa.gov/fishing/shellfishing-regulations/gear-rules.
Shrimpers are reminded that traps can be set one hour before official sunrise during any open period in the marine areas without specified harvest hours. These include Marine Areas 4, 5, 6 (except for the Discovery Bay Shrimp District), Marine Area 7 East, Marine Area 7 South, and Marine Area 7 West. The pots must be removed from the water in these same areas by one hour after sunset at the end of an open period. The start and end times for all other areas are listed above.
Seasons for non-spot shrimping (dock, coonstripe, sidestripe, and pink shrimp only) will begin later this year and will be announced separately. During non-spot shrimp seasons, 1/2-inch mesh pots are allowed, depth restrictions are in place, and all spot shrimp are required to be released immediately.
A rule adopted in 2025 prohibits setting shrimp gear from a vessel near 19 designated Washington State Department of Transportation-managed ferry terminals in Puget Sound and the San Juan Islands (Marine Areas 7, 8-1, 8-2, 9, 10, and 11).
Shrimpers and other boaters are reminded to follow Washington rules to help protect endangered Southern Resident killer whales (SRKWs). Under state law, recreational vessels in Washington waters must stay 1,000 yards away from Southern Resident killer whales (SRKW). For details about steps boaters and fishers can take to keep the whales – and themselves – safe, refer to the Be Whale Wise website at https://www.bewhalewise.org/.
Tips to catch spot shrimp
Top of the list when planning a spot shrimp fishing outing is to make sure all your gear – pots rigged correctly, yellow buoys, line, cooler and ice, electric pot puller, and boat motor – is ready to go, and the bait is properly prepped before you leave home.
Another key point to keep in mind is that this highly popular fishery draws hundreds of anglers, so allow yourself plenty of time to get to the boat launch and secure a parking space, which can be limited depending on the area.
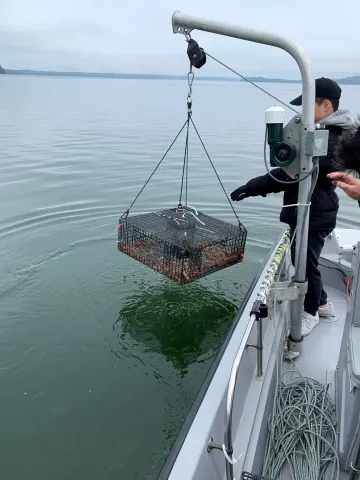
One of the tips that can make or break success is knowing where the schools of spot shrimp are congregating. The majority of spot shrimp can be found in deeper depths along steep ledges, drop-offs, and sharp inclined bottoms, and usually lurking in 200 to 350 feet of water.
Once you’ve located them on the fish-finder, make sure to scatter your pots across a broad area and set them at various depths because schools of spot shrimp tend to move around quickly depending on the tides and currents.
The amount of weight to keep your pots on the bottom depends on the tide, current, waves, and wind. A safe bet is anywhere from 20 to 30 pounds, and be sure they’re evenly placed and secured around the corners of the pot. Allow a one to two-hour soak before the first pull. This provides you with at least two more chances during a brief four-hour fishing period.
The bait mixture is another important factor in catching spot shrimp, and prep a good slurry of bait ingredients and thickness similar to yogurt. Make sure the scent cloud is leeching out of the trap consistently.
For the bait itself, use a good amount of shrimp bait pellets mixed in with oily tuna, whitefish, or salmon in a five-gallon bucket. Bring a large ladle or scooper and latex gloves, as it can get rather messy, and nothing is worse than a bunch of stinky slime on the boat deck. Be sure to add several cans of cat food with small holes punched into them just before you drop the traps. Don’t forget to take around 25 to 35 extra cans of cat food; more is better than running out while out on the water with a grocery store nearby.
A medium-sized square pot with a bait barrel (bring extra bait barrels) connected to a four-way rope harness attached to each corner of the pot. Keep your bait barrel securely fastened to the trap with a wide strip of elastic cord. Using a biodegradable escape cord made of cotton (or other natural fiber) will degrade and reduce the amount of shrimp wasted if the pot is lost and required on all shellfish traps.
Having an electric pot puller is a wise investment, especially when pulling up a 35-plus-pound trap from 300 feet of water. The Scotty Electric Pot Puller and the Ace Line Hauler Pro are two ideal choices that can be placed onto a Scotty downrigger mount and plug.
For buoys, go with a large round (soccer ball size) yellow buoy (your full name and address is required on the buoy and must be legible) attached to a secondary buoy stick with a flag or staff. A phone number is highly recommended. Use a colorful flag or staff to help easily locate your own buoy among the thousands of other buoys set nearby. Always attach buoys with the rounded end towards the trap and not the flat end, which creates more drag and can snag floating debris. Never use empty containers (like a one-gallon milk container) as a buoy, and it is illegal since they create drag and fill up with water and sink.
For each pot, use at least 400 feet of sinking lead line. The line length is dependent on how deep you drop the pots. Tide changes will alter your water depth, so a good tip is to use a line that is 1/3 longer than the maximum water depth to prevent losing a trap. Avoid using lines with a large diameter, particularly those greater than 5/16 inch, which create more drag in a current and can pull lighter traps away from where they’re set. You can also add a weight to the line. Propellers can sever floating lines on the surface and will increase the chance of entanglement with floating debris. Before heading out, make sure the drop lines are coiled neatly and ready to deploy.
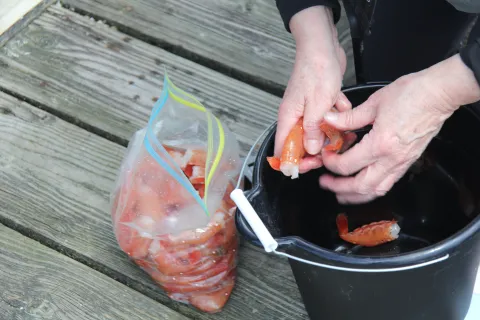
Spot shrimp are high in Omega-3 fatty acids with a nice, sweet flavor to the firm meat texture. They can be eaten raw, and if cooked, boil them for one to two minutes at most or until they turn pink. If possible, live spot prawns should be prepared the same day they’re caught to avoid them becoming mushy.
To keep spot shrimp in the best condition, ice immediately after you catch them. Shrimp can be kept in the refrigerator for a couple of days to be eaten fresh. Freeze immediately if you plan on saving them. Never store them with tap water, as chlorine kills them. If kept overnight, remove the heads as the digestive enzyme makes the flesh turn mushy.
Lastly, now that spring has arrived, you’ll need a 2026-2027 recreational fishing license valid from April 1, 2026, through March 31, 2027. WDFW offers two mobile apps https://wdfw.wa.gov/about/apps, and both apps are designed to make your outdoor experience easier and more efficient. MyWDFW serves both hunters and anglers, offering electronic tagging, harvest reporting, and access to licenses and permits, and go to https://wdfw.wa.gov/about/apps/mywdfw for details. The Fish Washington® at https://wdfw.wa.gov/fishing/regulations/app is tailored for anglers, providing fishing regulations, digital catch cards, and license management. Licenses may be purchased online at https://fishhunt.dfw.wa.gov/login or from hundreds of license dealers across the state.
(Mark Yuasa is a Washington Department of Fish and Wildlife Communications Manager and longtime local fishing and outdoor writer.)
Before making plans to go spot shrimp fishing, anglers should check the WDFW emergency rules webpage for possible in-season closures. at https://wdfw.wa.gov/fishing/regulations/emergency-rules.
Here are the 2026 spot shrimp fishing dates:
● Marine Area 4 east of the Bonilla-Tatoosh Line: Open daily beginning May 24. Shrimping is allowed during daylight hours only. The recreational spot shrimp season closes when the quota is met or Sept. 15, whichever comes first.
● Marine Area 5 (western Strait of Juan de Fuca): Open daily beginning May 24. Shrimping is allowed during daylight hours only. The recreational spot shrimp season closes when the quota is met or Sept. 15, whichever comes first.
● Marine Area 6 (Port Angeles Harbor, eastern Strait of Juan de Fuca, excluding the Discovery Bay Shrimp District): Open on May 24, May 26, June 7-8, and June 21-22. Shrimping is allowed during daylight hours only. An announcement regarding additional dates may be made later in the season.
● Marine Area 6 (Discovery Bay Shrimp District): Open on May 24 from 9 a.m. to 3 p.m. only. An announcement regarding additional dates may be made later in the season.
● Marine Area 7 East (northern Rosario Strait, Bellingham Bay, Sucia, and Matia islands, Strait of Georgia): Open on May 24, May 26, and June 7-8. Shrimping is allowed during daylight hours only. An announcement regarding additional dates may be made later in the season.
● Marine Area 7 South (Iceberg Point, Point Colville, Biz Point, Salmon Bank): Open on May 24, May 26, and June 7-8. Shrimping is allowed during daylight hours only. An announcement regarding additional dates may be made later in the season.
● Marine Area 7 West (San Juan Channel, Speiden Channel, Stuart, and Waldron islands): Open on May 24, May 26, June 7-8, June 21-22, and July 18-20. Shrimping is allowed during daylight hours only. An announcement regarding additional dates may be made later in the season.
● Marine Area 8-1 (Saratoga Passage, Deception Pass) and Marine Area 8-2 (Port Susan, Port Gardner, Everett): Open on June 8 and June 22 only with shrimp fishing allowed from 9 a.m. to 1 p.m. each day. An announcement regarding additional dates may be made later in the season.
● Marine Area 9 (Edmonds, Port Townsend Bay, Admiralty Inlet): Closed for spot shrimp harvest in 2026 due to low abundance.
● Marine Area 10 (inside of Elliott Bay east of a line from West Point to Alki Point): Closed for spot shrimp harvest in 2026 due to low abundance.
● Marine Area 10 (outside of Elliott Bay west of a line from West Point to Alki Point, which includes the Bainbridge Island shrimp fishing grounds): Closed for spot shrimp harvest in 2026 due to low abundance.
● Marine Area 11 (Tacoma-Vashon Island): Closed for spot shrimp harvest until further notice. An announcement regarding an opening may be made later in the season if sufficient quota is available.
● Marine Area 12 (Hood Canal Shrimp District): Open on May 10, May 24, May 26, June 7, and June 21 from 9 a.m. to 1 p.m. only. An announcement regarding additional dates may be made later in the season.
● Marine Area 13 (South Puget Sound, Carr Inlet): Closed for spot shrimp harvest in 2026 due to low abundance.
/articles/its-shrimp-tacular-season-mark-yuasa
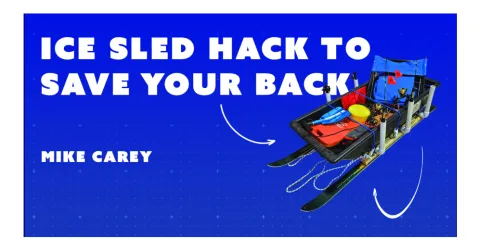
Ice Sled Hack to Save Your Back
My fondest memory of my grandfather is visiting his shop and looking at all his woodworking tools. He would show me what they were for and how to use them. Stanley and his wife, Martha, were from the old country, immigrants of Czechoslovakia. I credit my grandfather with my woodworking and tinkering skills. Anytime I use my hands to build something, I think of grandpa.
I can’t take credit for the following hack. I stumbled on it one evening surfing through ice-fishing videos on YouTube. I filed it in the back of my head last year as a project to work on before this year’s ice fishing adventures. As luck would have it, we’ve had a warm stretch here in Great Falls and, combined with a nice ten-day off stretch, I decided to get my act together and make the Ice Sled Ski Hack.
Those of you who ice fish are probably familiar with ice sleds. Piled high with our always-growing essential items, these sleds are designed for transporting your gear across the snow and ice of frozen lakes. Sleds are functional and a must for ice anglers. That said, as “essential” gear grows, anglers (especially we senior citizen anglers) get to deal with heavier sleds. Dragging a sled a few hundred yards can get to be a pain in the back, to be felt hours after the fishing day is done. The Ice Sled Ski Hack makes it easier to pull your sled across snow or ice. It’s an ingenious hack and works exactly like it looks, elevating the sled on two skis, allowing the sled to slide more easily, with less resistance.
This hack is a breeze to build, requiring a minimal number of tools. A saw, a power drill, screws, and a screwdriver will get the job done. There are a variety of designs posted on YouTube, and it’s easy to come up with your own design once you see what others have made.
The most important part of the ice sled ski hack is (of course) the skis. Fortunately, the investment is minimal. There’s no need to go out and buy a new set of snow skis. Instead, pay a visit to your nearest Goodwill, St. Vincent DePaul, or Salvation Army store. There, you’ll find a variety of inexpensive used skis perfect for our purposes. You’ll want to buy downhill skis, not cross-country skis. The reason for this is that downhill skis are shorter, wider, and thicker. You don’t need a long, thin cross-country ski. If you have a smaller sled, find a pair of used kid skis; otherwise, adult skis for a full-size sled are perfect.
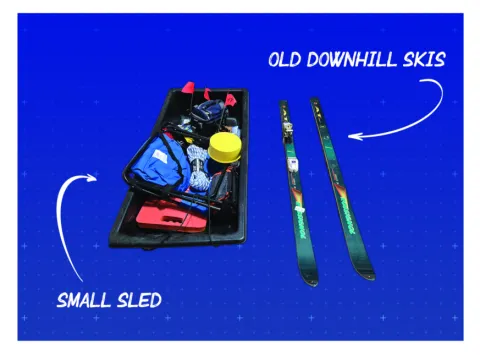
The first thing that needed to be done was the hardest part of this project, for me, removing the ski bindings. The bindings are screwed into the skis, and you’ll have to find what to remove to get access to those screws. Fortunately, between YouTube and an internet search, I was able to figure it out (and you will, too).
With the bindings removed, the next step is to construct a platform on which your sled will rest. I spaced the width of the skis to the width of the sled. Onto each ski I screwed on a four-foot-long 2x3-inch board, which matched up perfectly with the width of my skis. The purpose of the wood is two-fold. First, it gave me a solid structure to build from, and second, it raised the sled up off the snow. The whole point of this hack is to ride the sled on the skis and not have the sled drag on the snow. You may have seen some sleds that come with runners installed already, and while those runners certainly help, the sled is still dragging along the ice. The beauty of the ski hack is that the sled is gliding on the skis. And for those of you who have ever skied, you understand the advantage of this system.
The frame structure that the sled will rest on can be made with a variety of materials and ways. For my project, I decided to use 1 ¼” PVC tubing, lining up three cross-frames, and securing them with plumbing straps, then a couple of screws through the tube into the wood. Be sure to square up the skis so they are parallel, otherwise your ski sled will not track straight. I added two cross beams made of 2x3 wood to strengthen the frame.
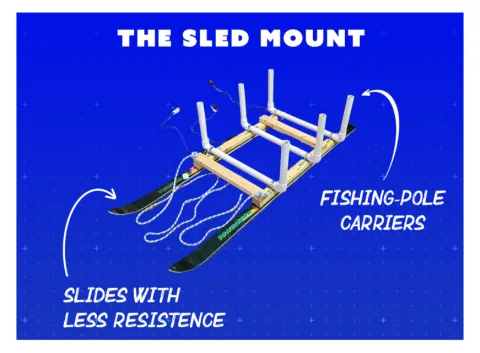
Wrapping up the project, I added 90-degree elbows on the PVC tubes and then 14” vertical tubes for side support and as rod holders. Finally, circular eye bolts on the front and sides of the frame serve as connection points for the tow rope and bungee cords that will hold the sled to the frame.
Project completed, I tested the ski-sled on carpet - December 24th, and we have no snow on the ground here in Great Falls (that won’t last!). The ski-sled slides effortlessly with just a fraction of the effort of pulling the sled without it. Success!
This was a fun and simple hack that will make my life much easier on the ice. If your sled is feeling a bit heavy with all your essential gear, give this setup a try!

/articles/ice-sled-hack-save-your-back
Winter Trailering
Being a sportsman, it is likely that you own at least one trailer. Whether it be one or more boat trailers, the utility trailer you use once a year to haul gear to high camp, or even motorcycle trailers, they all need a little TLC for winter duties.
The late Patrick McManus addressed life with trailers in his book “The Grasshopper Trap”, a collection of short stories. A few quotes from his story “Trailer Trials” may find their way into this article.
“Over the course of his life, any sportsman worthy of the name will own a dozen or so trailers of various kinds—utility trailers, tent trailers, boat trailers, house trailers, horse trailers, trail-bike trailers, and snowmobile trailers, to name but a few.”
Patrick F. McManus
With all these trailers cluttering up the driveway, it is probably a good idea to create a Winter Trailer Maintenance Checklist. Below are a few suggestions for maintenance checklist items, but be sure to customize the list for your specific needs:
- Check your tire pressure.
- Check the spare tire condition.
- Check your tires for wear and correct inflation.
- Check Bearing Buddies or the oil bath sight glass for condition.
- Check brake pads, shoes, brake drums, and hydraulic lines.
- Check the brake fluid reservoir.
- Check the trailer lights.
- Check the trailer for overall condition.
- Check trailer and payload for unauthorized passengers, cats, raccoons, and wasp nests.
- Ball mounts and Safety chains
- Hitch and ball mount
- Check payload tiedowns.
Tires
Check tires for condition and proper inflation before each trip. Check tread depth for uneven wear, damage, cracking, and bulges. Include the spare in your tire check. Make sure the spare tire lock is functional. The spare tire for my drift boat trailer is mounted under the trailer tongue. The lock gets seriously fouled with mud, road grime, and ice.
Bearing Buddies and Oil Bath Bearings
Failed wheel bearings are often a preventable source of trailer troubles. Bearings can get rusty if they are contaminated by water. Most boat trailers are equipped with Bearing Buddy Bearing Protectors or oil bath hubs. Bearing Buddys use a spring-loaded piston to hold grease in the wheel bearings to displace any water. With oil bath bearings, the bearings run in a sealed cavity filled with oil. Typically, there will be a sight window that allows you to assess the level and condition of the oil.
Servicing Bearing Buddys is easy. An occasional pump of waterproof grease is really all that is required between bearing repacks. Depending on usage, they should be repacked and inspected every 1 to 3 years.
Oil bath bearings should be checked for leakage, oil level, white frothy contamination, or very dark oil regularly. There isn’t really a recommended teardown interval. If you see any signs of contamination or water in the oil, it’s time to service them.
Brakes
If you launch your boat in salt water, it’s important to rinse the trailer brakes as soon as possible after you retrieve the boat. Trailer brakes may be disc-type (with brake pads) or drum-type (with shoes). Just like the brake pads or shoes on your tow vehicle, trailer brakes will wear with use,
Inspect or have the pads or shoes inspected every few seasons.
You can combine brake service with wheel bearing service. This can be handled via DIY, a general auto repair service, or even some tire stores can handle this job.
Be sure to also check the brake lines for signs of rust and cracking.
Brake Fluid
Check the brake fluid reservoir in the master cylinder (on the trailer tongue) a couple of times a season, following instructions in the trailer owner’s manual. The fluid level will go down as the pads wear. If the level is suddenly very low, you could have a leak in the brake system, which should be repaired immediately.
Trailer Lights
“One eighth of a sportsman’s life is spent trying to hook up trailer lights.”
Patrick F. McManusAnd if the wife tries to help, “The divorce rate among trailer owners is nine times that of the general population.”
Patrick F. McManus
Be sure to check your trailer lights every time you hook up the trailer. It is a good idea to protect the trailer light connector pigtail on your trailer when not towing to prevent corrosion from forming. Many will have a plastic cap that fits over the connector, or even a small plastic bag with a twist tie will get the job done. A little dielectric grease will also help prevent corrosion.
Bad grounds are often the cause of trailer light failure. The ground wire should be white and secured to the trailer. Locate the connection point and evaluate for corrosion or broken wires. Make sure there is a good, clean ground path with the trailer frame.
Most new trailers have LED lights. Aside from ground issues, LEDs are reliable and more or less trouble-free. Older trailers with incandescent bulbs, on the other hand… Even with proper care and feeding will frequently burn out, sometimes between the boat ramp and home! Keep a stash of the correct bulbs and a small tube of dielectric grease handy.
“Shortly after man invented the wheel, he invented the trailer. Ever since then, he has been trying to figure out how to hook up the lights.”
Patrick F. McManus
Tie-downs
Check the condition of your tiedowns. It may be a good idea to store them somewhere out of the elements, but then you have to remember to install them before you hit the road. Even if your boat is heavy, use some form of tie-down straps. Years ago, I was pulling my offshore sportfishing boat down the 22 Freeway in Southern California. A car bounced off the K-barrier and spun right in front of me. I had to slam on the brakes hard to keep from hitting it. I managed to stop in time without jackknifing. With the traffic stopped, I got out of the truck to check on the boat. Where I had thought that it was heavy enough to stay put, one of the tie-down straps had broken. Fortunately, the safety chain prevented the boat from going airborne and landing on my truck.
Ball Mounts, Trailer Hitch Receivers, and Safety Chains
Check the ball mount and receiver for any obvious signs of damage. Be sure the ball is the correct size for the trailer hitch and is secured to the ball mount. Check the pin holding the ball mount in the receiver. Look at its condition and verify that any locking feature is functional.
Regarding safety chains, all trailers should have 2 different safety chain setups. One secures the boat to the trailer, and the other secures the trailer to the tow vehicle. Make sure that both are connected properly and in good condition.
“Trailer hitches can be a problem, although they are nothing compared with trailer lights. The hitch simply clamps down over a steel ball on the car. The steel balls come in three sizes—too large, too small, and just right.”
Patrick F. McManus
“Safety chains, by the way, are required on all trailers. Their purpose, should the hitch come loose, is to rip the rear end off the towing vehicle, thus further punishing you for using the wrong ball.”
Patrick F. McManus
Winter driving
Double-check your trailer and tires, being sure to check the tire pressure. Consider running mud and snow tires on your trailer. They can help prevent the trailer from sliding around. Properly fitted chains are your friend in icy conditions.
If you tow a trailer during inclement weather, never use the cruise control. Drive with a plan, no sudden stops or hard turns. If you miss an exit or turn, continue to the next safe place to turn around. It is a good idea to keep a bag of kitty litter or sand and a shovel in the back of your tow vehicle. The added weight will improve your traction and can be used under the tires for extra grip if needed. Know when to say no, we need to pull over, or even we’re going to leave it in the driveway.
Storage
If you’re storing your rig for winter, try to find a covered location like a garage or barn to protect it from the elements. Otherwise, invest in a breathable or ventilated tarp. Pull all drain plugs and ensure there is no water in the washdown pump or livewell system. To keep water from pooling, try to store your boat a little bow high if possible. If your boat is an outboard, tilt the motor down to the running position to prevent freeze damage to the internal components or lower unit. It is also a good idea to jack up the axles and block them to prevent damage to the tires or bearings during long-term storage. Tire covers can help prevent tire UV damage.
Conclusion
As your winter work week ends and you feel the need to get up 3 hours before your alarm would normally go off, then hook up the boat or hunting trailer to hit the road. Be sure to take a few minutes to ensure your rig is winter roadworthy. In closing, a few more quotes from our friend Patrick McManus.
“Rancid was poor. He didn't seem to know that he was poor, however, and I never had the heart to tell him, because he was the happiest person I'd ever met. If he had known he was poor, of course, then he would have been sad and miserable all the time. As it was, Rancid was able to live out his whole life in blissful ignorance of the fact that he was poor.”
Patrick F. McManus (They Shoot Canoes, Don't They?)
“My grandmother had actually known some real mountain men back in the old days, but she had never taken a liking to them. She said they drank and swore and spit tobacco and never took baths, and fought and bragged and lied all the time. I don't recall, however, that she ever mentioned what was bad about them.”
Patrick McManus

/articles/winter-trailering
Chasing The Chill: Your Guide to Preparing For An Ice Fishing Adventure
Ice fishing, often described as a serene and rewarding experience, is more than drilling a hole in the ice and waiting for the fish. It's an adventure that combines the thrill of the outdoors with the patience of angling. But to truly enjoy your trip and ensure your safety, preparation is key. Whether you're a seasoned pro or a beginner, this guide will walk you through the essentials of planning and executing the perfect ice fishing outing.
Understanding The Environment and Weather
Before embarking on an ice trip, it is crucial to understand the unique challenges posed by the frozen landscape. Understand the environment you're heading into, and how the weather has been, and will be for the day. You want the area to have sustained a decent string of cold temperature days to put a solid 4 inches of ice before venturing out.
Safety First
The first rule to ice fishing is ensuring the ice is safe, as a minimum of 4” in is recommended for safe walking. Carrying a spud bar early, and late season is non-negotiable, as you can check the thickness while walking out. Local fishing reports, weather conditions, advice from seasoned anglers, and even tackle shops provide valuable insight into ice conditions and safety. Additionally, investing in safety gear like ice cleats for walking, flotation devices, flotation suits, ice picks, and some rope won’t only enhance your mobility on the ice, but also offer crucial protection if the unthinkable happens and you fall through. Extra clothing and a blanket with you are good as well.
Gear Checklist
Ice Rods and Reels
Ice fishing rods are shorter than traditional rods, offering better control in a confined space of a shelter, or standing directly over the hole. Paired with a compact and durable reel, these rods and reels are typically designed for cold weather and built for conditions and the fight of winter fish. (Don't forget the use of Tip Up’s!)
Bait And Tackle
Top lures and prolites for most ice anglers are a spoon, such as a Swedish pimple, or a small 3mm/6mm tungsten jig tipped with a couple of maggots, waxxies, or your favorite plastic. Colors in shiny metallic, or glow are the most proven.
Ice Augers and Drills
You can’t fish without a hole, and creating that hole is impossible without an auger if it's manual, or even powered. Hand augers are plenty for most ice we get, and they're affordable and lightweight. I tend to stray away from the weight of gas and the mess, and instead, run a composite auger on a 20v drill. Please never use chainsaws, and in Washington state keep the hole no bigger than 10 inches.
Ice Shelter
Having a portable pop-up shelter on the ice offers protection from the biting winds and keeps you warm and dry. Some are equipped with insulated materials to hold heat from the heater and sun lights can be installed; they are a nice, cozy add-on when on the ice.
Warm Clothing
Layering is essential for ice fishing. Start with a moisture-wicking base layer, adding insulating layers like fleece, and top it off with wind/waterproof wear. Don't forget thermal socks and good insulated boots, gloves, beanies, and a face covering to retain body heat. I always recommend overdressing, because you can always take it off, but you can't if you don't have it.
Planning Your Trip
Once your gear is ready, it's time to plan the trip. Here are a few tips to ensure a seamless experience.
Research your destination: Selecting the right body of water may determine the bite, its thickness, and species. Maps will be your best resort or just common knowledge of the lake over time. Other options include checking local reports from tackle shops, Facebook pages, state websites, etc. And always make sure to check the regulations for rules and limits!
Monitor The Weather
Harsh winter conditions can change rapidly, so keeping an eye on the forecast is critical to avoid venturing out into the storm, high winds, and extreme cold. Having a blanket in your car and safety gear at all times is a must, and always let family and friends know where you plan on fishing when you leave, and when to expect your return.
Plan Your Route on The Ice
Venturing out on this ice, may it be by foot, snowmobile, or ATV, make sure to know if there are springs on the body of water, stay away from streams and inlets as the moving water makes for weak ice.
Watch for crossing wet or dark patches if possible, and never if you can avoid it, access ice from the docks, as the sun can warm the docks and weaken the ice surrounding it. Always try to access from a shoreline. Don't forget to try and follow the same path back, since you know it was safe prior.
Before we go, just remember fish are active early morning and late afternoon hours so be prepared for long days. With schools of fish always on the move, fish near structures, weed beds, and drop-offs, and drill as many holes as you can to cover more water. This is where a fish finder comes in handy to find these spots quickly. Be as quiet as possible while moving from hole to hole, fish do spook easily as we’ve witnessed on cameras.
Fish behavior will change throughout the day with temps and lighting, so vary the depths of your presentation until you find the most active fish. Again, it's easy to solely focus on fishing and forget about your comfort. Stay warm and appropriately dressed, bring a thermos of something hot, and always carry water and snacks to enjoy a day on the ice all while respecting the environment by disposing of trash and packing out what was packed in. Respect nature, wildlife, and other anglers.
Ice fishing can be more than a hobby, but also a way to connect with nature, test your patience, and enjoy the camaraderie of fellow anglers. Every outing can be a learning experience with unique challenges and rewards. As you sit on the ice, surrounded by the quiet beauty of the frozen landscape, the cold becomes a distant memory. As I always say, “The tug is the drug!” and the joy of reeling in a fish are moments that make the preparation worthwhile.
With this overview, you're ready to tackle the ice, create memories, and perhaps catch the fish of a lifetime. Bundle up, grab your gear, and embrace the chilling adventure that awaits you!

/articles/chasing-chill-your-guide-preparing-ice-fishing-adventure
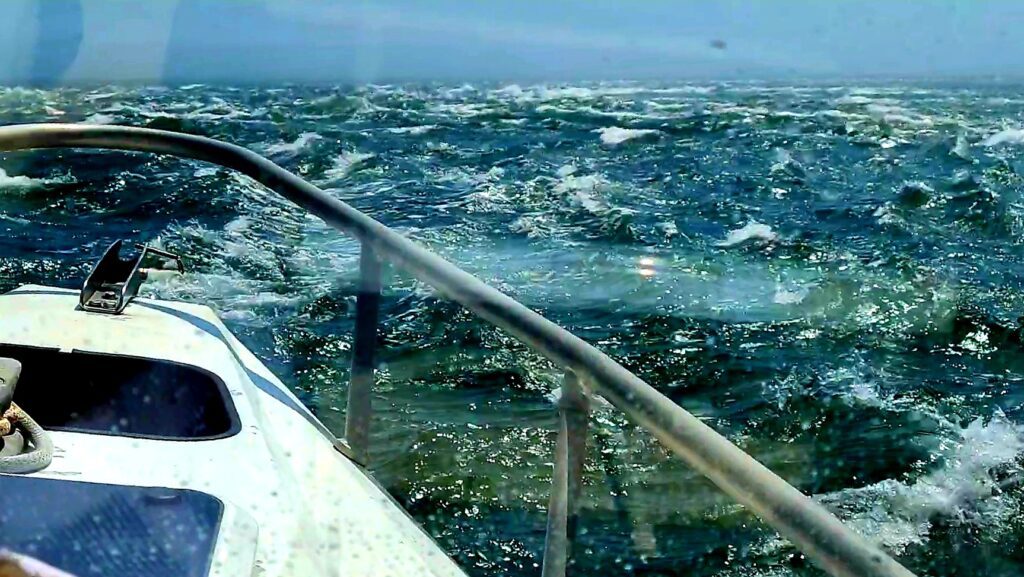
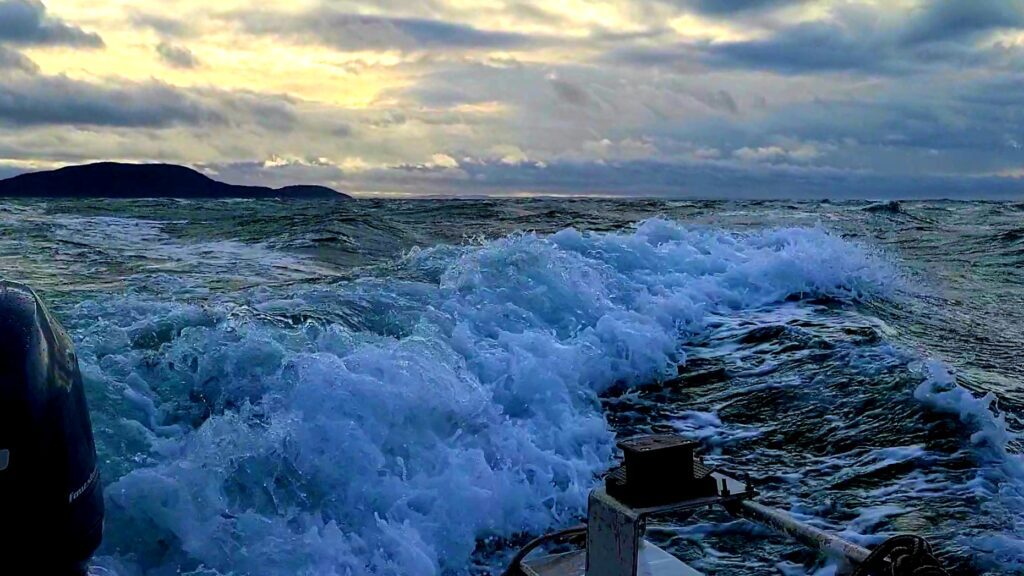
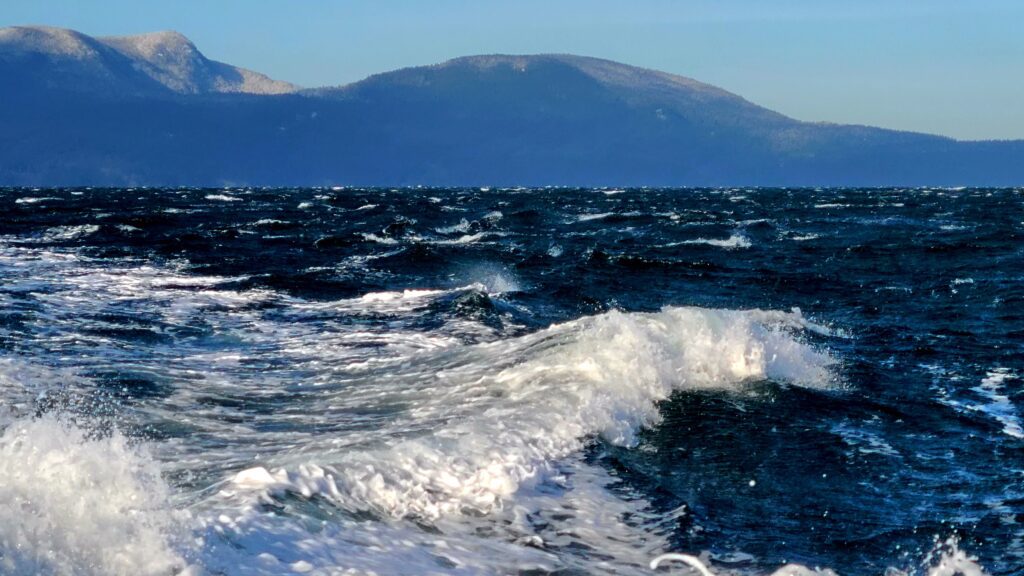
Severe Weather Boating
When I saw that I pulled the coveted “Writers Choice” slot for my assignment this month, I was busy trying to keep a small boat right-side up during our recent “Bomb Cyclone “(Yes, I was messing with my phone). I got to thinking, that if I survive the next couple of hours, a piece on heavy weather boating may be in order.
First, if the weather is questionable, don’t go. No fish is worth losing your boat or even your life for. Before any recreational boating trip, check the weather forecast and plan accordingly. Even if that means stopping at Skagit Seafoods to buy your next meal's main course. In the long run, it would be much cheaper than trying to run into conditions beyond the capability of your boat.
In my case, it’s my job, and my options are limited. I’m retired from a 38-year suit and tie gig but I couldn’t do retired life. Now I run a mailboat in the San Juan Islands, and unless I can’t get the boat out of the slip, the mail must go through. In addition to first-class mail, I also deliver freight, packages, time-sensitive prescriptions, perishable items, and other necessities for landlocked islanders.
I recognize that sometimes the weather just happens, going from a bit of a chop to holy crap in minutes. Here are a few thoughts on preparations and handling emergency situations on the water.
As mentioned earlier, check the weather forecast or maybe try an app such as Windy to make sure the conditions will be safe for your planned adventure. Remember, if you’re questioning your ability to get to your fishing spot and back, the fishing will be uncomfortable at best.
Make sure you have the correct size PFDs (personal flotation device) for each passenger onboard. It is also a good idea to conduct a VHF radio check and carry a fully charged cellphone. If boating in the PNW, I strongly suggest that you purchase the appropriate Vessel Assist membership for your area and boating style.
Make sure you have adequate fuel onboard. It is amazing what you can get your boat to do when the motor is running. I also suggest that you equip your boat with a fuel/water separator and use a fuel treatment with every fill-up.
There could be times when you have to anchor because of the high seas. Have an anchor, chain, and rode, sized for your boat ready to deploy in the case of an emergency. If you lose your motor, deploy the anchor from the bow before you drift into a dangerous situation. Never anchor from a stern or spring line cleat.
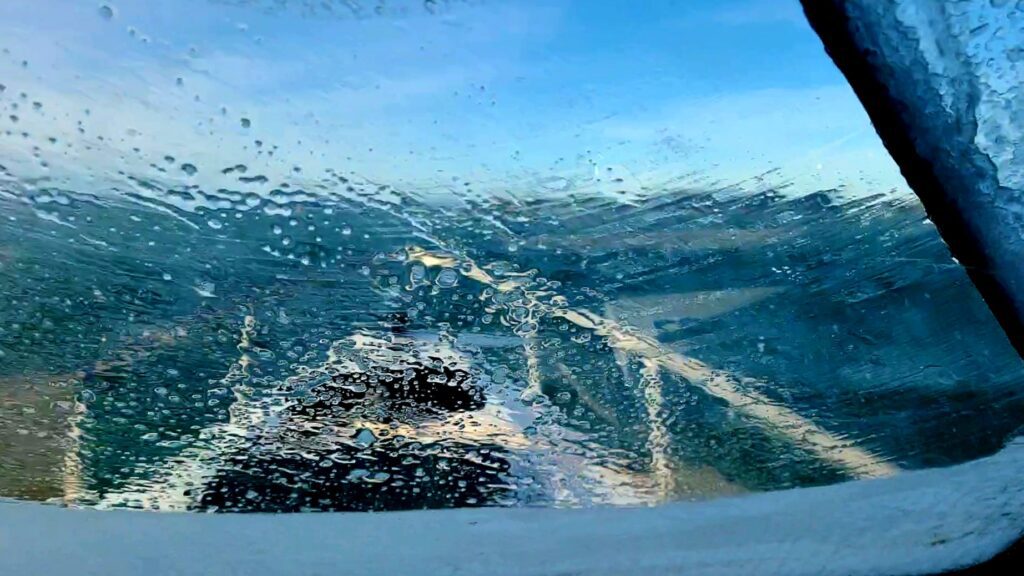
If you have a defroster, turn it in at the first hint of unfriendly weather. If you don’t have a defrost system, consider having a portable 12-volt fan and treat the windows with an anti-fog product. Check your wiper blades for damage before each trip. Also, ensure that the wiper motors and arms are functional. When you’re running in heavy seas you need to be able to read the seas ahead of you.
If the forecast includes a freezing spray advisory, leave your boat on the trailer. Even with a forced air defrost system you will not be able to keep the windows clear of ice. In addition to the resulting reduced visibility, moving around on a rocking ice-covered deck is close to impossible and flat-out dangerous.
When you first realize that you’ll be running in heavy water, have everybody onboard put their PFDs on. If practical, lower your center of gravity. Keep someone on watch, but have the rest of your passengers sit on the floor. Weight distribution can be critical in how your boat handles big water.
Running in heavy seas is a mental challenge at best. You’re managing the impact of the wave you’re on while reading the seas at least 3 waves ahead of you. Don’t panic and plan your actions. Focus on the seas while keeping your passengers calm.
When running into a head sea, in general, you want to approach a wave just off of head-on. If the crest is breaking, you want the bow just behind the break and adjust the throttle as required to let the wave roll under your boat. Constantly read the seas ahead of you. Every wave will be different.
When running with a following sea, you’re constantly feathering the throttle and keeping the boat pointed down swell. You never want to let a breaking wave overtake you. The wave’s energy will feel like it’s pulling your boat backward and filling it with water. Again, hand on the throttle when running with a following sea and keep the boat more or less perpendicular to the swell or waves. Don’t run on the down face of the wave ahead of you. As the boat approaches the trough, it will slow down and the energy of the next wave could cause your boat to broach. Broaching is where the wave behind you lifts your stern enough that you lose directional control and possibly roll your boat.
Running in the trough is kind of a combination of running into an oncoming sea and running with a following sea. You’re constantly managing the throttle and the wheel while looking for breaking waves. You want to let the breaking wave pass by just in front of your boat. You may have to throttle up to turn the boat and take a wave just off center of head-on, then realign with the trough.
A key to successfully navigating heavy seas is to know your boat and not be afraid to change plans if you need to change your destination for safe harbors. Most people don’t file a float plan anymore but it is a great idea to let someone on shore know what your general plans are for the day. If you get into heavy weather, designate someone to communicate your changing plans. As a skipper, you need to focus on managing the boat, not yapping it up on the phone or texting. On that note, keep a tidy ship. Things rolling around the cabin, or sliding around the deck can be both distracting and dangerous.
The safest way to manage heavy seas is to enjoy them through the windshield of your tow vehicle. If you do get stuck having to run in unfriendly conditions, keep cool and rely on your preparations. Become one with the sea, you can’t change the conditions but you can understand their impact on your vessel and plan accordingly. As a skipper, at the end of the day, you are responsible for making sure your passengers make it home to spin man verses the sea tales. Be the legend!

/articles/severe-weather-boating
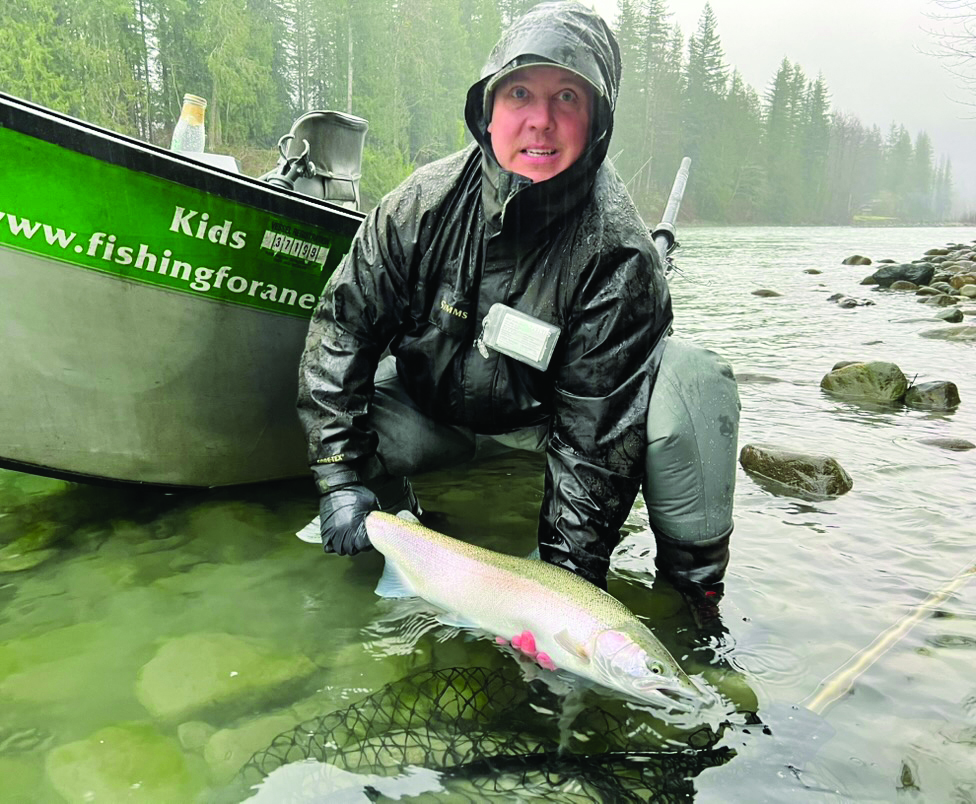
Winter Steelheading – Fishing for the Elements
My favorite time of year is upon us.
Soon, winter steelhead will be entering our rivers to begin their migration to their natal spawning grounds. If you are a “steelheader” then you savor this time and are excited to begin your piscatorial pursuit of this elusive species. For me, there is no greater pursuit than winter steelhead.
Summer steelhead often enter the rivers in the summer and hold over until winter and even spring. Winter steelhead migrate into their natal rivers during the winter months, starting as early as mid-November, and often hold over to spawn in the spring. In some systems, the two collide and spawn with one another.
Unlike salmon, after spawning steelhead can return to the ocean to begin their cycle again and are known to spawn as many as 3-4 times during their lifecycle. Steelhead are less predictable and often harder to catch than salmon. They can be very finicky and the weather and changes in the water flow and clarity can vastly transform the approaches that we take to catch them. This might be the reason that we love them so much; they are not easy to catch and sometimes can be very hard to find.
While many of you might love to chase steelhead as I do, you likely dread the early mornings, the darkness of winter, the cold, and the wet. Let’s face it, getting out into the elements when they are at their worst is not for the faint of heart. It takes grit and determination and the overwhelming lure of this fish to motivate us to leave the comfort of our homes to brave the elements. The key to a great day on the water is staying warm and dry.
Since I started pursuing winter steelhead about 15 years ago, much has changed in the technology of the gear that we use. At the forefront of this technology, is the availability of clothing that will not only allow us to endure the elements, but to embrace them in absolute comfort. Many of us have a garage full of clothing that we have bought to stay comfortable.
I know that I spend a lot of time chasing winter steelhead on a river north of Seattle that is nestled in the mountains. It is often cold and wet when I float this river, with average daytime temperatures between freezing and the mid-40s on the average day. Some days are much colder and many days bring snow, sleet, rain, and wind.
I have found that the combination of cold and slowly getting wet over hours of floating is exacerbated by the reliable late morning and afternoon winds that blow through the river valleys. While we may start warm and dry, we often finish the day damp and cold. That warm cup of coffee at the end of the float is always a welcome sight.
So, how do you keep warm and dry? This is the million-dollar question, and I am here to tell you that it does not mean spending $1000s on high-end gear. The key that I have found is to layer and to make sure that you have an impervious outer layer to wear when it rains and the wind blows. The addition that I made to my repertoire last year was a battery powered, heated vest.
I bought this online for around $60 and it was the best money that I have spent. I am known to wear 3-4 layers below the waist and 6-7 above, and even then, I tend to get cold. This investment has been the single greatest factor in staying warm on the worst of days.
Here is my suggestion on how to dress. I will clarify that my opinion is based on either walk-and-wade fishing or floating a river in a drift boat. You will obviously stay warmer if you are moving, which you do very little when fishing from a drift boat. Start out with a good base layer of long underwear, both top and bottom. Wear a warm pair of pants or sweats over the bottoms, preferably something that is not cotton. Remember, cotton is rotten, meaning that when it gets wet, you get cold. I wear a pair of Simms M's Thermal Mid-Layer Bottoms which will set you back about $90. They are fantastic and keep you warm. Over these pants, I wear two pairs of socks and stocking foot waders with wading boots. My lower half, including my toes, rarely gets cold.
Let’s move to the top half of the body. Start with a base layer, a long-sleeve shirt. This should be tight-fitting to keep the heat against your body. I wear a second layer of long-sleeve shirt over this, generally a light fleece or mid-layer garment. At this point, I put on the battery-powered heated vest that is mentioned above. This is the keystone to keeping your core warm and remaining comfortable for the entire day.
After this, a puff jacket or fleece, followed by an impervious outer layer jacket, round out the ensemble. When it comes to the outermost layer, there is great debate. I will wear a Gore-Tex jacket when the weather is not forecasted to be super wet. This will generally stay dry enough, but I have yet to find a high-end Gore-Tex jacket that is water”PROOF”.
For really wet days, I rely on rubber. My go-to is something made by either Helly Hansen or Grundens that is designed for commercial fishing. There are many options and most cost less than a high-end jacket from Simms, Patagonia, or another leading brand. The key is to go with something that will keep the rain and wind out. Also, layering as outlined above allows you to dress and undress for comfort, as conditions change during the day.
I don’t want to sway anyone to a particular brand of clothing as we all have our preferences. I can attest to what has worked best for me based on years of trial and error as well as talking to guides who are out in the elements every day. Getting cold is a strong motivator to find a way to keep warm, so a lot of testing goes into determining what works best. I will leave it to you to listen to the research and advice of someone who has invested heavily in this process or choose to learn on your own. Hopefully, this is helpful, and you successfully chase steelhead in 2025, while remaining warm, dry, and comfortable.
Good fishing!

/articles/winter-steelheading-fishing-elements